Introduction
Welcome to the mid-game guide for Oxygen Not Included. We’ll be picking up where we left off with the Oni Starter Guide on cycle 11 and we’ll be assuming all the steps taken and knowledge in the starter guide have been adopted. If you haven’t been through the starter guide or it has been a while, consider reading through it quickly.
Whilst there was a pretty firm priority order in the starter guide, things in the mid game really start to open up. We’ll propose an order of operations in this guide but we’ll often be addressing things simultaneously and you may need/want to do things with different priorities. When using this guide, it’s recommended to read through ahead of where your own colony is so you can see what’s coming and work on requirements ahead of time.
The overarching goal of the mid-game is setting your base up to survive indefinitely and opening you up for the Oni late-game. As we left our base in the starter guide, many of our vitals like oxygen and water were coming from finite sources. We want to amend this. So with the goal of setting up to last indefinitely, here are the main sub-goals of this guide:
- Our base has no temperature control
- Our latrine is producing a lot of waste product and it is manual to maintain
- We are relying on a finite source of fresh water
- Our oxygen production is relying on Algae that will eventually run out
We will be addressing these weaknesses loosely in this order, but we will usually be able to work on more than one at a time. These are only the overarching goals, we will need to address plenty of smaller topics as we progress. The chapters in this guide are:
- Temperature control
- Exploring for steam
- Base update cycle 35
- Morale
- Bathroom
- Base update cycle 50
- Shifts
- Renewable oxygen
- Renewable water
- Base update cycle 70
- Mid-game food
- Mid-game review
Temperature control
Temperature is a hidden killer in Oxygen Not Included. If your crops can’t grow because they’re too hot/cold, or dupes get injured and stress out through temperature; then things can collapse suddenly. In the image below from the starter guide you can see that some of my Mealwood aren’t growing because they are too cold.

Whilst my asteroid (Rime) has cold as a primary threat, many other asteroids provide heat death as a likely killer. Regardless of your asteroid, insulating your base is a top priority before you start losing control of dupes/crops. To do this we will, focus our research toward “Temperature Modulation” and begin building a perimeter of Insulated Tile (using Sandstone (Solid) is fine for now).
Below you can see a snapshot of our base as at cycle 20. You can see at this point the insulating shell of the base is starting to take shape and we’ve left space for plenty of future rooms.

You can see we’ve selected one of the Insulated Tiles and it shoes a “Thermal Conductivity” (TC) of 0.029. This is 100 times smaller than the TC of the base material sandstone. Building insulation will always result in a tile with 100 times smaller TC of the material you build it with. You can browse the Oni Material Database for other building materials with lower and higher TCs than Sandstone. TC will become an important factor in later, more complex builds. We will often be pursuing to build with either extremely high TC to transmit heat quickly, or as we are now, with a low TC to prevent transfer.
In real life, Thermal Conductivity is why a pan (made of metal) and carpet (made of fibers) can both be at room temperature but the pan will feel colder to you. The pan is removing heat faster from your finger than the carpet and so it feels colder to your brain, even though the two things are the exact same temperature.
We’ll take this opportunity to introduce you to the other dominate metric for temperature control and that’s “Specific Heat Capacity” (SHC). You can think of each tile kind of like a bucket and water as heat energy. TC is the size of the hose filling the bucket, it controls how much energy is poured in to the material. SHC is the size of the bucket, it is how much energy it takes to fill up. SHC is less important with our current goal of insulating, but later in the game when we want to look at storing and moving heat energy, using materials with a high SHC that are able to store lots of energy will become more important.
Exploring for steam
Water is the lifeblood of your colony (despite dupes not needing to drink it). Water is consumed by most crops, its used by your super computer and your oxygen production. Now that our temperature is mostly under control, finding a renewable source of water is paramount. For this you will need to do some exploring. You can see in the image below that on this asteroid we were quite lucky and we found a Cool Steam Vent just to north of our base.

You will likely have to explore a little further, but when going in the cardinal directions (N, S, E, W) from your base, you will find one on the starting asteroids. The giveaway of a vent is the four black tiles of Neutronium they sit on. Using the material view can be helpful to identify them.
The vent is spewing Steam at 110C and you can read the details to see its other metrics. To learn more about the vent, we have to send our researcher to it to analyze it (during idle periods to prevent them being burned). Additionally, we want to insulate and control the vent’s temperature. Vents and Volcanoes put out tremendous amounts of heat energy that can cook your colony overtime if you’re not careful. So you’ll see in the image below that we’ve started to wrap it in insulation.
If you want to do more detailed planning about how much material and energy your specific vent is outputting you can use the Oni Geyser Calculator.

Conveniently for us, there was also some Thimble Reed near by being held at its growing temperature by the geyser. Thimble reed is very important for its production of Reed Fiber we need for the Atmo Suit. It would normally be too cold on Rime for Thimble Reed so we’ll try to keep it in its growing temperature range.
If you’re playing on one of the other starter asteroids, Thimble Reed temperature won’t be your problem as things will be warmer. However a bigger risk to you is Slimelung. Remember the advice from the starter guide and be careful exposing slime to air, particularly polluted oxygen where it thrives. Keep an eye on the Germ view as you explore as Slimelung illness slows your colony down.
Base update cycle 35
Below you can see how the base is looking as at cycle 35.

A few points:
- The base is now insulated and starting to warm up from the heat of the machinery.
- We had to build a hospital room in the top right. We pushed a couple dupes too hard to build near the steam vent and they were badly injured.
- Below the hospital is a ranch ready for a skilled dupe to relocate all the hatches in our base. It’s not a major priority but we don’t want the hatches eating our Algae and Dirt so corralling them here and controlling what they eat is safer for us. We’ll also maintain some Coal output from their excrement and a little Meat which is a nice bonus.
- We’ve cleaned up a lot of the loose debris to prevent the morale impact mess has on our dupes. We pile it into a single pile by having dupes sweep everything into a single Storage Bin set to “Sweep Only”, then periodically un-tick items to have them fall out into a neat pile underneath the locker. Just be careful sweeping items like ice or slime into your base that can melt/gas-out and be a pain.
- It’s not the best having the mess hall all the way right of the base, it’s inducing unnecessary travel time. We’ll move it to the middle when we replace the mealwood later.
- We’ve put a little S-bend at the top exit of the base to limit liquids pouring in.
Morale
In the image below you can see some of our dupes are starting to skill up to a point where they are demanding more morale and creature comforts than our base provides. We’ll have to start using some art soon to provide artwork around the base, you can see Marie here is capped at demanding 7 morale for her skills. We don’t want to not be able to skill her up, so let’s grab some quick morale wins.
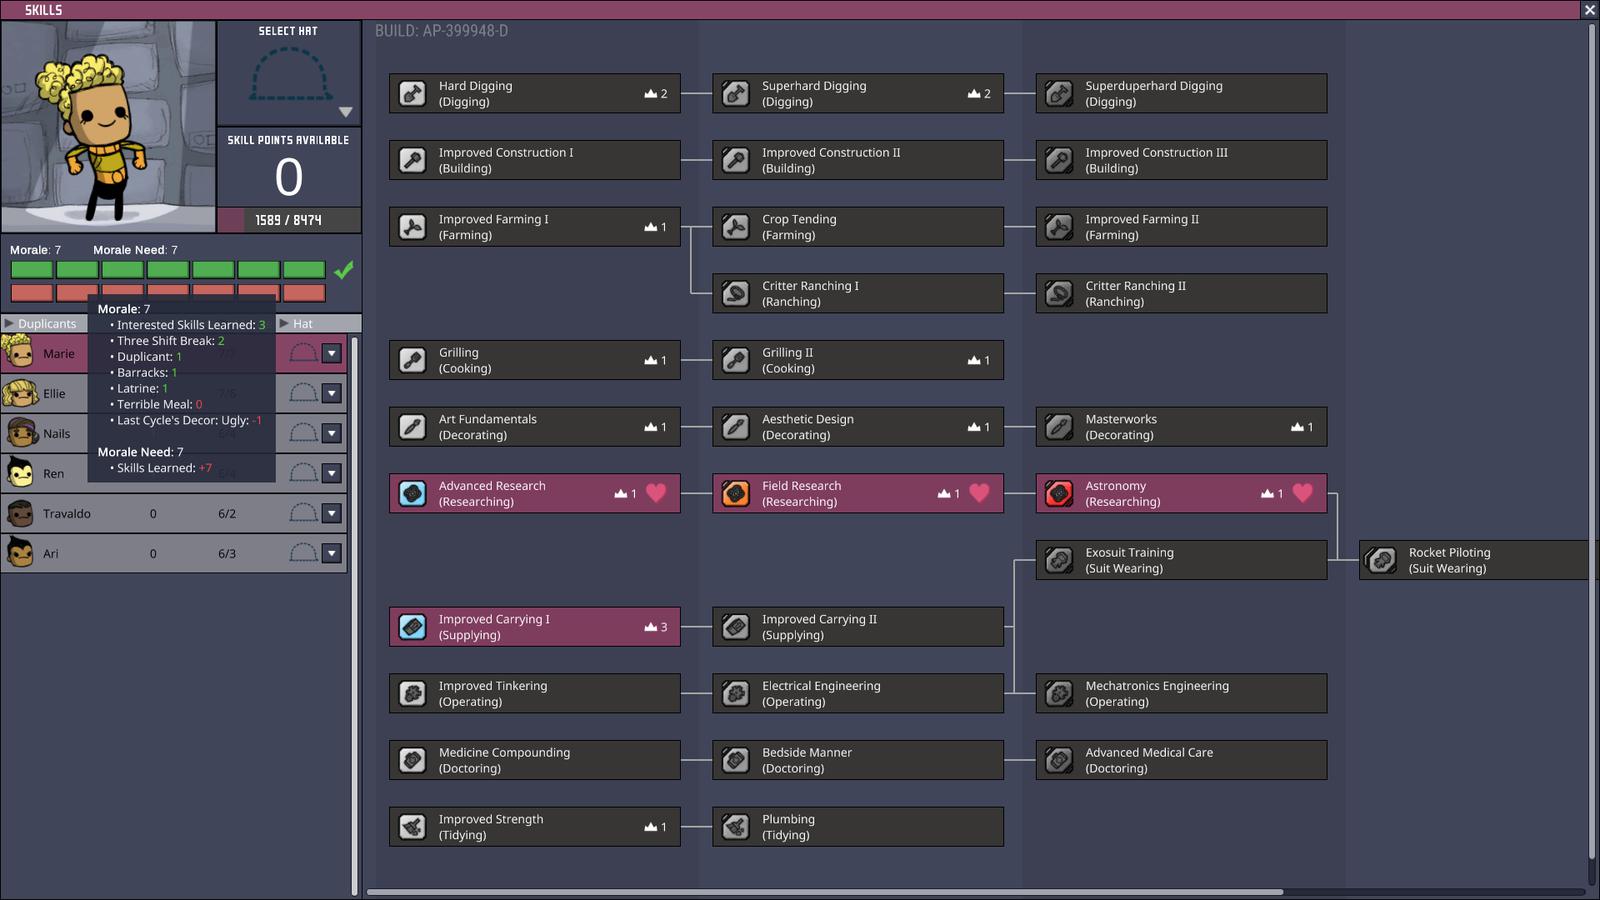
- Converting the mess hall to a great hall with some high decor art will boost its morale impact.
- You can see the decor impact is currently negative. Decor is an easy fix with an artist but lets focus on areas where it will have the most impact; areas where dupes spend a lot of time like their bedroom, the mess-hall and commonly used machinery.
- Looking through the morale impacts on your dupes you can see that pursuing other items like better meals and a proper bathroom will also open up new morale benefits.
Side note: You can see Marie has hit the end of her primary specialty and has started on “Carrying”. Dupes do a lot of carrying, they spend most of their day running around with handfuls of things to build what you ask them to. The more they carry in one go, the less trips they do so this is a great secondary skill. Additionally, we want all our dupes to move quickly in their Atmo Suit, so progressing this skill is important long-term.
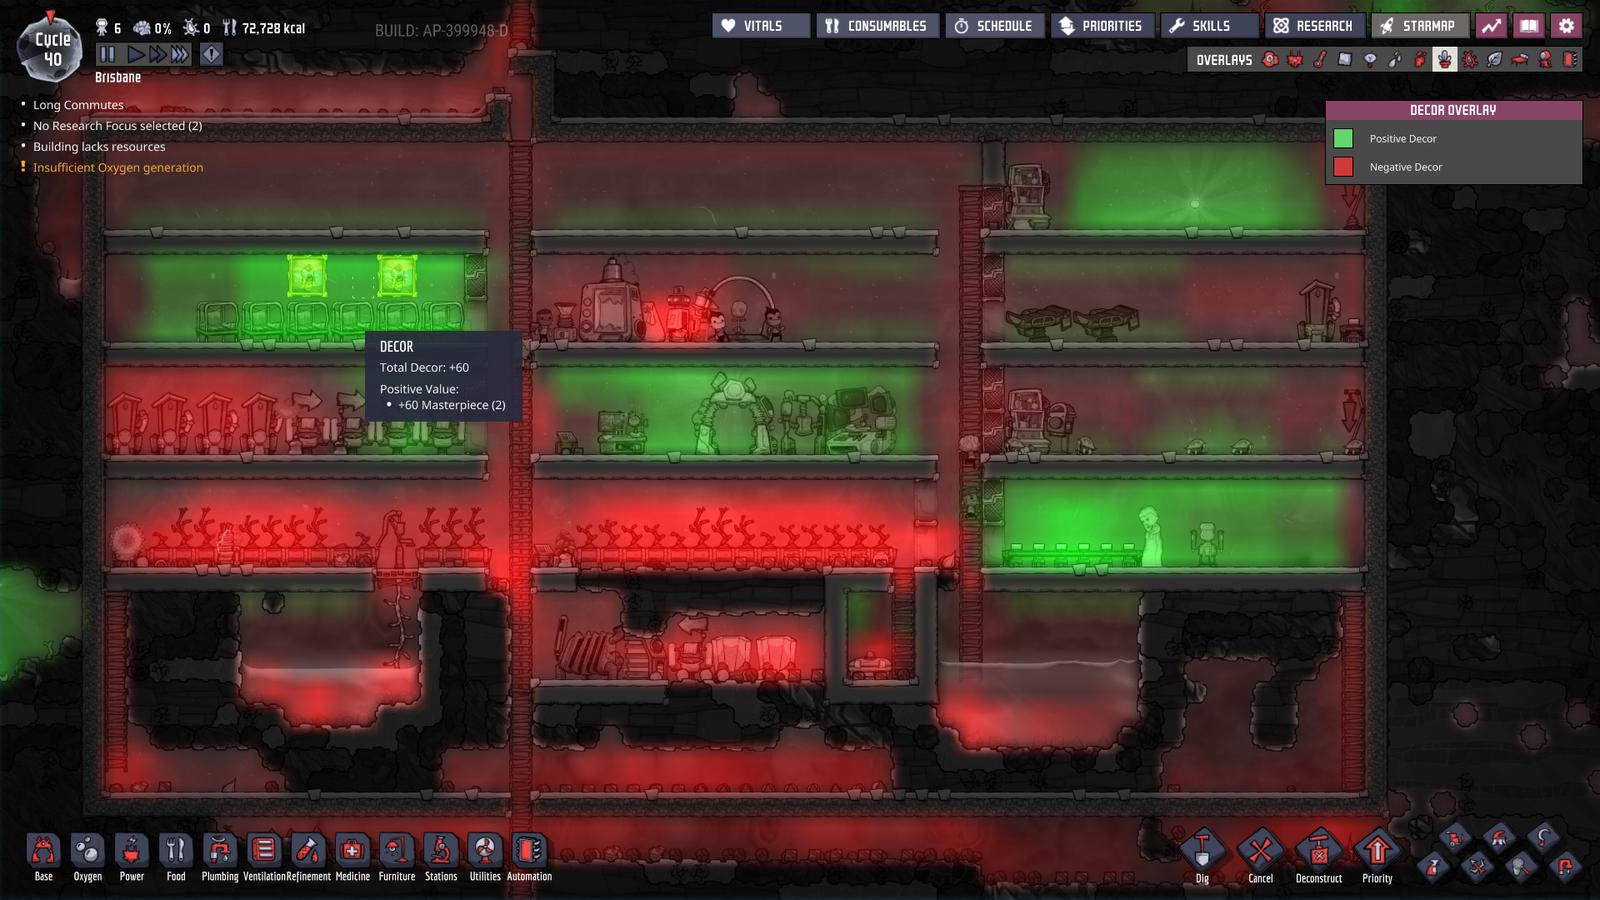
Below you can see that with using only 2 reed fibers on paintings in the bedroom, there’s +60 decor there now. Combined with the sculpture in the Great Hall we now have a nice foundation of decor in key areas. We don’t want to over allocate effort to decor as we have more pressing issues, but just keep an eye on the morale of your dupes and boost it as their skills require.
Bathroom
Our Latrine is creating problems for us; emptying the Outhouse takes time, they produce a lot of germs, there’s bottles of Polluted Water building up from the basins sublimating to Polluted Oxygen. We’ll upgrade this quickly to a full bathroom. First we’ll need to research Sanitation, Distillation and Improved Plumbing to give us the tech we need to build it. Once we have all the tech it’s time to put together a skeleton like the one below.

Without going into a full guide on piping in Oni; it’s important to know that liquids automatically travel from a green (output) square to a white (input) square. There is no sense of pressure, liquids just flow between those two points. As long as you connect pipes with clear paths from green to white, things will flow fine.
You can see I have pipes primed for a full bathroom but have only installed one new Lavatory and Wash Basin. This prevents accidents, you don’t want to uninstall the entire bathroom and not get anything built in time for the colony bathroom break.
Additionally, the Liquid Pump is only temporary to get the first bit of water into the system. Once there’s a few liters in the system, things will flow fine as the Water Sieve turns the polluted water into fresh water.

Actually, the system will fill-up over time. The Lavatories output more polluted water than they take in Water because of the dupes own “additions”. For this reason we have included the Liquid Reservoir. Without this, the pipes would fill-up and jam. Keep an eye on the reservoir, when it fills up it will be time to bleed the excess off somewhere else outside the base.
You can see we’ve also included a Bottle Emptier station down the bottom too. This will be a drop-off point for our dupes when we set them to sweet up all the polluted water that has built up in our base.
Finally, it’s imperative to know the that Water Sieve only converts Polluted Water to Water. It does not remove germs from the water. You should consider this a grey water system; do not mix this water with germ free water that finds its way into your food supply.
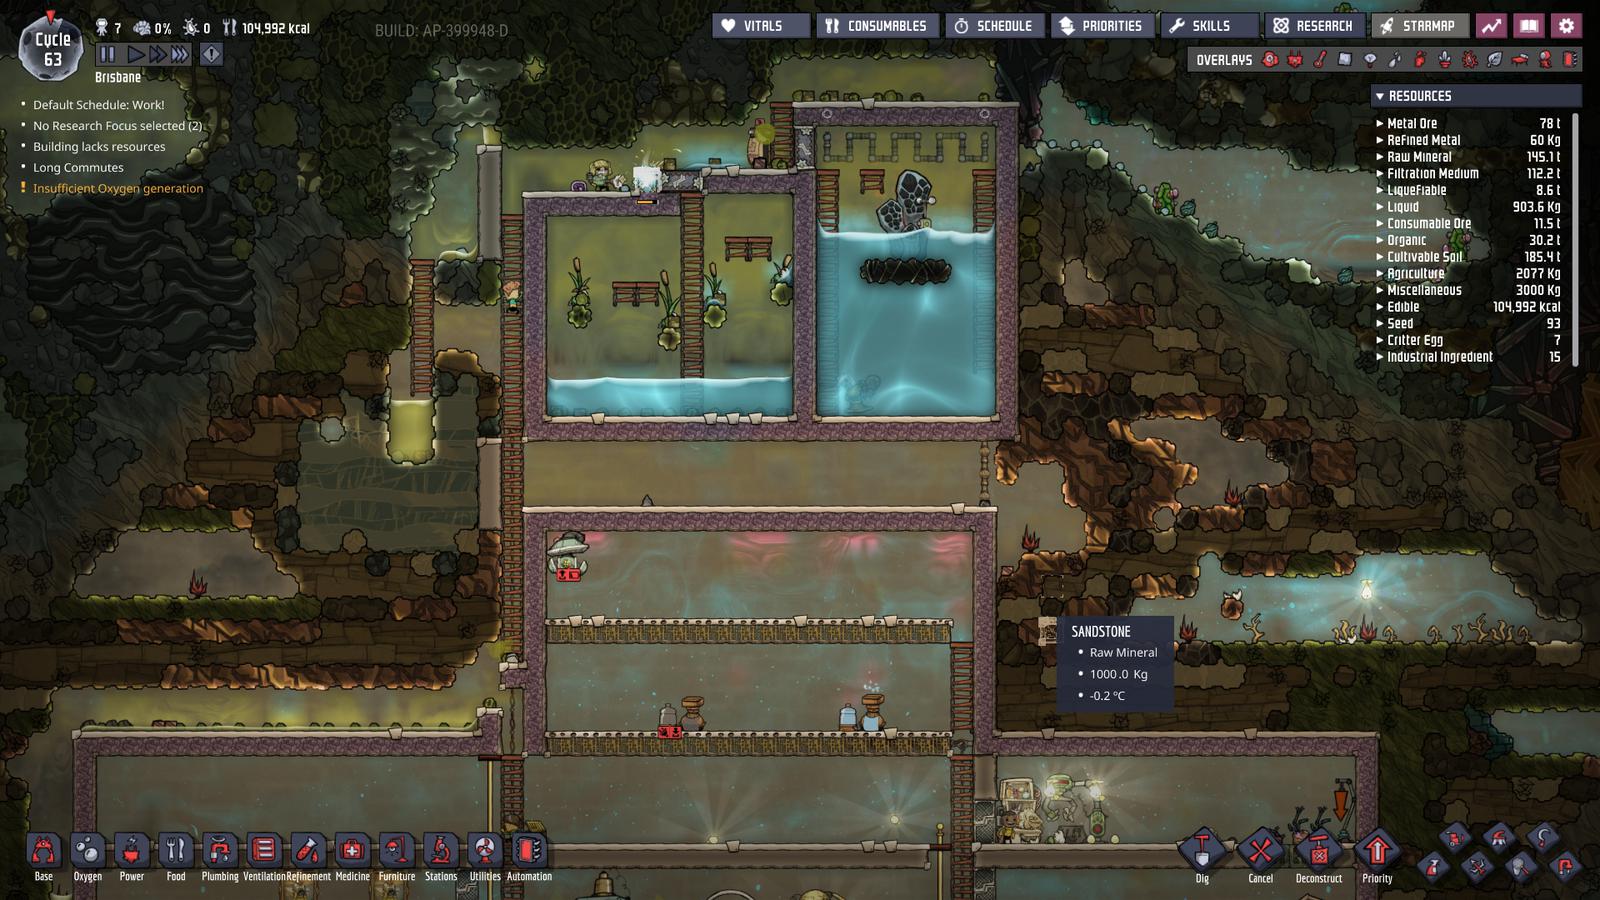
Base update cycle 50
A few points looking at the image below:
- Looking at our major goals we’ve already completed (1) temperature control and (2) a bathroom. We additionally found the water source and have started on (3).
- The base population is still only 6. At cycle 50 we’ve had 50/3 = 16 chances to accept new dupes but taken only 3. Be picky with your dupes, you’re here for the long haul.
- At 6 dupes, our next dupe is pretty much going to force us on to having split schedules; we don’t want ques and accidents in the bathroom.
- I had more Polluted Water lying around than I expected and built a second reservoir to hold it temporarily.
- We’ve started installing Fire Poles to allow dupes to descend faster and reduce travel time.
- Thimble Reed is growing and we’re starting to collect the reed fiber

Shifts
By cycle 60 we were able to accept our 7th dupe. For those keeping track with the reject rate, that’s 70/3 = 23 chances to accept dupes and only 4 have been accepted, so 83% of the dupes we were presented with have been rejected to date. If you need a refresher on dupe selection then please refer to the Oni Starter Guide.
With 7 dupes however, we risk having accident sending them all to the bathroom on break at the same time. For this reason, we use the shifts tab to split our colony into two shifts, staggering the breakroom and sleep.

This also gives us a chance to put dupes with the night-owl trait like Rowan here to work when they are most productive.
Renewable Oxygen
You can see in our database that there are many ways to produce Oxygen (Gas). We’ll be using the Electrolyzer to produce renewable (effectively infinite) oxygen because its only input is Water that we will have an infinite source of from the steam vent we are encasing. Additionally it’s very easy to automate to a point it requires zero dupe attention/maintenance.
Below you can see we have set up a free-breathing Electrolyzer in the top of our base. There is an insulated pipe running from the pump in the bottom of our steam vent pod, through the walls and into the electrolyzer. We give it power and it is now splitting water into Oxygen and Hydrogen.
We call this “free-breathing”, because we’ve built it at the top of our base allowing the Oxygen to fall down naturally into the base without gas pumps while the hydrogen rises into the pocket to be pumped out. By not needing to pump the Oxygen we’re saving a lot of energy.
We don’t want the hydrogen pump running non-stop wasting energy either, so we’ve put together a simple logic circuit in the image below. Two Gas Element Sensors both need to register hydrogen in their tile and trigger the And Gate together. Once triggered, there is a three second Buffer Gate sending the signal to the pump. We’ve added a 3 second buffer here because it’s not efficient if the gases are moving around flicking the pump on and off. We want the pump to get a few good, full pumps into the pipe for the energy it burns.
None of this logic needs power so its all “for free”.

More complex is the filtering technique. There is a Gas Filter, however it consumes power. I would always encourage you to look for ways to tune your colony to reduce the power/resource consumption as these will ultimately limit your colony.
The below filtering technique operates on the mechanics of the Gas Bridge. Specifically, if a gas packet in a pipe has a choice between continuing on a pipe or being taken into the input of a gas bridge, it will always go into the bridge if it can. We call this “gas bridge input priority”.

At the other end of the bridge the opposite is true; a gas can only leave the bridge if there is space for it, the output of the bridge does not have priority.
The setup leverages this as follows:
- After the pump we add a gas valve that limits the packet size to 999g.
- We then present the gases with a fork, they will go into the bridge if they can, otherwise they will branch off down to be vented out.
- At the end of the bridge however is a small infinite loop made of pipe and another valve limiting packets to 1g.
- If any packets can’t enter the second valve then they branch off right to be burned for electricity in the hydrogen generator.
The trick here is that the gas bridge wants to pull all gases onto the infinite loop, but because the loop already has 1g packets of hydrogen on it, only more hydrogen can join it. To get this to work you need to only make sure the first packets entering the system are hydrogen, afterwards the loop will do the filtering for you.
Finally the smart battery is set up to turn on the Hydrogen Generator when it gets below 30%. This is before the 20% setting on the Coal Generator; our colony is now preferably running on hydrogen. The coal generator will only turn on now if we don’t get enough electricity from hydrogen, that will reduce the Carbone Dioxide output significantly.

The only thing we need to be careful of here is heat. We are feeding in hot water to the electrolyzer and so hot air comes out. The electrolyzer is deleting a lot of heat energy since Water has a much higher specific heat capacity than the Oxygen (Gas) and Hydrogen (Gas) coming out. We will be deleting further heat by feeding the hot hydrogen into the generator. But the Oxygen is still hot. At this point it’s advisable to start looking for Wheezewort as you explore the map. These plants slowly delete heat and a few of them in your base should keep it under control.
Keep an eye on the heat in your base and be ready to switch back to the Oxygen Diffuser or other sources until you can control the heat output. We’ll build a heat deleter that can be used as an airconditioner in the Oni Late-game guide.
At this point renewable oxygen is pretty much done. The steam vent reservoir above already has over 72 tonnes of water in it that can be split into 64 tonnes of Oxygen. This would take a single dupe over 1000 cycles to consume via breathing so the colony already has over 130 cycles of oxygen ready. By the time that is consumed, we’ll be long finished making sure the water source is renewable.
Renewable Water
Below you can see four views of the steam vent that we have enclosed.
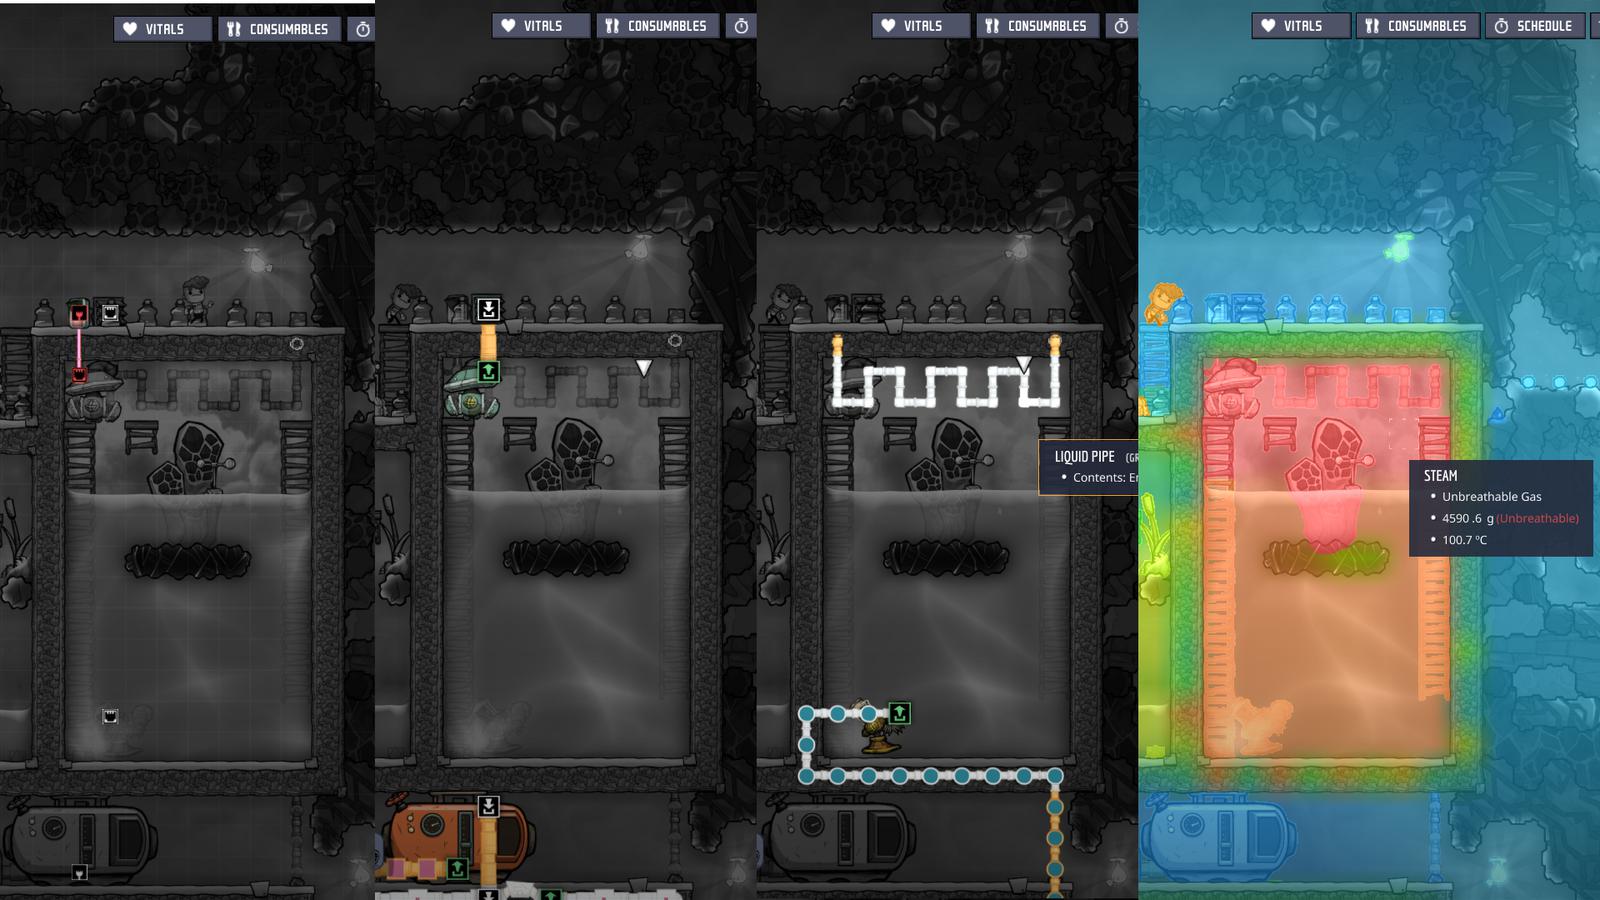
A few comments:
- It is now fully enclosed; almost no heat is leaking from the vent destroying the local environment.
- At the bottom we have a Liquid Pump built with gold ore to handle the high temperature water.
- At the top is a set of liquid pipes built with Granite. We will later circulate these with cool liquid to extract just enough heat energy from the steam to condense it to water. This is effectively a heat exchanger system.
- Also at the top is a Gas Pump (also built with gold) connected to a manual switch. When the vent is idle and there’s no steam, we’re manually turning this on to extract all the other gases in the space. Ideally the only gas touching the granite pipe should be steam to increase condensation rate to water and prevent the gas vent from over pressurizing.
Water is pretty much done, the only thing left between us and infinite water is:
- Finishing off pumping out all the other gases
- Filling the heat exchanger with cool, circulating liquid and deciding how we want to delete the heat it extracts.
We’ll go through wholesale heat deletion in the late game guide however if you want to run ahead you can check out the Oni Cooling Calculator.
Base update cycle 70

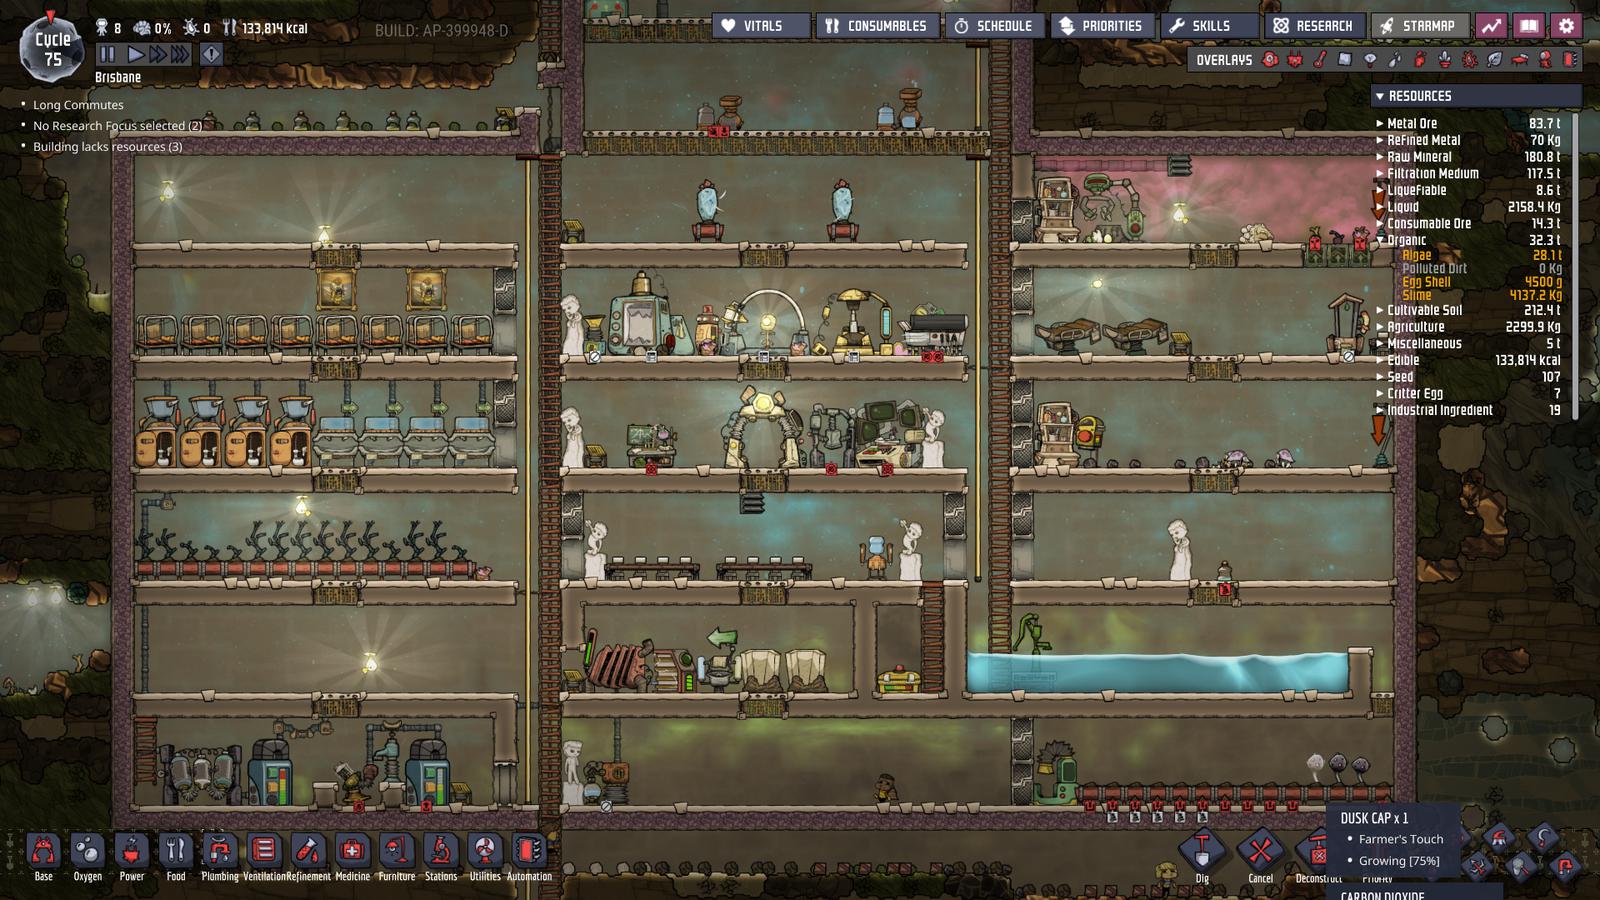
Looking at the colony at cycle 70:
- We’ve added Airflow Tile around the base to promote oxygen flow down through the base.
- There’s a new Carbon Skimmer removing Carbon Dioxide (Gas) down the bottom of the base and connected to the Sieve.
- We’ve started to tunnel down from the base toward the oil biome at the bottom of the map.
- We are temporarily peeling off some of the hydrogen we produce and sending it to the Drecko ranch in the top right after we got lucky with a drecko egg. We can shear them to increase reed fiber output for Exo-Suits.
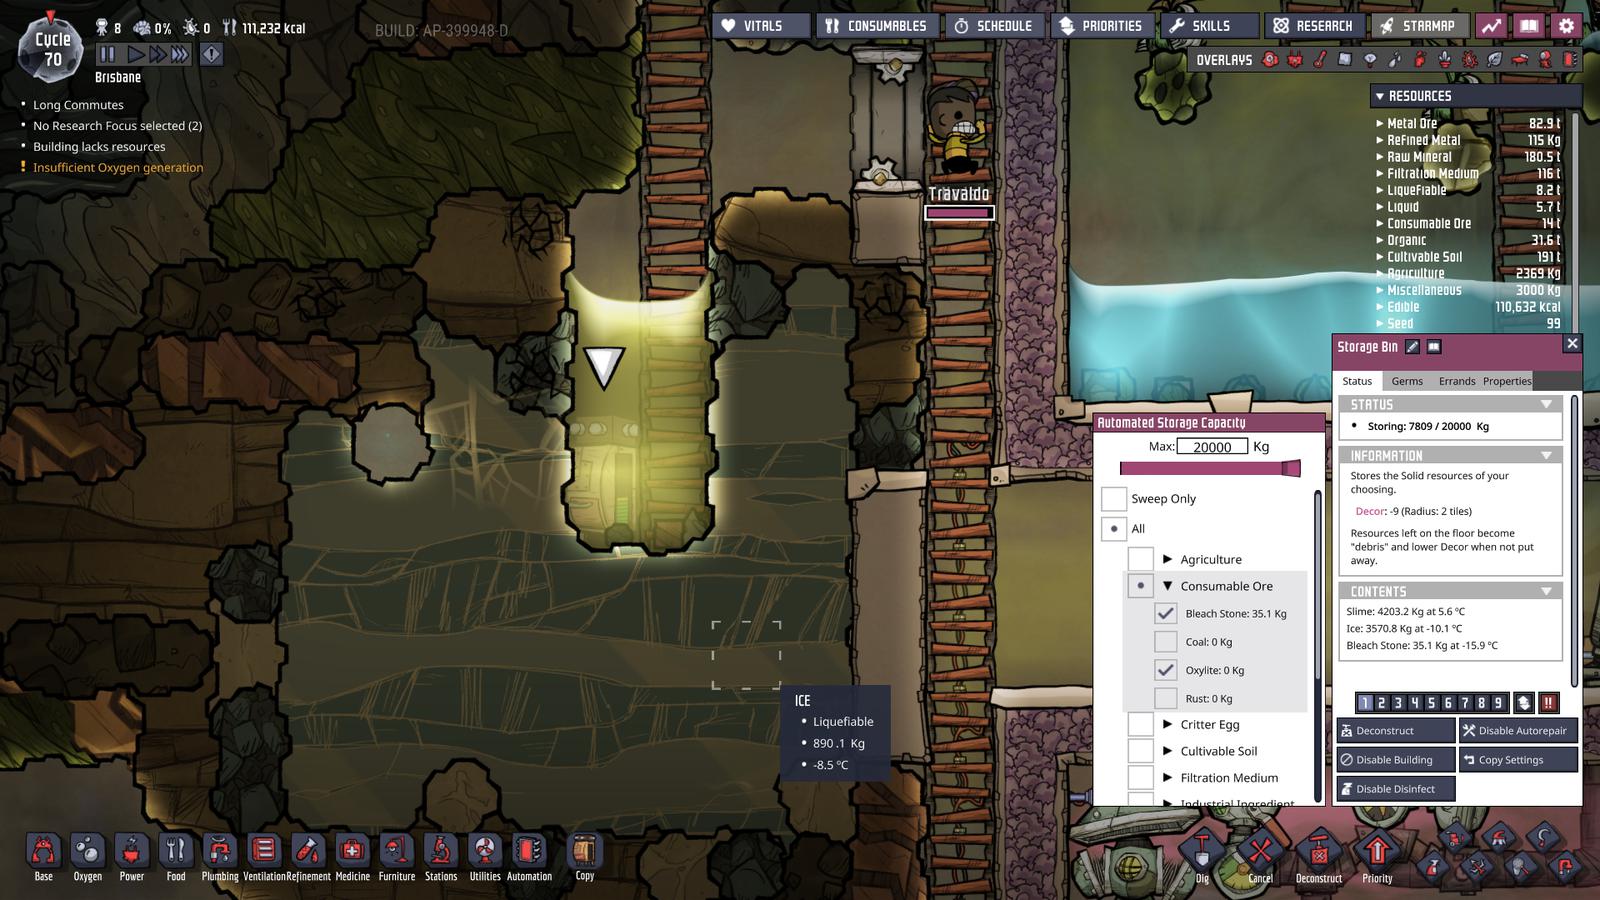
Zoomed in below is a Storage Bin buried in liquid. This bin is not set to “sweep only”, so dupes will always try fill it up except it’s their last priority (priority 1). The bin is set to accept any “problem items”, for this guide this includes anything that can off-gas or liquefy. Having the bin in water prevents the items from off-gassing. Items set to be dumped in this bin are:
- Bleach Stone
- Oxylite
- Slime
- Polluted Dirt
- and all Liquefiable items
Keeping these things under control is important, but saving your Oxylite in particular is desireable as you’ll want it as rocket fuel much much later.
Additionally because dupes get a 15% work speed bonus when working in a well lit area, it’s optimal to add [Cielling light] over work areas in the base that are turned on by Duplicant Motion Sensor. I neglect to do this here until much later but it would best this is done sooner than later.
Mid-game food
Using the Oni Food Calculator you can see a colony of 8 would need to be using 350kg of Water per cycle to keep up Liceloaf production. Whilst we have virtually limitless water, it’s coming to us at close to 99 degrees which is no good for plants. We don’t want to run out of the cool water before we progress to being able to delete the heat from our infinite water.
Long term, I personally prefer to aim for a Pepper Bread fed colony for several reasons, however this requires water being fed to the Sleet Wheat at 0-5 degrees Celsius which is out of capabilities now.
The goal of mid-game food is to diversify away from the starting food Liceloaf. We’ve done this below:
- We’ve added a small Dusk Cap farm.
- The hatches we’re farming will provide enough Meat for Barbeque for a lucky 2-3 dupes.
These will allow us to lean away from water consuming Liceloaf whilst we progress toward the goal of large scale heat deletion and Pepper Bread. Don’t forget to prevent your dupes from eating the intermediary products like meat and uncooked mushrooms through the Consumables menu.
Mid-game Review
Looking back at the over-arching topics we wanted to address from the start of this guide:
-
Our base has no temperature control -
Our latrine is producing a lot of waste product and it is manual to maintain -
We are relying on a finite source of fresh water -
Our oxygen production is relying on Algae that will eventually run out
Sure goal (3) is not totally fixed until we implement a heat deletion method on the steam condenser but we have so much water there and so much time that we’ll tick there box there for now.
We do need to watch our base temperature with the open-breathing oxygen electrolyzer but generally, most of our biggest vital resources are infinite or so long lived that we’re set-up to survive to cycle 200 without doing much except emptying the grey-water system occasionally.
Our next priorities include:
- Centralizing a power grid in preparation for higher wattage demands
- Atmo-Suits
- Wholesale heat deletion
- Preparing for the surface
We’ll address these in the Oni Late-game Guide.
Discussion, questions and feedback
Oni Assistant is a place for learning and sharing ideas. If you think this page could be improved please let us know. If fellow users have questions, please be kind and helpful in your answers.
If you like using Oni Assistant and want to give back, the best way is to link it on your forums and socials.
K
To save your bandwidth, comments don't load automatically. Click the button below to view and provide comments.
Show Comments