Introduction
Welcome to the late-game guide for Oxygen Not Included. We’ll be picking up where we ended the Oni Mid-game Guide on cycle 75 so check back there if you need an update on where we left-off.
Our work in the mid game means we’re now mostly stress free in regards to fundamental needs like water and oxygen. In the late game we’re focussing on moving up the technology tree and automating the production of late game materials in order to prepare for space and the end game.
The order in which we do things in this guide is only indicative, it is what works for this asteroid and the points of interest that we discovered on it. For exmaple, if we had found an AETN and some Sleet Wheat we’d probably be targetting food earlier but we’re flexing to other pathways.
Here are our major goals for this late-game guide:
- Centralizing a power grid in preparation for higher wattage demands
- Atmo-Suits
- Wholesale heat deletion
- Preparing for the surface
As usual, these are only the major goals. The chapters in this guide are as follows:
- Power commentary
- Temporary Metal refining
- Centralizing power
- Priming Atmo-suits
- Plastic
- Heat deletion
- Cold water
- Steel
- The surface
- Aquatuner upgrade
- Transit tube
- Base update cycle 190
- Ready for end-game
Power commentary
Up until now, this entire colony has been running on a single grid of Wire offering a maximum power capacity at any one time of 1000W. It’s only through efficient use of power that we have avoided wasting time and materials building unnecessary power infrastructure so far into the colony’s development.
All pumps in this colony turn on only when they are needed, there are no needless Mechanized Airlock chewing power, the Oxygen Diffuser is free-breathing and the gases that aren’t already sorted by gravity are sorted using zero power, mechanical loops. Rather than build infrastructure trying to cool the Water coming in to the Oxygen Diffuser, it’s much easier to cool the Oxygen in the base.
I’m a firm believer that:
The best solution to most power problems is not needing the power in the first place.
This will be a common theme as we move into more complex builds.
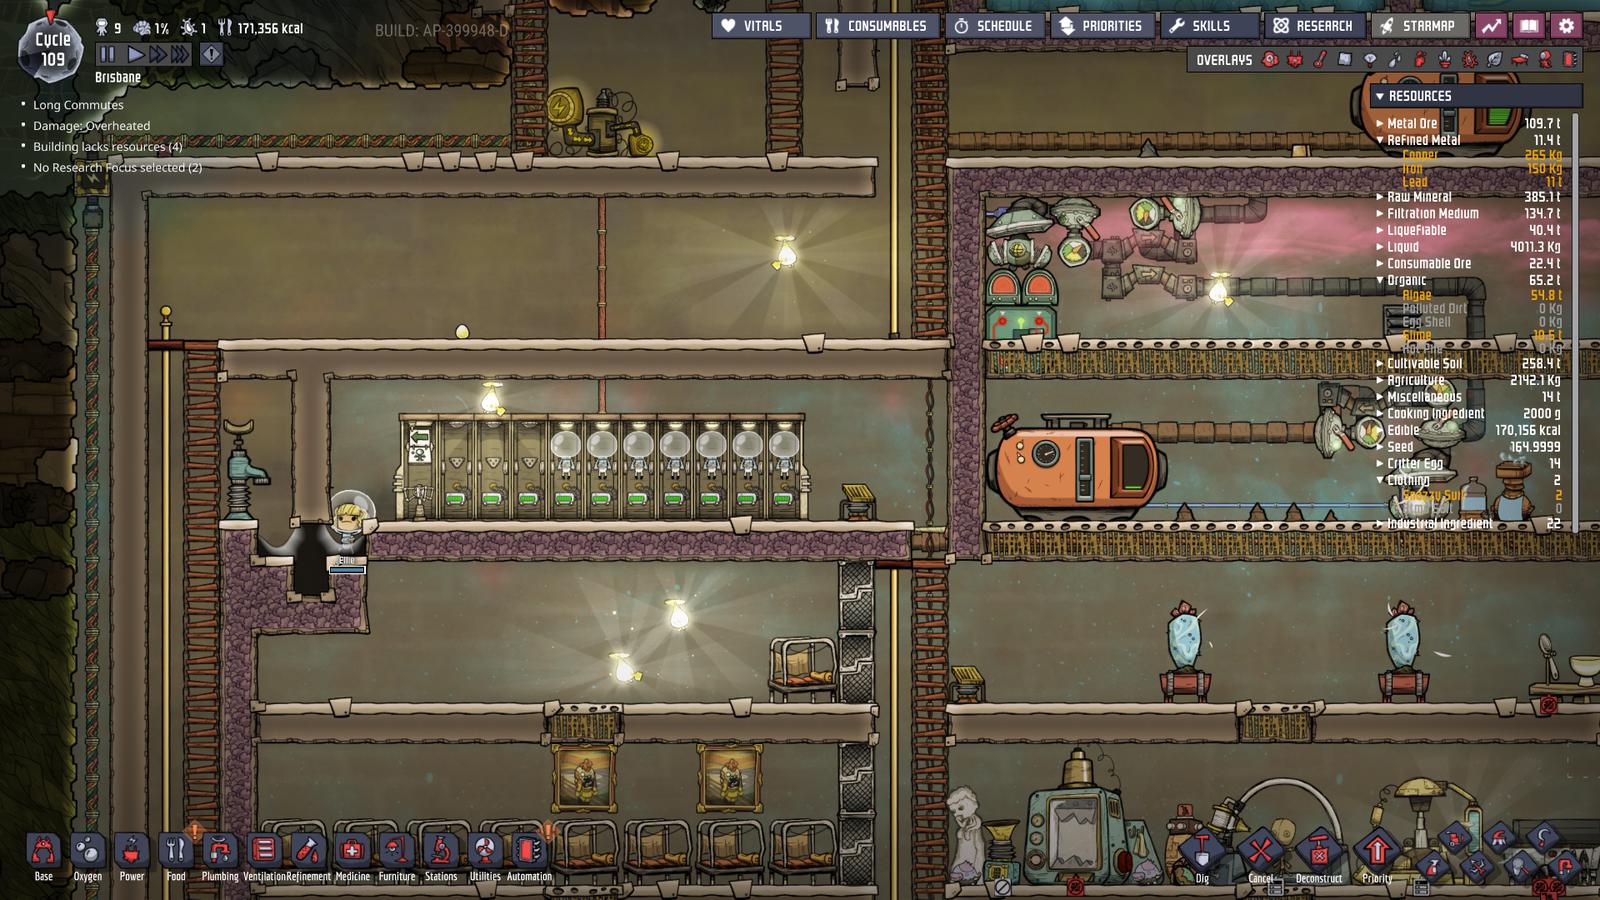
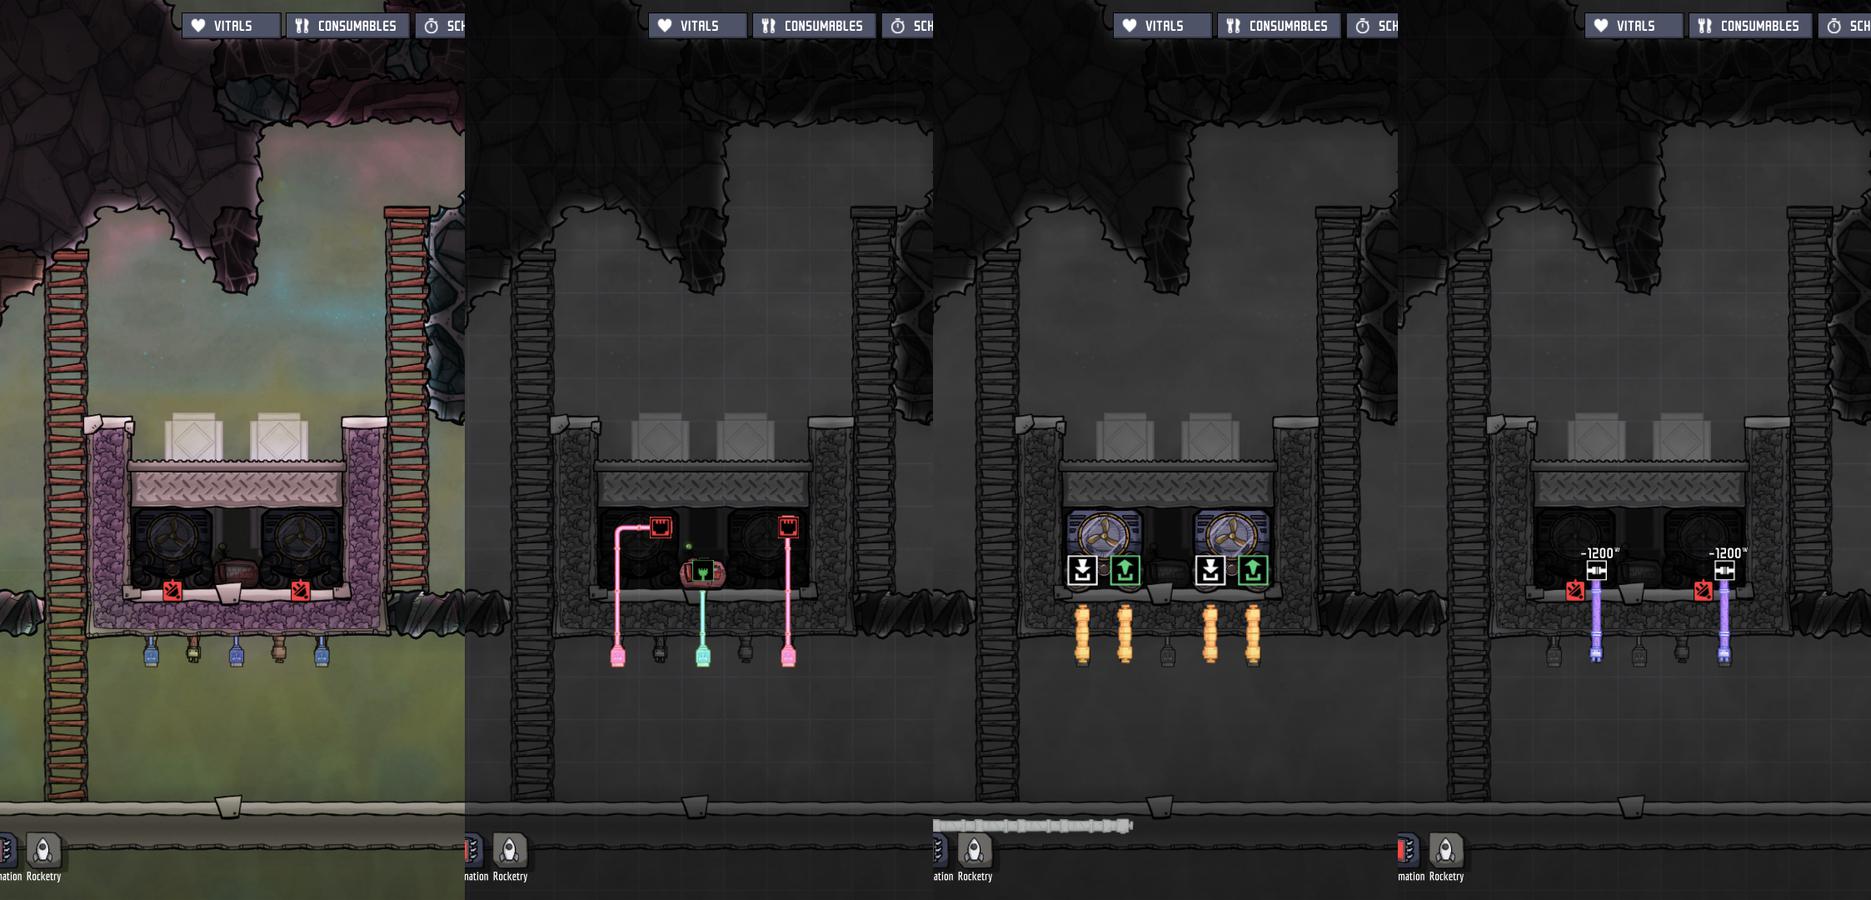
Temporary Metal refining
For the remainder of the guide, the builds require a lot more refined metal. Whilst our Rock Crusher was doing fine producing small amounts of copper for smart batteries, we need to ramp up to a Metal Refinery for more volume.
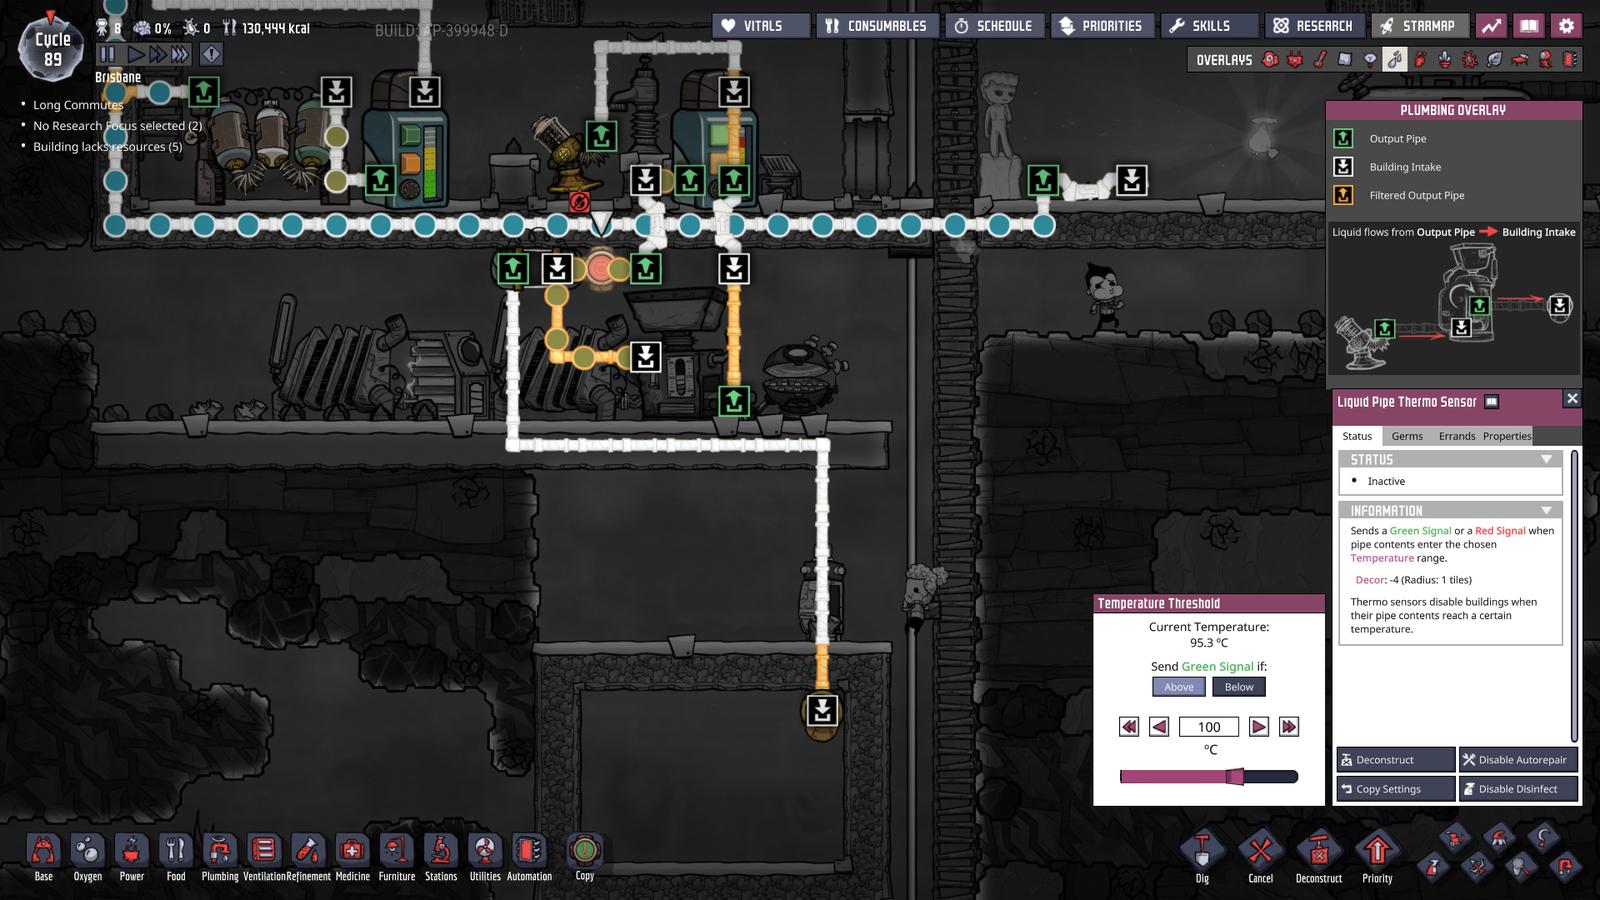
In the above image there’s a few mechanics we are taking advantage of to deal with the heat output by the metal refinery:
- We’re only smelting Copper Ore to Copper (Solid), this job injects little heat into the coolant liquid compared to iron.
- We’re using our Polluted Water excess from our grey water bathroom system. Polluted Water has one of the highest specific heat capacities allowing it to store lots of heat energy. Additionally it has a higher vaporization point than fresh water.
- We have a Liquid Pipe Thermo Sensor turning on a Liquid Shutoff if the water approaching the metal refinery is above 100C. This water would boil and break if it entered the machine so we let it pass down into the insulated holding tank below.
- We are looping the output back into the Liquid Reservoir, this averages temperatures of all the packets that enter, allowing us to dump as much heat as possible into the liquid before it creeps up toward the 100C mark.
- Side note: I’ve removed the Carbon Skimmer on the right but still want the pipe to drain. Remember Oni has no pressure mechanic, it’s just packets of liquid moving from a green output square to the next building’s white input square. Just adding a liquid bridge like we have here on the right of frame is enough to have that pipe empty over time.
The metal refinery is powered on its own separate, high-watt power grid with a smart battery connected to two coal generators and the refinery. Nothing else is on this power loop; it’s temporary. In only a couple cycles we’ll connect this to a centralized power grid discussed below.
Not much else has happened since cycle 75. But we were very lucky in finding two Natural Gas Geyser right next to each other and just to the left of our steam vent. We’re using the natural Abyssalite to insulate the area and form a little reservoir.
From here we’re going to work on two big topics simultaneously as we head toward cycle 100: (a) a central power grid, (b) priming an Atmo-suit checkpoint for the colony.
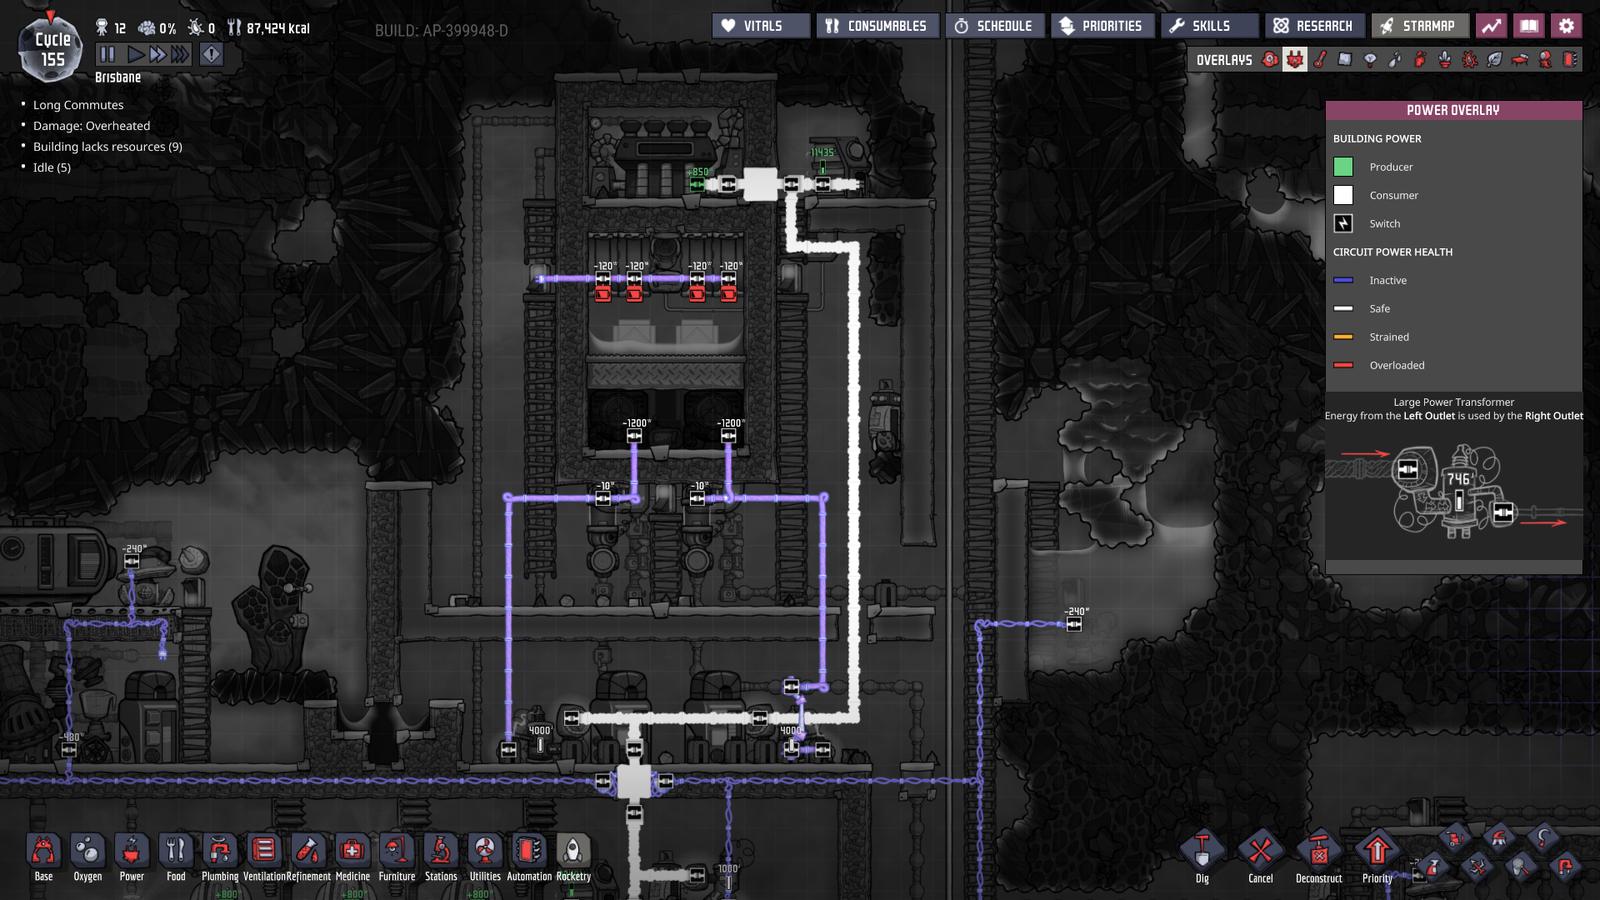
Centralizing power
In this guide we will be building a single power “spine” that forms the back-bone of the colony’s power needs from now until end game. The design principals are:
- There is a single Heavi Watt Wire power line running from the bottom of the map to the top
- All power production is connected to this same high-watt line
- Any power users peel their power off this main line using Power Transformer or Large Power Transformer
A single 20,000 Watt line is more than enough for the colony size we’re targetting (circa 12-16 dupes) and the simplicity and flexibility will keep us out of power troubles as the colony grows.
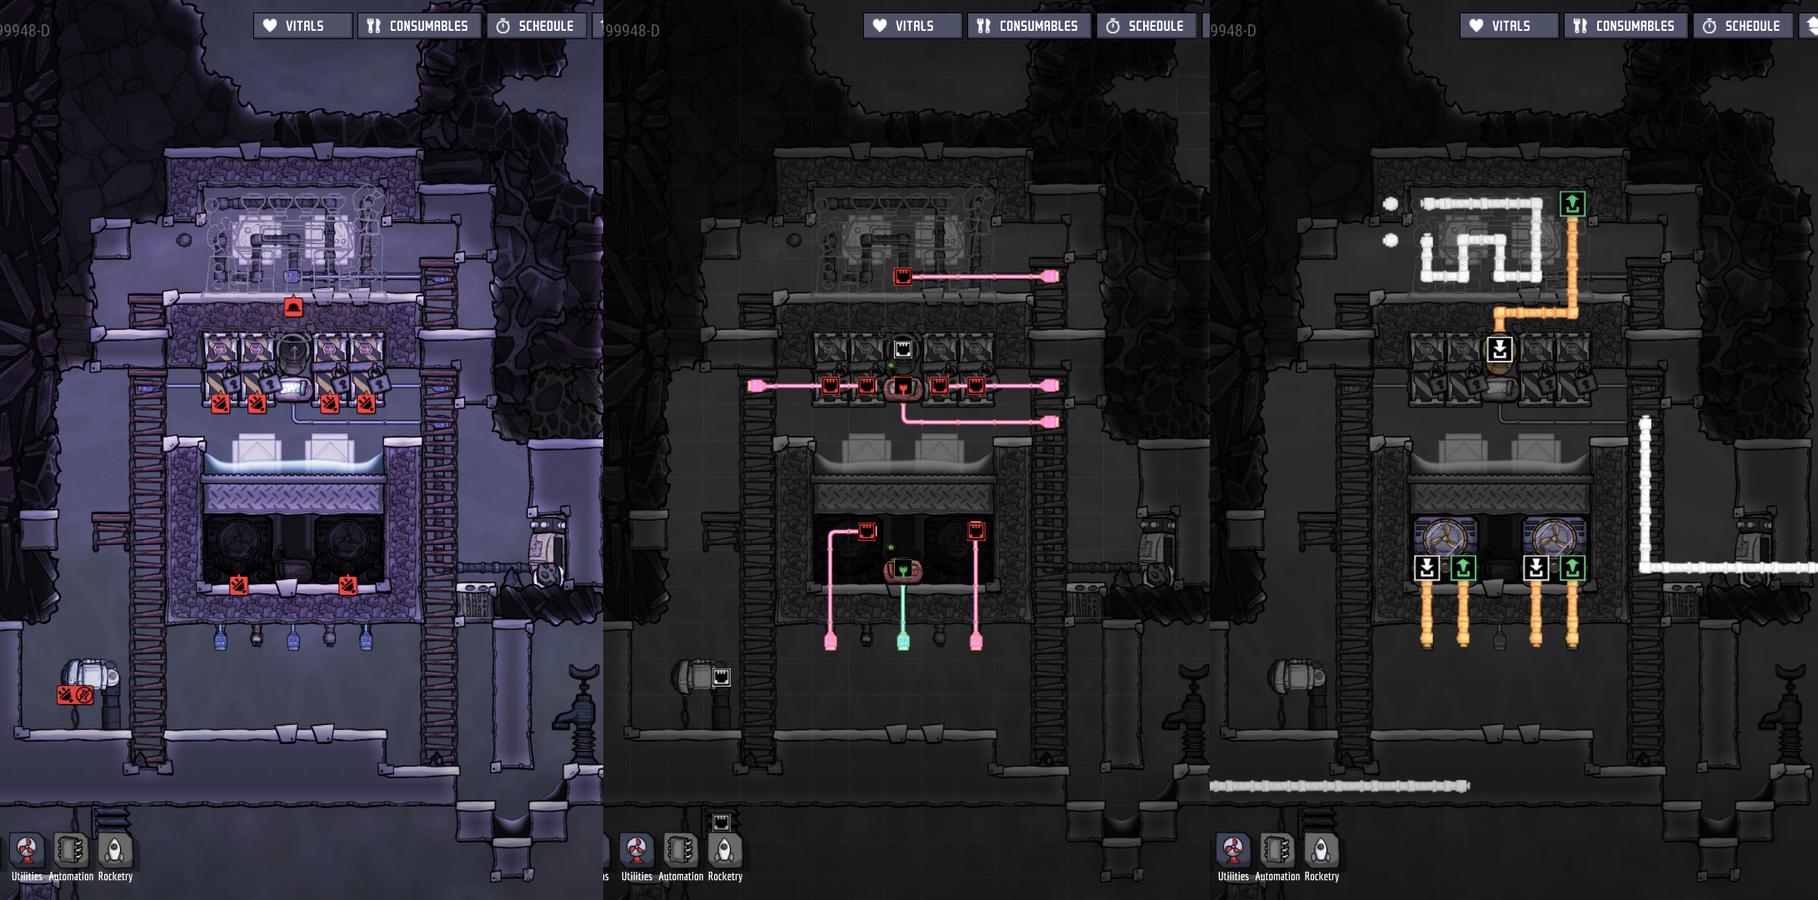
Here’s the start of our power grid as at cycle 100:
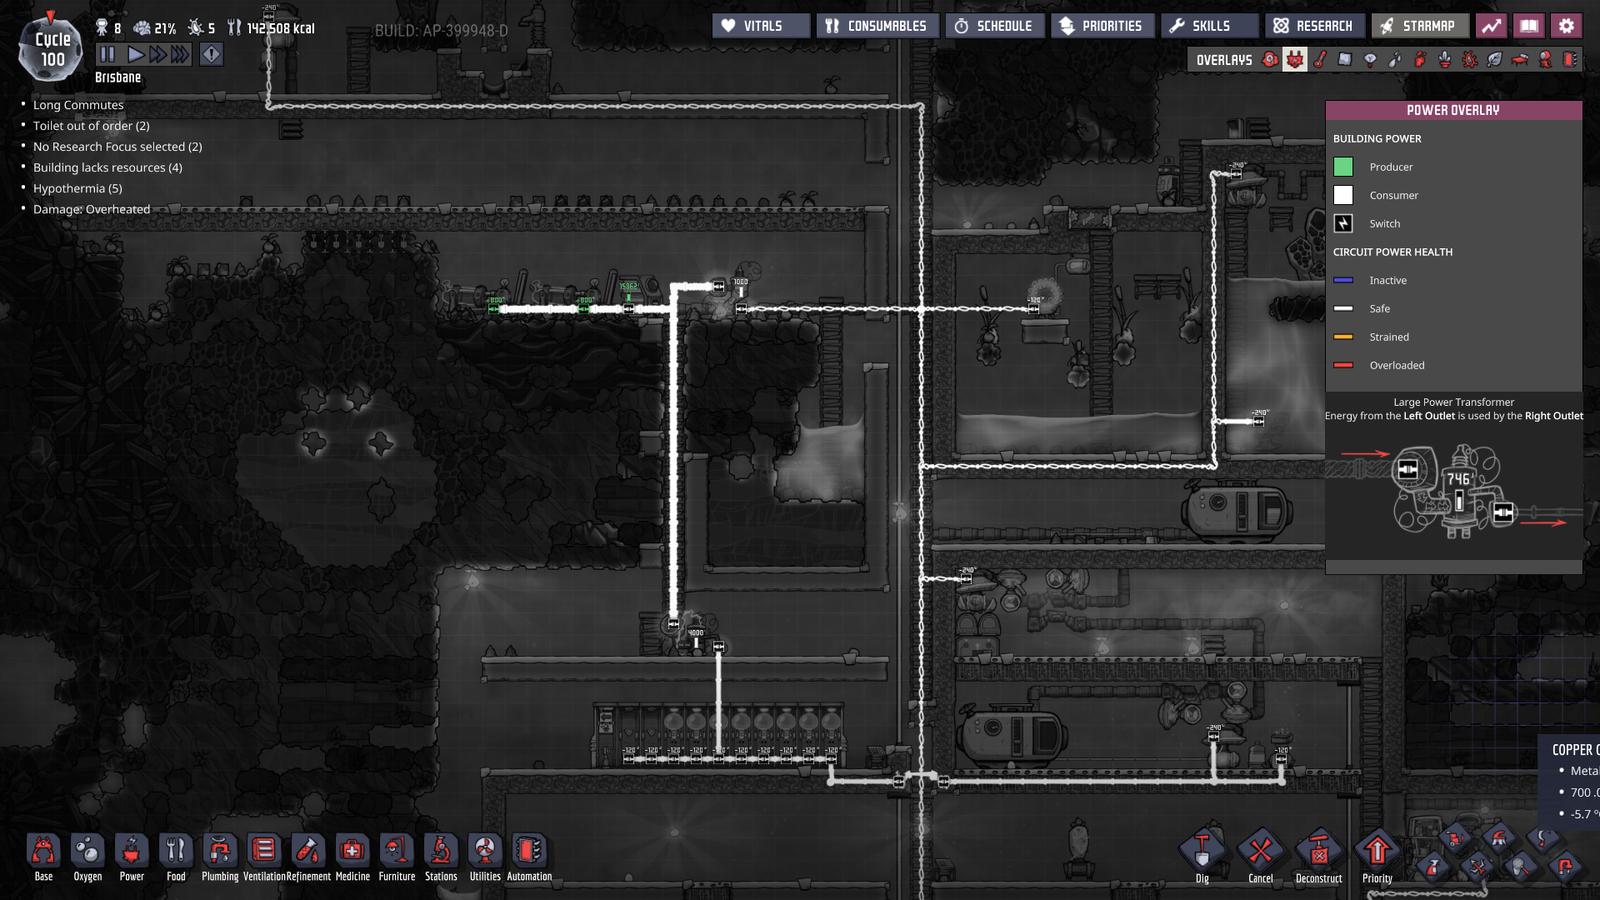
It’s only a very short heavy-watt power line running up and down the center of frame, but it’s this simple approach that we’ll extend to the top and bottom of the map. Let’s look at the producers and users connected to this line.
Power producers
It’s not much right now with only two hydrogen generators, but when we revisit this location it will have been expanded with a row of natural gas generators above them and coal generators below them. Each type of generator will have its own smart battery deciding when they are turned on; Hydrogen first, Natural Gas as backup, Coal as a second back up. The entire colony runs on a single powerline with redundancy.
Power consumers
This is where things start getting more flexible. At the top of the spine is a Power Transformer peeling off up to 1000W to feed the old base power grid. At the bottom of the spine is a Large Power Transformer for peeling off and feeding the Atmo Suit Docks. We’ll discuss these more in the next section, but because there is so many of them, they can power spike and pull a lot of power if all dupes return their suits at the same time. Accordingly, we run them on their own grid shared only with a couple consistent load buildings.
But that’s it for power. This simple approach of a single high-watt spine with transformers peeling off power as required will take us through to the end of the game.
One final note, heavy watt wire has a tremendous negative decor effect. Dupes find it hideous. So much so that being near it can plummet their average decor and drag down their morale. Try to always hide it behind walls and generally keep it out of sight of your dupes and their main thoroughfares.
Priming Atmo-suits
You will have noticed that things have slowed down now that you’re building outside your base. Dupes spend a lot of time running all the way to dig a single tile, run out of breath half way through digging, then run back for dinner.
To fix that we need to get each of our dupes into their own Atmo Suit. The two biggest benefits are portable oxygen and insulation; allowing our dupes to stay out and work longer. Additionally however they prevent our dupes from getting germs and getting wet; the latter becoming quite important as we start using liquid locks. Finally, Atmo-Suits prevent our dupes from breathing out CO2 into places we don’t want them to. As we move on to working in vacuums this becomes important.
We didn’t rush to suits sooner because it’s important your dupes have skilled into “Exosuit Training” as discussed in the mid-game guide, otherwise they’ll move too slowly in the suits to be helpful.
The design principals of the Atmo-suit dock are: one single entry/exit point from the base to the asteroid. No one can leave without a suit. One single path is important, if it’s possible to leave through the suit dock but enter another way, then suits will end up wearing suits in the base and things will get confused.
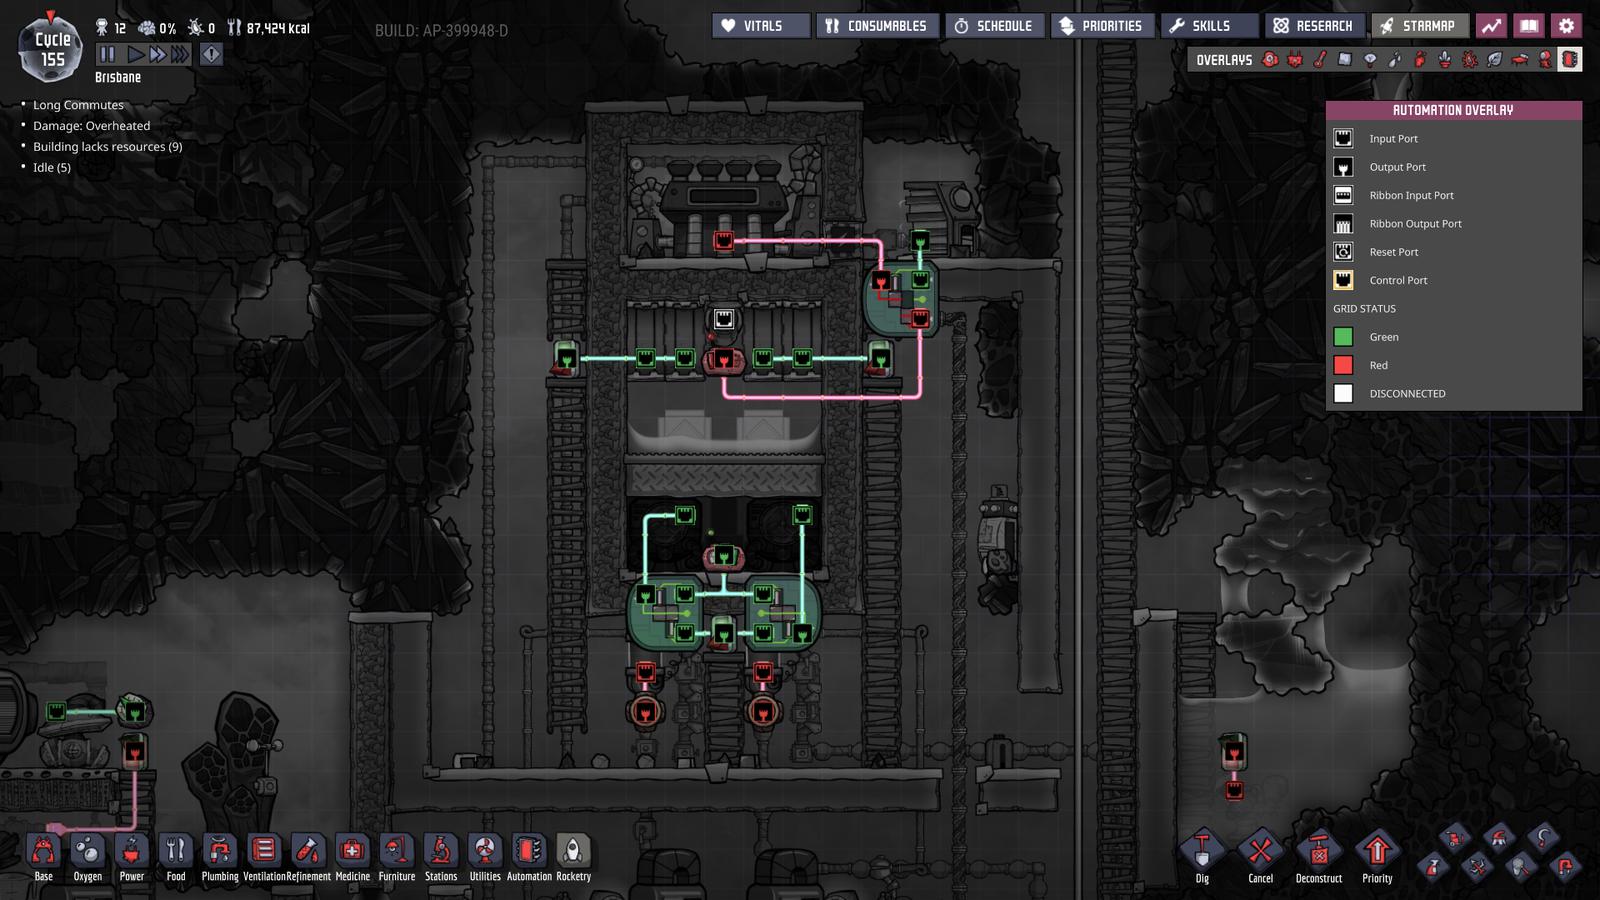
By cycle 100 we’re in the process of priming the suit dock:
There is space for 10 suits and the Atmo Suit Checkpoint. The checkpoint is built but disabled to prevent confusion whilst it’s still under construction. The docks are powered through a transformer taking power from our power spine.
Most of the oxygen is coming from a new pump positioned right next to the oxygen diffuser. It will sometimes suck in hydrogen which would damage the docks if we sent it to them so there is another loop filter built as discussed in the mid game guide to ensure only oxygen is making it to the suits.
The Gas Reservoir is a nice buffer for when many suits are returned at once, but mostly we’re using it as a control to turn off the oxygen pump when it’s not required.

When the tank fills up, it will send a red single to the pump and turn it off to save power.
A few cycles later we seal the bottom of the base and enable the checkpoint and now anyone leaving the base must be wearing their Atmo-Suit. We’ve also installed a simple liquid-lock. Dupes can move through the oil but gases can not, our base is now airtight. We’ve used Crude Oil (liquid) here as a liquid because the temperatures require in on Rime, but on other starter asteroids simple water would be fine.
Now our dupes are armed and dangerous.
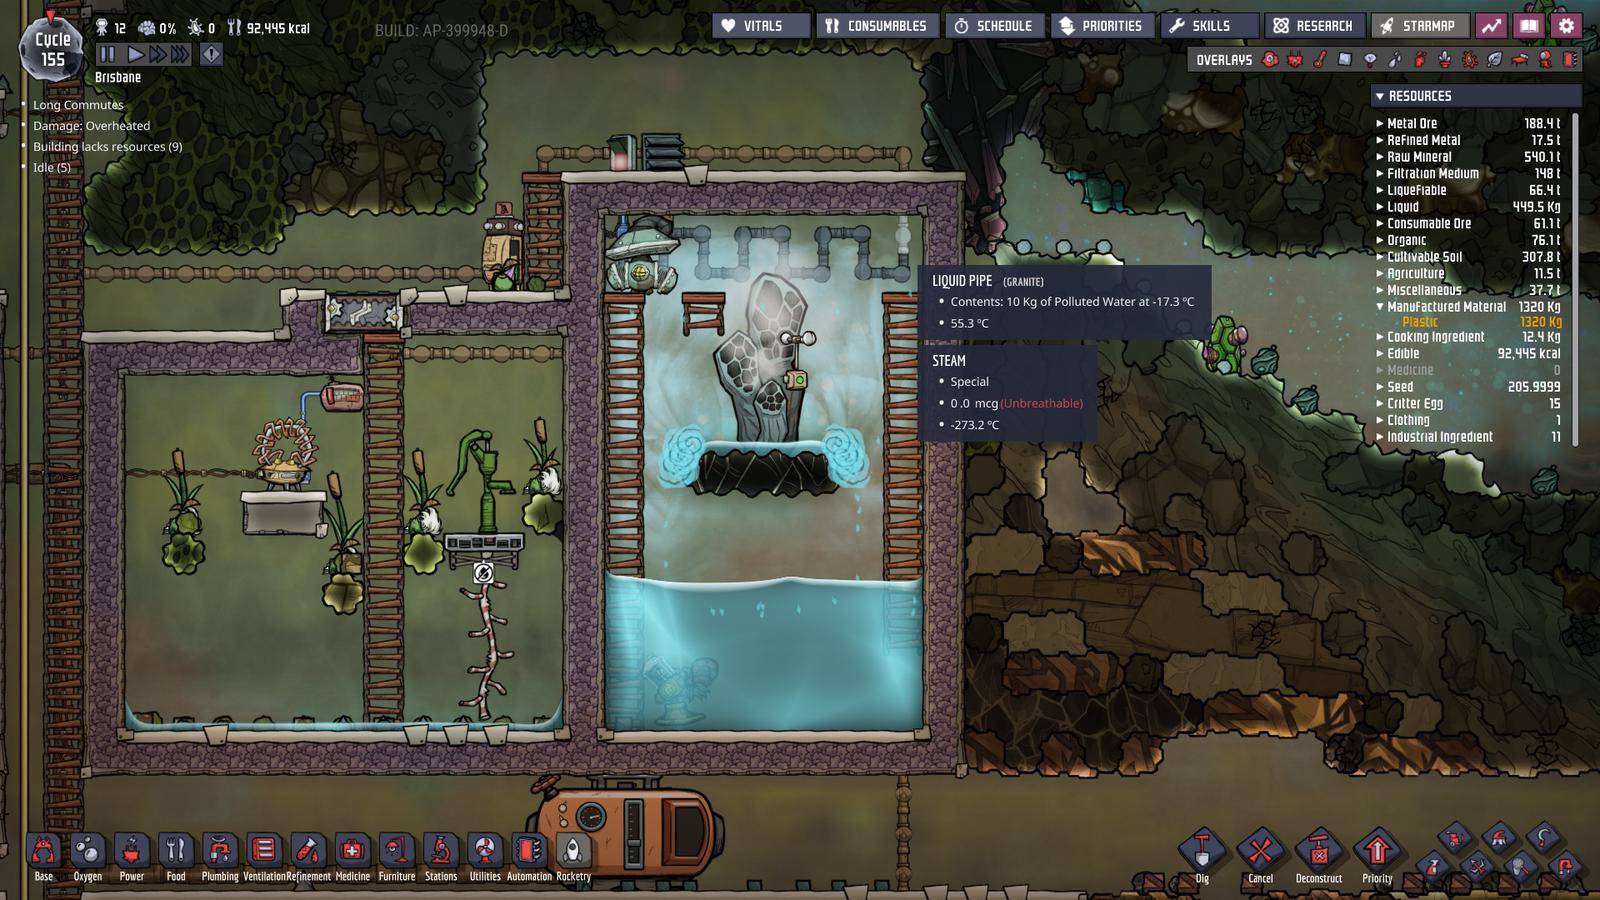
Plastic
There’s one more thing we need to do before we move on to some more complex builds and that’s sourcing the Plastic we will need. If you’re lucky, you will have gotten a Glossy Drecklet Egg sooner than I did. Mine came too late to be of use so we will have to build a manufacturing pathway to plastic instead.
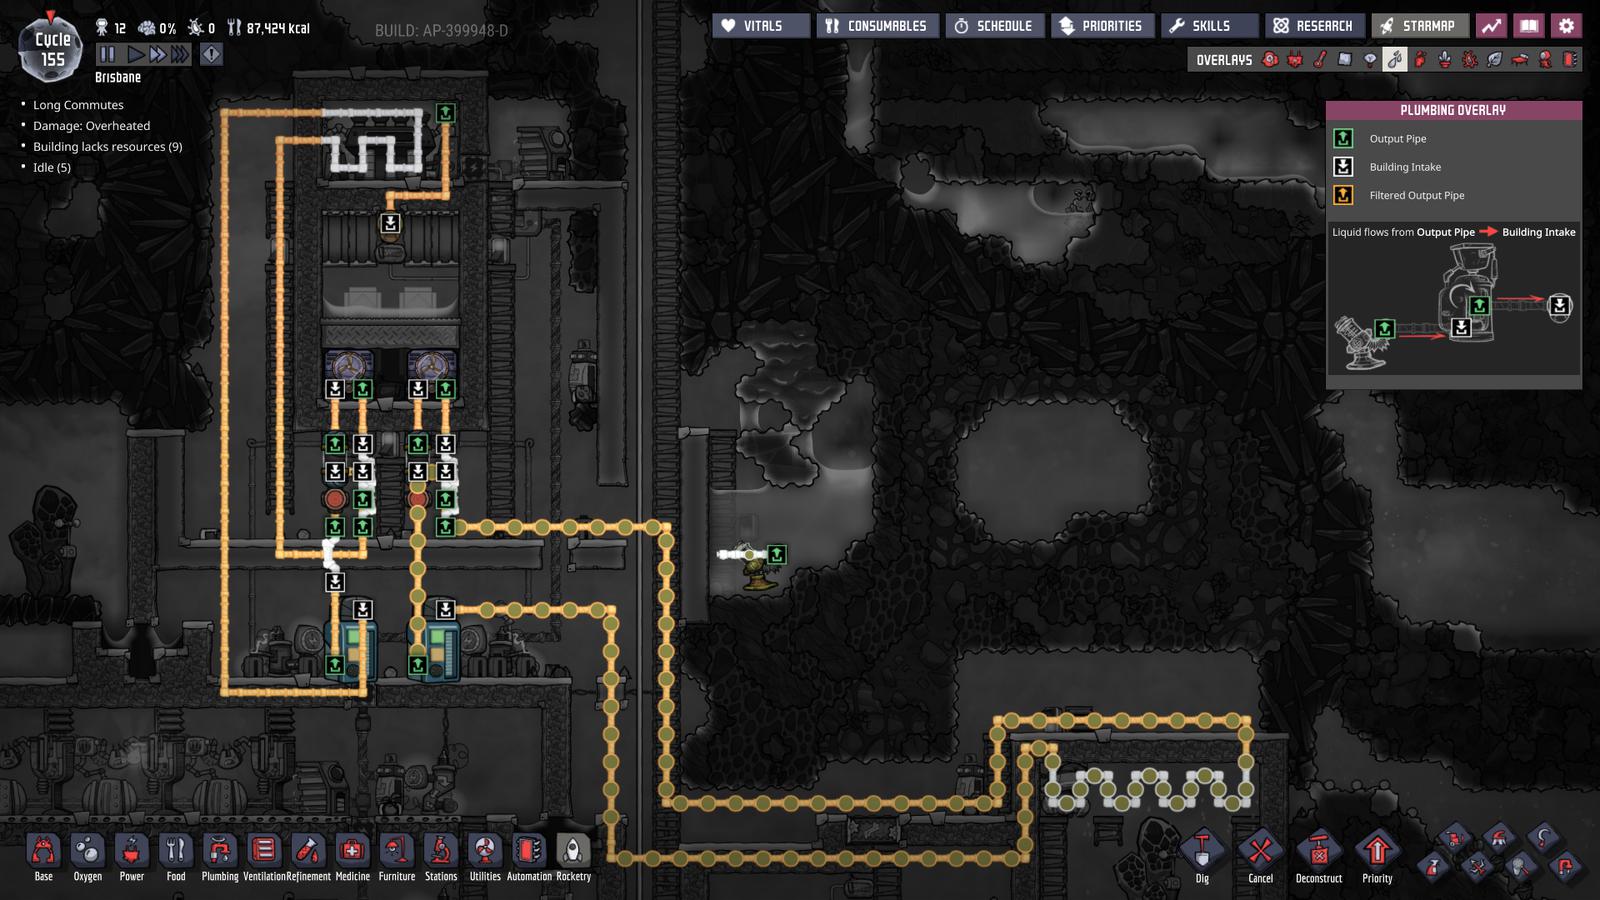
First we’ll be digging down to the bottom of the map to pump up some Crude Oil (Liquid). When you hit the last layer of abysalite, don’t tunnel right through it because anything your dupes drop down the shaft, including liquid spills, will contaminate your oil. We don’t want to need to bother with a filter on the liquid pump if we don’t need to so you can see the protection we’ve created in the image below.
Finally, if you’re on a world with a hot oil biome then the pipes up to your base will want to be insulated to prevent heat bleed and cooking the whole path up to your base. We’ll need to do this anyway on Rime once the pools of cold oil run out.
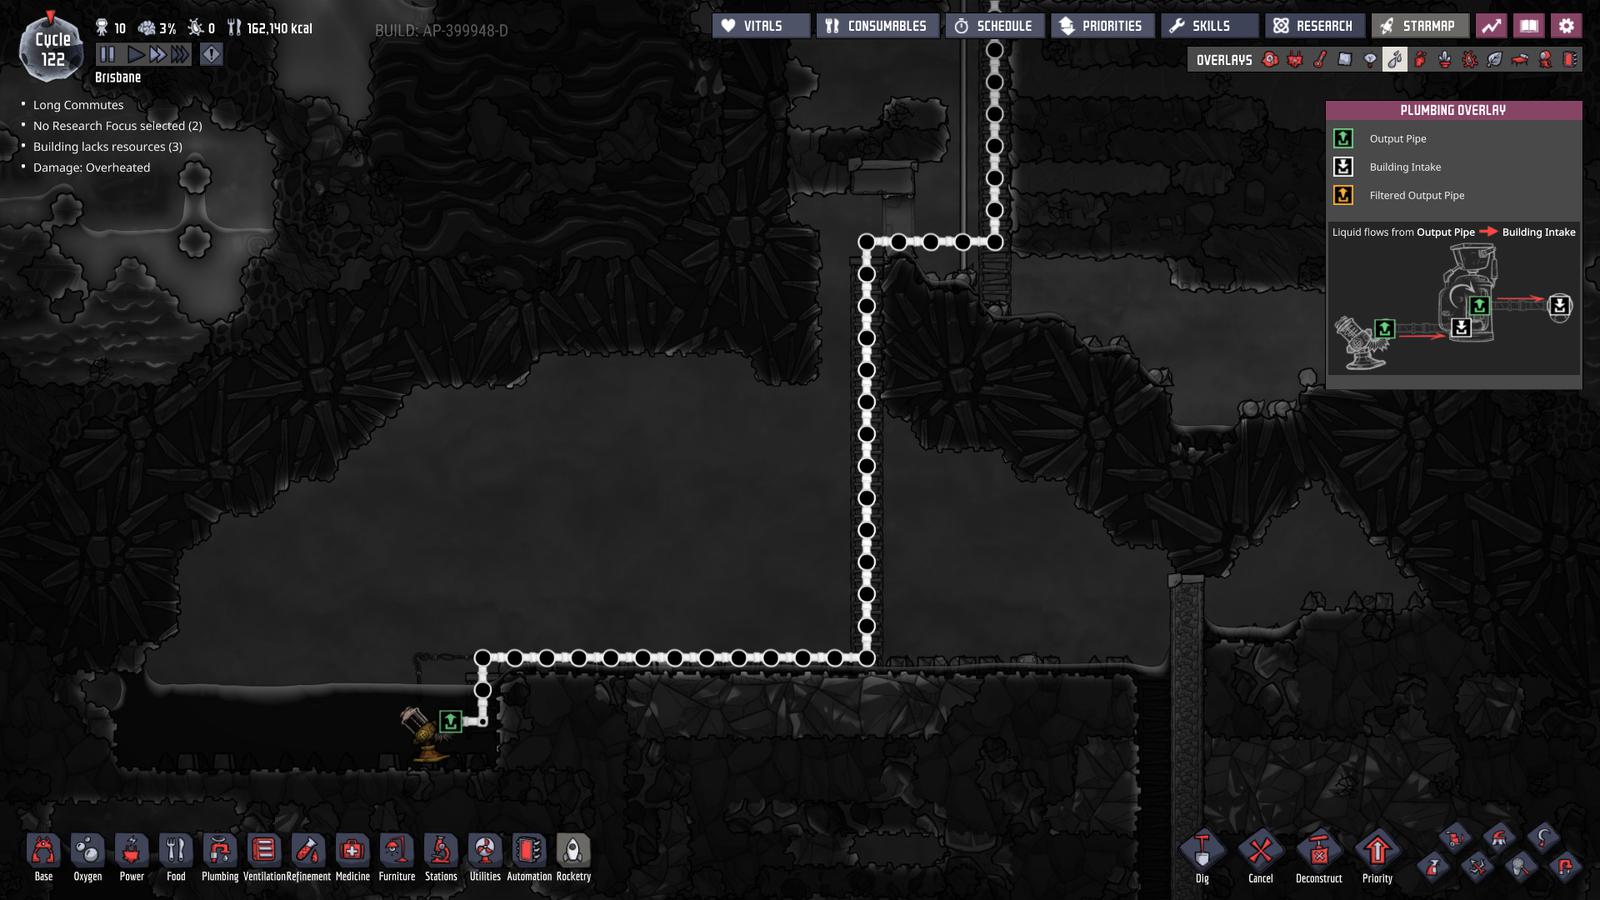
Below you can see our industrial area has progressed over the past 20 cycles; there’s more structure to it and you can see the lines of generators taking shape. Let’s focus on the plastic.
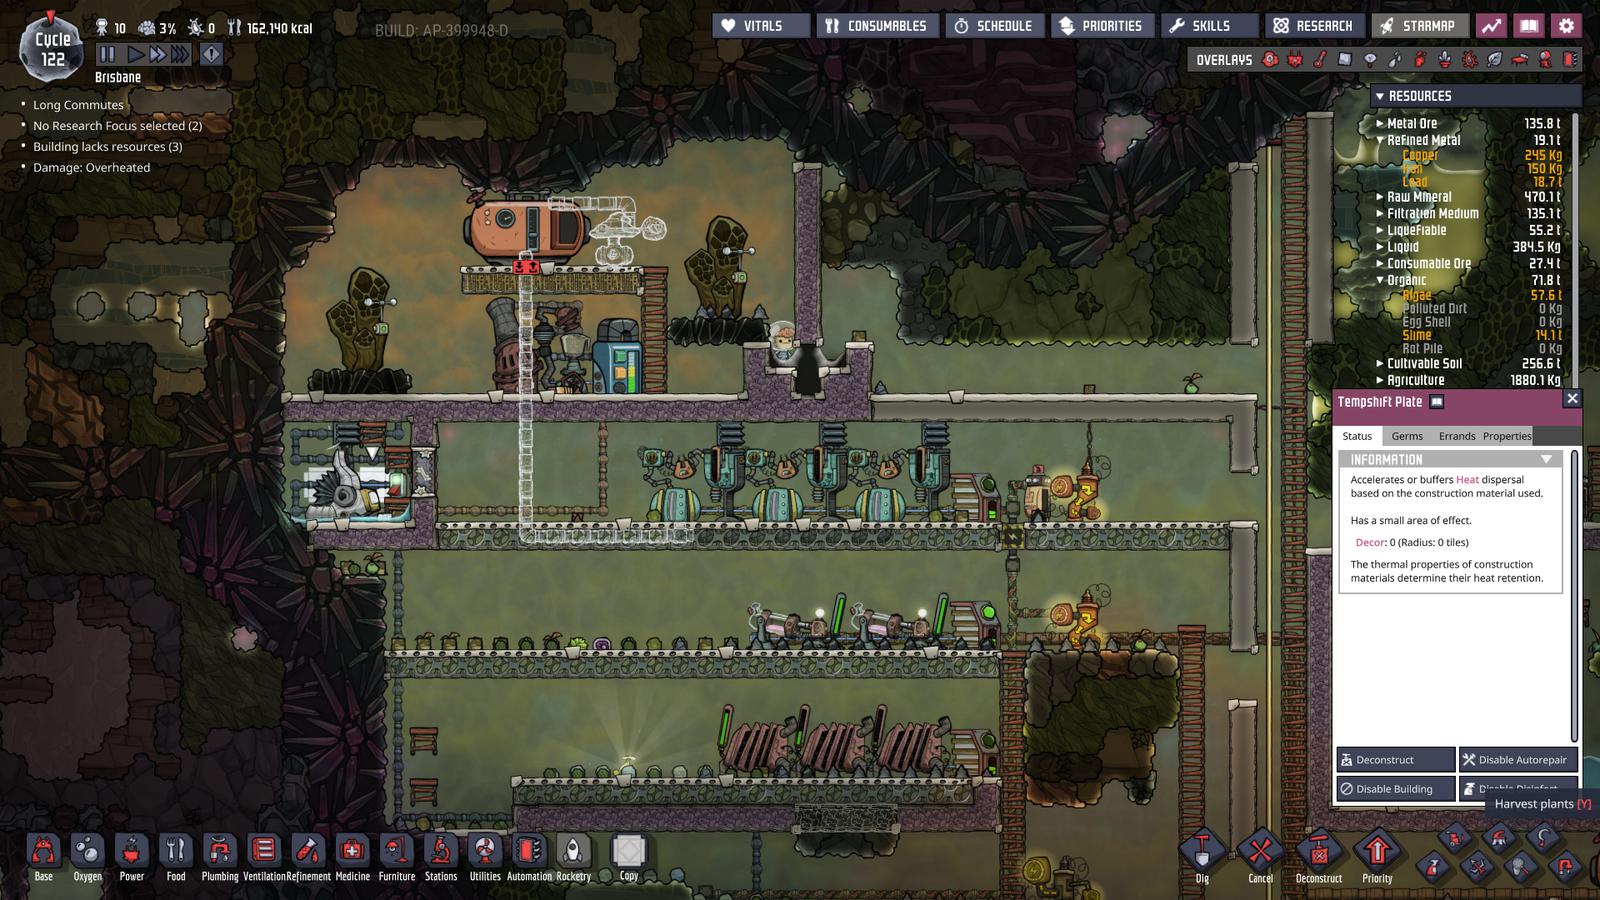
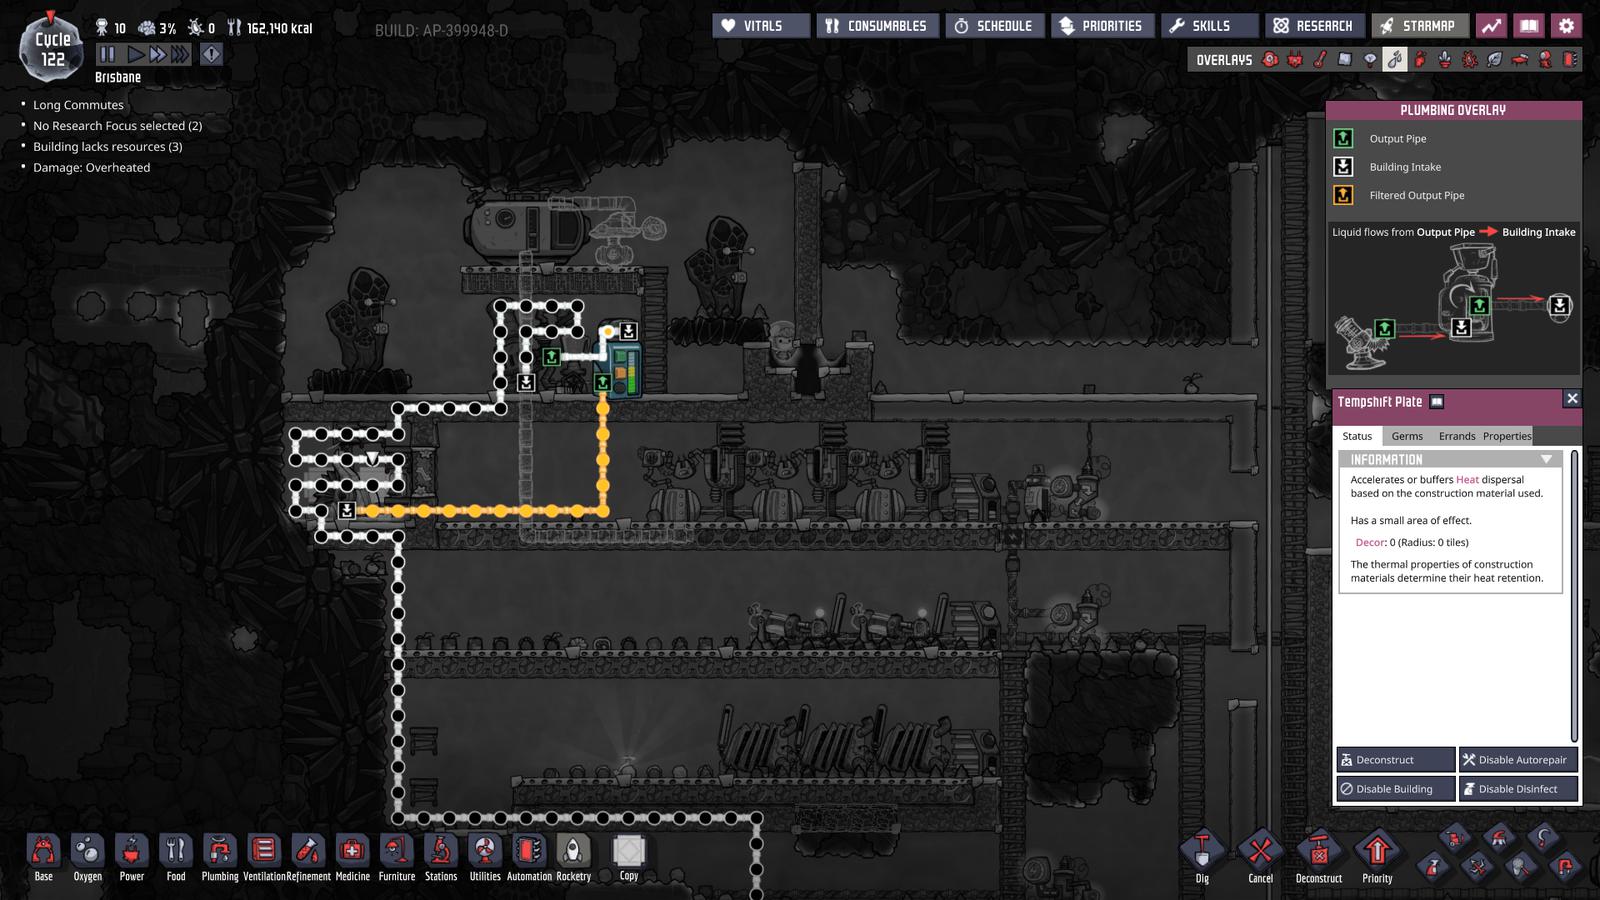
First we’ve added an Oil Refinery into the natural gas room with the natural gas vents. I like to do this because the refinery openly emits natural gas into its environment, not through a pipe you can control. Building it here means all our Natural Gas is found in one place. This machine will convert our Crude Oil (Liquid) into [Petroleum].
Next we have the Polymer Press sitting in its own insulated room. The polymer press takes petroleum to make Plastic. The trouble with the press is that is heats itself extremely fast and it’s very easy to break it. We’ve built some Tempshift Plate behind the press. These objects only take up one tile but enhance the speed at which heat transfers for a 3x3 area around them. This helps get the heat away from the machine quickly. Second, we let the machine sit in a little puddle of water, my world is cold enough tht the steam coming out of the press turns into water without a problem. If you’re playing on a warmer world you might want to use a Pitcher Pump or Ice Block to get some cool water there.
Let’s talk about cooling these two machines. Below you can see on Rime we have some great, temporary cooling. The oil coming up is already cold so I run it past both machines before feeding it into the refinery.
If you’re on a world with a hot oil biome then you can’t do this. We are very close to building a mass heat deleter so we only need to use a quick temporary method to cool these machines. I’ve definitely built ice blocks in the past with a little pool in the press room to catch excess water as they melt. If you built the metal refinery out of gold it should be able to last a long time before it overheats to the 150C natural gas out of the vents. You can also snake its petroleum output past it since it comes out at a fixed temperature of 95 C.
Side note: when ever you see “fixed temperature”, this is the game offering a chance to delete/create heat. If you’re feeding in oil above 95C into the refinery then you’re effectively deleting a lot of heat when “cold” 95C is coming out. I’m not going to use that here, but just keep this in mind. Fixed output temperatures is always a chance to get rid of some heat.
Heat deletion
Given this is a guide for new players, I would have preferred to have the first heat deletion method be an AETN, but I haven’t discovered one yet on this seed so instead, we will be using the Steam Turbine. The Steam Turbine deletes heat by converting it into electricity when it takes in hot steam and outputs water fixed at 95C.
One thing I should mention, deleting heat on Rime might seem redundant; the entire asteroid is -30 degrees. I’m choosing to delete heat for two reasons:
- The guide is more useful to people playing on normal and hot asteroids.
- It’s my preferred play-style to minimize the impact on the asteroid’s environment. Progressing through the game whilst minimizing impact on the asteroid itself is a part of the challenge for me personally but if you get satisfaction from seeing a completely mined out asteroid, more power to you.
So let’s build a Steam Turbine heat deleter. Before we start a should flag two things (1) this will take a while, maybe 20-30 cycles (2) make sure you have a dupe skilled into “Electrical Engineering”, otherwise you can’t build the turbine itself.
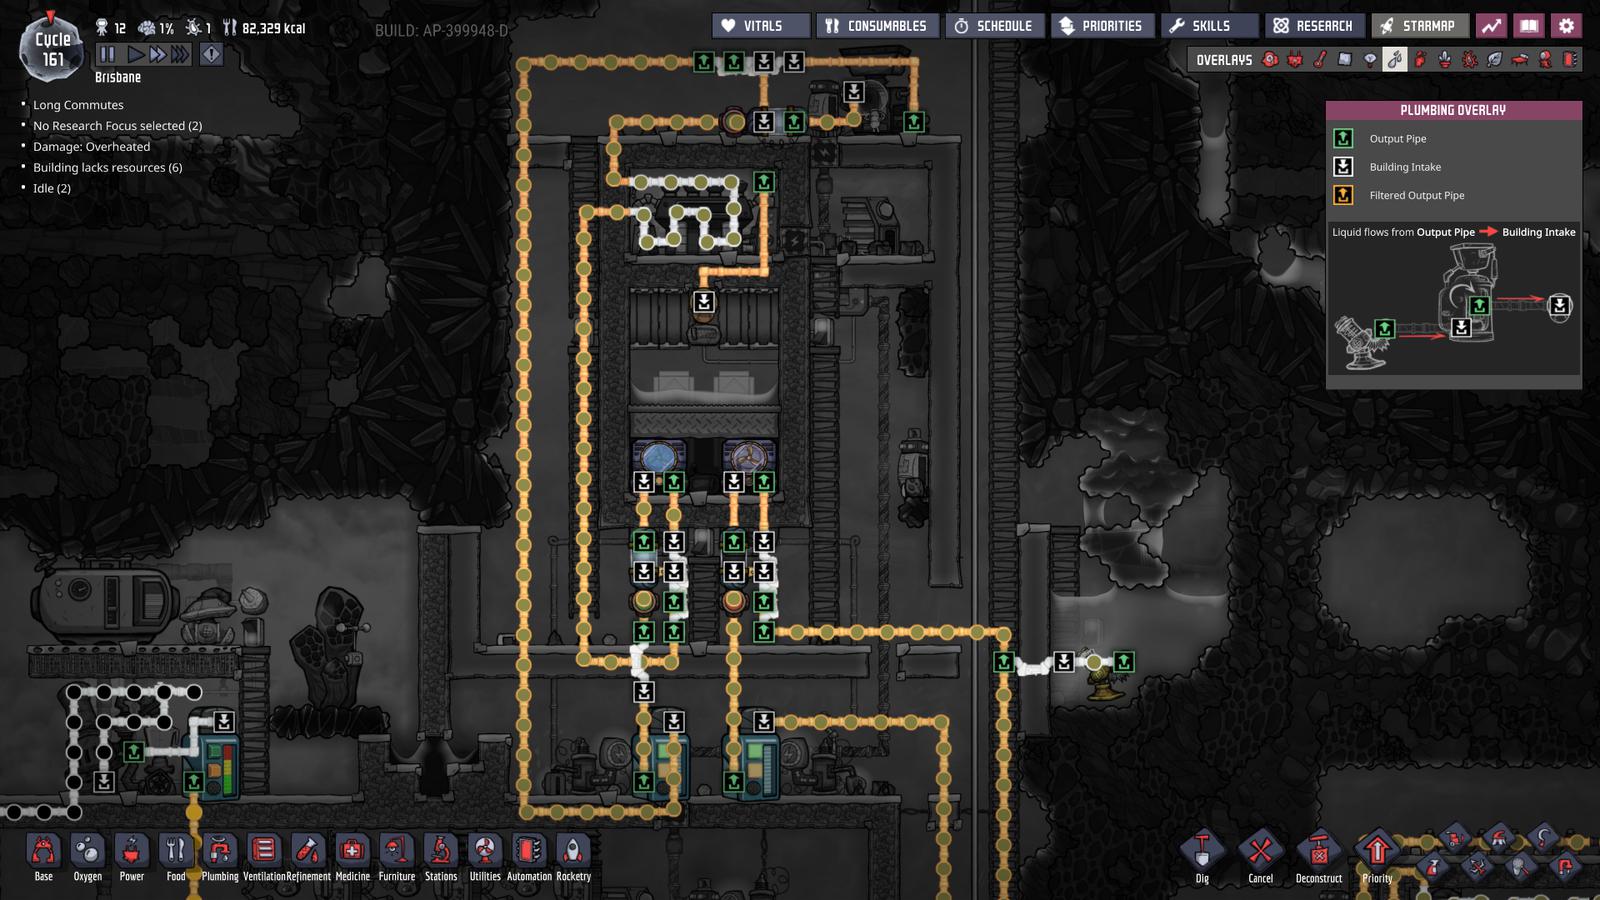
The first of the three sections we will build is the heat exchanger at the bottom. Here’s what the build looks like in a number of views.

A few major points:
- We will use two Thermo Aquatuner to transfer heat out of coolant lines into the steam. I’ve only built these out of Gold Amalgam which will limit how high of a temperature we can run them at (175C). You can build them out of [Steel] immediately. But for now I know upgrading them later isn’t difficult and gold is good enough for the little mounts of heat we will be deleting to start.
- The oil pipeline, the output vent and the hydro sensor connected to it are all only temporary. They’re only there to fill the exchanger. My goal here is to show you how to build one of these in a survival game. There’s enough videos showing the finished product in to creative mode. The hydro sensor turned off the output vent once the top layer of oil hit 800kg.
- The Metal Tile are made of Aluminum (solid) to enhance heat transfer.
- There are 4 diamond Tempshift Plate in this image, two touching the top of the metal tiles, and two touching the bottom. We want to get the heat away from the aquatuners as fast as possible.
- We’re using Mafic Rock for the insulated tile here. It performs better than any other rock for this purpose. You could use Ceramic but this build takes long enough and the gains in insulation are marginal.
- The first piece of pipe under the inputs and outputs (not visible) is Ceramic. Ceramic is usually overkill but at this point we will have extremely cold coolant in a pipe sitting in extremely hot oil and we don’t want to have transfer here.
Once it’s filled with oil we can remove the temporary items (vent, oil line and hydro sensor) leaving the first compartment finished:
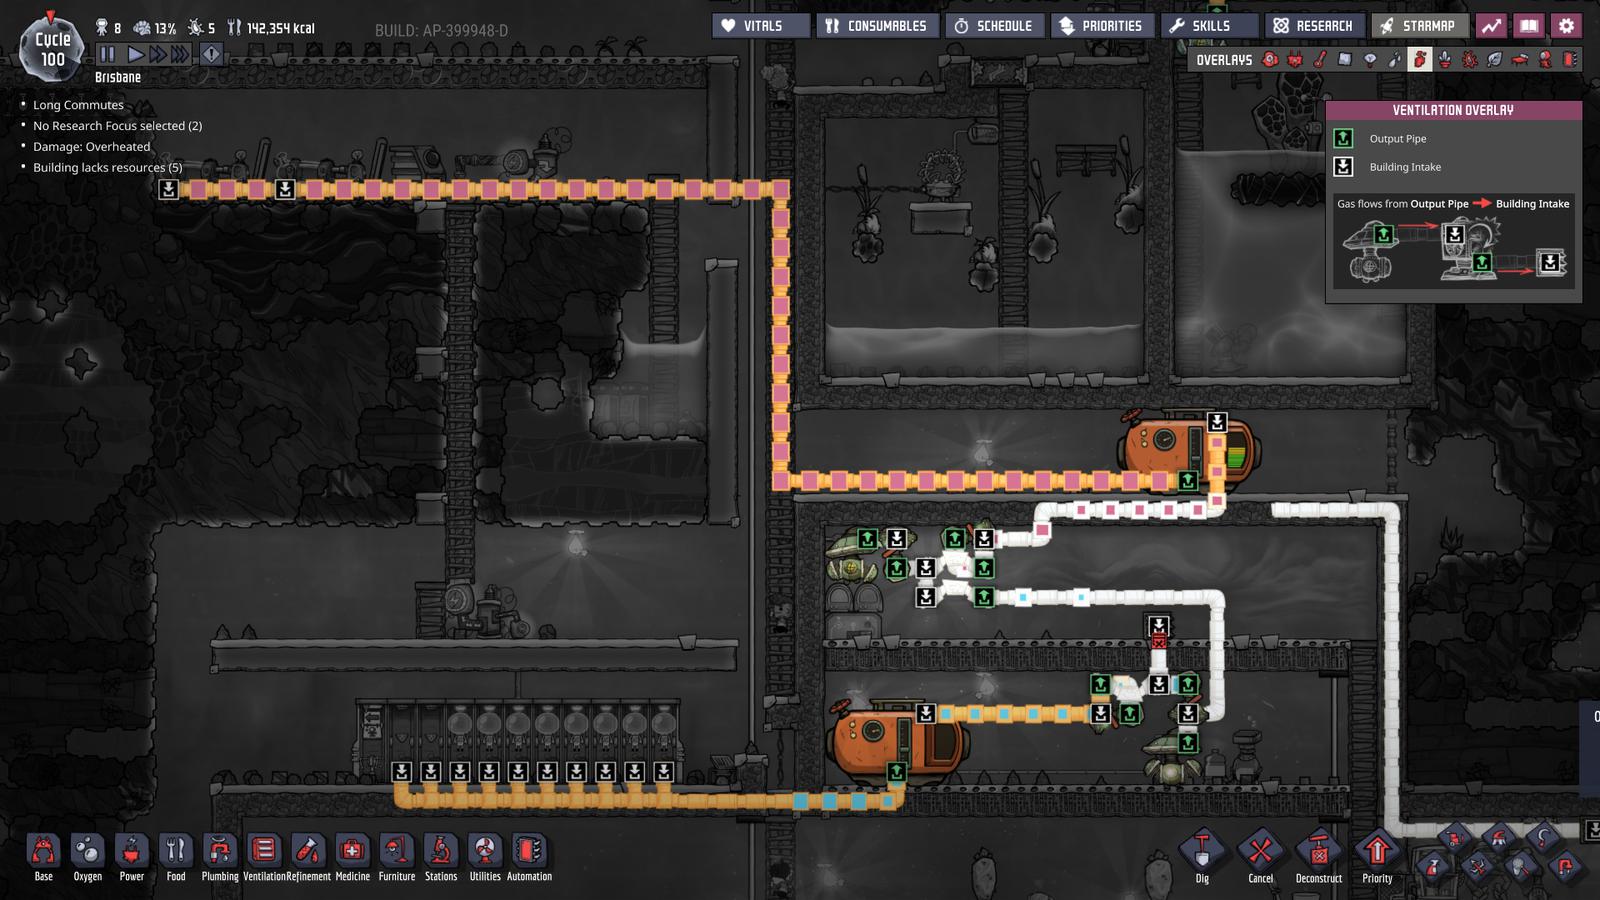
The second section we will build is the steam chamber. It’s important that this chamber has nothing but Steam in it, which means we need to start working in a vacuum. Add a liquid-lock, a pump and start pumping out all the gas from your construction site whilst we build the steam chamber structure below:
- Awaiting the vacuum is the slowest part of this build. You can see I’ve sealed off as much as possible to minimize the space in which gas can spread out, pushing it toward the pump. Additionally we’re saving power by using a Mini Gas Pump once the air in the room is below 50g per tile.
- In the pipe view you can see there was a pipeline of water coming in from the right. This was used to put the water layer you see in the steam chamber using the same vent/liquid sensor technique as the oil. There’s 200kg per tile there.
- The doors are gold amalgam, we’ll use them to control the amount of steam going in to the turbine.
- The tip of the pipe entering the steam chamber to get to the liquid vent is again ceramic. We really don’t want the water in this pipe boiling at this point and breaking. Getting back into the steam chamber to fix things is very difficult once it is sealed. Ideally, once we vacuum and seal it, we won’t ever open this again.
With the structure built and the vacuum in place we can seal the steam chamber and move on to the final chamber for the turbine itself:

- The snaking, uninsulated pipe is Granite. The turbine heats itself up overtime and we’ll run cold fluid through these granite pipes to cool it. To help with heat exchange, the chamber will be filled with hydrogen that we peeled off from our base’s oxygen diffuser.
- The insulated pipe carrying the water from the turbine back to the steam chamber is just igneous rock, except for the single ceramic point actually in the steam chamber.
Once it’s full of hydrogen it’s time to seal it up with insulation and a heavy watt join plate then start connecting everything. Let’s speak about the automation first:
- The turbine will only turn on if both sides of an And Gate are satisfied; (a) the smart battery on the main grid was below 95% and not yet 100% (b) the temperature in the steam chamber is above 140C.
- The doors are connected to Switchs we can control manually, we will rarely need to touch them and they are not critical to safety.
- Each of the aquatuners will only turn on when their And Gate is satisfied; (a) the oil in the exchange chamber is below 155C, (b) a manual switch is on.
- The Polluted Water approaching the thermo aquatuners will only be allowed to enter if it is above -5C to prevent it freezing inside the aquatuners.
Speaking to the piping:
There are two loops but only the right one is currently in use; we’ve connected it to our steam vent exchanger and you can see the cold pipes condensing the steam into water.
Most important however is the section of piping immediately below our new construction that makes sure no polluted water below -5C makes it in to the thermo aquatuners to freeze and break. Water returns from the steam vent through the reservoir to give us some buffer and smooth the packet flow. It then approaches a liquid pipe thermo sensor. If the liquid is below -5C the sensor sends a green signal to the liquid shutoff immediately behind it, allowing the liquid to enter the aquatuner. Water that is colder than this is rejected and shortcuts back onto the loop to go and get more heat.
Importantly, because the length of our loop is effectively growing/shrinking depending on the temperature of the water, we need to make sure it runs smoothly. To do this we use the double bridge technique. We don’t want the aquatuners to ever get blocked and need to wait so we bridge them back onto the loop first, they then have priority. The second, lower bridge bridges the rejected packets (too cold) back onto the loop AFTER the packets coming from the aquatuner. So when a packet get rejected but there’s a previous packing coming down form the aquatuner; the rejected packet has to wait.
The Liquid Reservoir handles the waiting and allows the rest of the loop to keep moving smoothly. It all looks a little complex but this really is the best know way to keep a loop moving smoothly.
Speaking to the power:
- The thermo aquatuners each have their own heavy transformer on a refined metal line to deal with their high wattage.
- The steam turbine is connected directly to our main power spine.
As a recap here’s the current power priority:
- If batteries fall below 95%, the steam turbine will run until they are 100%.
- If batteries fall below 20%, hydrogen generators will run until they are 80%.
- If batteries fall below 15%, natural gas generators will run until they are 80%.
- If batteries fall below 10%, coal generators will run until they are 80%.
What we haven’t done here and should do once the turbine is actually hot enough to run is put a Buffer Gate on its logic. The turbine has a “spool up” time so we don’t really want to turn it off if we’re going to need to turn it back on soon anyway. A buffer on the logic wire keeping it on for 10 seconds extra would be fine.
Review and basking in your infinite water
You’ve done it. This was by far the most complex and time consuming build to date and as a result, you now have the power to move and delete huge quantities of heat. Congratulations! Seeing that water drip out of steam on the heat exchanger is always a satisfying feeling. Your water is now truly infinite and accordingly your oxygen and food is too.
One caveat on that word “infinite”. The steam vent can only support a colony of a certain size. A normal Duplicant breaths 60kg of Oxygen (gas) per cycle, this requires splitting 68kg of water. With 12 normal dupes that’s 810kg of water split per cycle. We can use the Oni Geyser Calculator to see this vent only averages 1.2kg/s or 717kg/cycle over it’s full activity period. This would be a problem except 9 of the 12 dupes have divers lungs; so we’re only needing 660kg/cycle of water for our Oxygen. This excludes water we need for research and food, so if we want to keep growing we need another vent.
For the next few cycles or so, your steam turbine isn’t going to be producing any power. It has a lot of heat to soak in to the 9 tonnes of oil, 1 tonne of water and all the machinery/metal. Once it’s hot, it has a lot of “inertia” and it will run pretty consistently. You can think of it as a giant battery; storing its energy as heat in all of that mass and releasing it slowly over time.
Because I built my thermo aquatuners with gold amalgam, the peak temperature we will let the oil get to is 155 and steam will be 1-2 degrees behind the oil. At these temperatures, we can open all the doors. In the future, when we upgrade to Steel (solid) aquatuners we can run it much hotter and we could close some doors. I won’t go into depth here on the specifics, but just know that once the turbine passes the point of converting heat into its maximum wattage of 850W, the extra heat energy is deleted without getting any power from it, so we close its intakes to limit how much of the far hotter steam it can take.
The left loop is unused right now, we just wanted to save power on the 10W shutoff valve, but it will be used soon.
Two aqua tuners and two lines gives us flexibility, you can connect these two lines to as many places you want to cool as you like. The safety thermo sensor on the oil will prevent damage to the main unit. Just remember however that because we’re using polluted water, we can’t reliably cool below -5C and be careful not to try cool something likely to go above 120C as then your lines will boil and break.
For now, we’re just using it on the steam vent to cool it until it condenses. Because the pipes are in a vacuum, there’s automatically no power wasted cooling other gases or the hot water. In future builds we’ll use some simple tricks to cool things to specific temperatures.
We could have used Crude Oil (Liquid) as the liquid for exchange loop. You can see in the database that it freezes at -40C compared to -20C on the polluted oxygen; it also boils much higher at 400C instead of 120C. The reason we’re using polluted whatever however is because of its superior ability to store heat energy. It has a specific heat capacity of 4.179 compared to oil’s 1.690. This is the most important factor for the efficiency of our system.
Each packet that goes in to the thermo aquatuner comes out exactly 14C colder than when it went in. This costs 1200W to make this change. If 10kg of oil goes in then that’s 10,000grams * 1.690 shc * 14C = 236,600 “DTU” of heat energy transferred to the aquatuner at the cost of 1200W. But if we use polluted water then that’s 10,000grams * 4.179 shc * 14C = 585,060 DTU of heat energy transferred for the same price. We can move energy faster and cheaper with polluted water because of its SHC.
Eventually we’ll upgrade to Super Coolant (liquid) with its amazing 9.46 SHC and range of -271C to 436C, but we need material from space for that.
Finally, the purpose of this steam turbine is to delete heat, the electricity is just a bonus. The current logic on the turbine won’t let it run unless the colony needs the power. If this becomes an issue, it won’t be difficult to add an Or Gate so that the turbine runs if the colony needs the power OR the oil in the exchanger chamber is too hot.
Cold water
During the build for the steam turbine, somewhere around cycle 130, the colony ran out of cool water. As a result, our research stopped and we had to pivot quickly to sourcing food from non-water-consuming sources. If this happened to you earlier, a nice little trick is to build Ice Blocks in a little pool of the infinite hot water as a temporary fix.
Now that we’re done with our heat exchanger however, we can do away with manual ice blocks and use our new coolant loop:

We’ve piped in the hot water from our steam vent and have a sensor opening the liquid output vent when the pressure falls below 200kg per tile. This gives us a steady pool of 800kgs of water.
The two doors are closed by the logic when the temperature of the water rises above 18C. The left door just prevents dupes running in and picking up hot water to distribute it around the base.
The right door is a heat coupler. When a door opens, air rushes in to fill the void. This door is encased, so there’s no air to rush in, leaving a vacuum when the door is open. A vacuum is a perfect insulator and so when the door is open (because the temp is below 18C), it stops cooling. To this simple mechanism we’ve added a filter gate that delays the opening of the door until 30 seconds after the 18C tipping point; this prevents the doors from annoyingly opening and closing repeatedly.
With the power of our heat deleter loop and that simple logic we’ve set up an endless kiddy pool of cool water.
Steel
Before we breach the top of the map and begin working towards space, we need to start volume production of Steel (solid). Steel is used in the Bunker Door and Bunker Tile that is able to withstand the impacts of the meteor showers.
Using the Metal Refinery to smelt steel produces a lot of heat. Smelting steel will add over 93 million DTU to the coolant, enough to raise the temperature of the 400kg of polluted water by 56 degrees. Conveniently, we just finished building a heat deleter that converts heat to power.
Smelting something takes 40 seconds so that 93 million DTU works out to 2.34 million DTU/s. The steam turbine roughly converts 1000 DTU to 1 Watt. So the heat energy we get form smelting steel is worth about 2,300 Watt, and it only cost us the 1,200W of the smelter to produce.
Let’s relocate our smelter and connect it to the unused left loop:
We keep a Storage Bin next to the smelter with a low priority command for dupes to gather the input materials Iron (solid), Lime and Refined Carbon to make them easily accessible next to the machine. If we keep this fed, we’ll get lots of steel for space as well as heat energy for our turbine.
With a starting supply of steel, approximately 2 tonnes, we can break the final layer of abyssalite to the surface.
The surface
When approaching the surface there are two facts to be aware of and cater to:
- The surface is a vacuum and all gases will be sucked away from your asteroid and deleted if you don’t stop them.
- Shove Vole is a native critter to the surface that can tunnel through and eat just about any tile, they can be a real pain if they infiltrate the asteroid.
To cater to point (1) we build another liquid lock and we address point (2) with a single steel door to the surface breaching the abyssalite. Shove voles can’t dig through refined metals or abyssalite.
Below you can see this implemented. Note the temperature of the regolith from comet impacts. The steel door to the surface has been positioned so that when debris falls down through the door; it lands on abysalite with its zero heat transfer property; preventing the inner asteroid from being cooked.

By cycle 180 we have enough steel to start putting together a shield above our asteroid:

- The three highest 3 Bunker Tiles are at the top of the map. They’re there just to shield the pop-out point where dupes can climb up on top of the shield and run along to build it quickly.
- The shield itself will be made of Bunker Door, the role of bunker doors is to take the impact of the meteors.
- The first three bunker doors left of the ladder are powered and on a logic switch so they can be opened to allow the Telescope to see the sky.
- When the bunker doors open the hot Regolith is prevented from dropping on to the telescope by the Mesh Tile
- When the doors are open, the Telescope has clear vision of the sky. The telescope needs a clear view of the sky 11 tiles wide; the four tiles it occupies, 2 tiles to the right and 5 tiles to its left.
- The telescope is built on two doors in case any regolith lands here. The doors can be opened to let the regolith drop away and prevent heat damage to the telescope.
- Finally the Telescope needs to be fed with Oxygen (gas), use insulated gas pipe to send some up from your oxygen diffusers.
Once you have the telescope setup, your researcher can start identifying asteroids and other objects on the star map. You can see below the telescope provides us a lot of information about the object and its make-up. To finish analyzing the unknown parts of the object, we will have to fly a rocket there.

Aquatuner upgrade
Around cycle 180 I noticed that so much heat was being transferred into the exchange chamber of the heat deleter that the safety thermo sensor was turning off the aqua tuners to prevent them overheating. This was slowing down steel production.
Below we saved up 2400kg of steel and performed some quick surgery on the heat exchange chamber to remove the old aqua-tuners and replace them with steel versions that can get much hotter without damage. You should be able to open it up and close it without spilling a drop of oil or having any gas enter the chamber.
Once this was complete, we updated the oil temperature sensor to have ceiling of 210C. This is hot enough to have the turbine run at maximum power whilst also giving our aquatuners far more headroom to run.

Transit tube
You might be wondering why we haven’t used any of our plastic to give our dupes new beds or other fancy amenities. The reason we choose not to do this is because they currently don’t require the extra morale. What they do need is a faster way to the top of the asteroid.
You can see in the colony summary stats below that average travel time per dupe has crept up, particularly since reaching for the surface.

In the end-game guide we’re going to start spending a lot more time building rockets, solar panels and other builds on top of the asteroid. Your researcher is also burning a lot of time climbing the ladder already to the telescope. We’re going to prioritize using plastic on Transit Tube construction that will let the colony progress faster.
First we re-engineered the exit point of the base to fit the Transit Tube Access, it consumes almost 980W when running so we have it fed with its own private 1000W from a small Power Transformer above.

At the top of the asteroid, the transit tube simply dumps the dupes out. There is no return access point, the dupes can simply use the already existing Fire Pole to get down fast. We save a lot of power for now and can add in a return once we’re flush with power post solar panels.

Base update cycle 190
A few other quick small changes were done as we head towards end-game and rockets. First we got lucky with some slickster eggs being offered as a printable. They will be kept warm and consume all the CO2 in our power generation room.
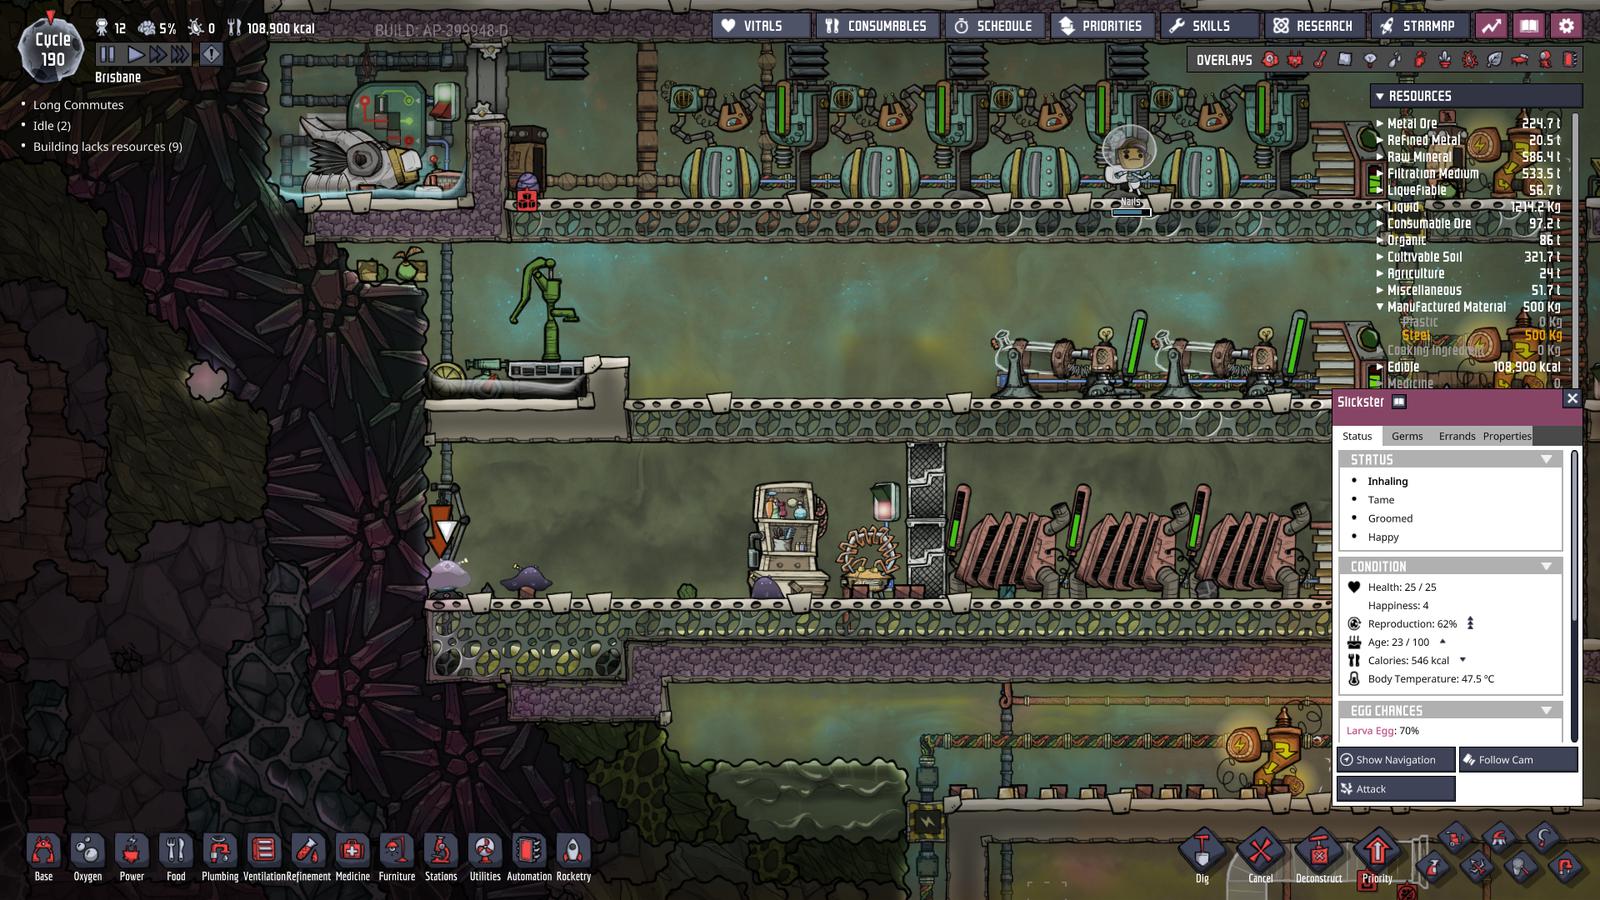
Second we added some simple logic to the bottom of our base to let CO2 fall out. If the sensor senses CO2 for 10 seconds then the Filter Gate lets the signal through to the Buffer Gate which opens to door at the bottom of the base for at least 1 minute. It’s sealed with airflow tile to prevent dupes getting their pathing confused.

We updated the water dispenser, it was a little too slow for our research so there’s now more transfer material between the cold pipes and the water.

Ready for end-game
At this point you’re ready for the end game. For these guides we define this period of the game as the construction of your first rocket, it’s arbitrary but that’s what we’ll be starting with in the Oni end-game Guide. Space is a fantastic section of the game and opens up new, more complex builds and the lure of exotic space borne materials.

Discussion, questions and feedback
Oni Assistant is a place for learning and sharing ideas. If you think this page could be improved please let us know. If fellow users have questions, please be kind and helpful in your answers.
If you like using Oni Assistant and want to give back, the best way is to link it on your forums and socials.
K
To save your bandwidth, comments don't load automatically. Click the button below to view and provide comments.
Show Comments