Introduction
Oxygen not included is an excellent game that challenges players through connected simulations where every action a player takes can have many different reactions. This guide is intended for players just starting out and looking to survive their first 50 cycles (days containing 600 seconds).
The game simulates many layers that each interact with one another (e.g. heat, pressure, germs, electricity, duplicants, morale, critters and many others). Much of the game’s enjoyment comes from discovering how these interact. Players are thoroughly encouraged to dive in and discover through trial and error, you will not be alone if even your 5th base does not survive to 200 cycles. This guide should however drastically improve your chances for surviving the early game and giving you a firm base from which to build and experiment.
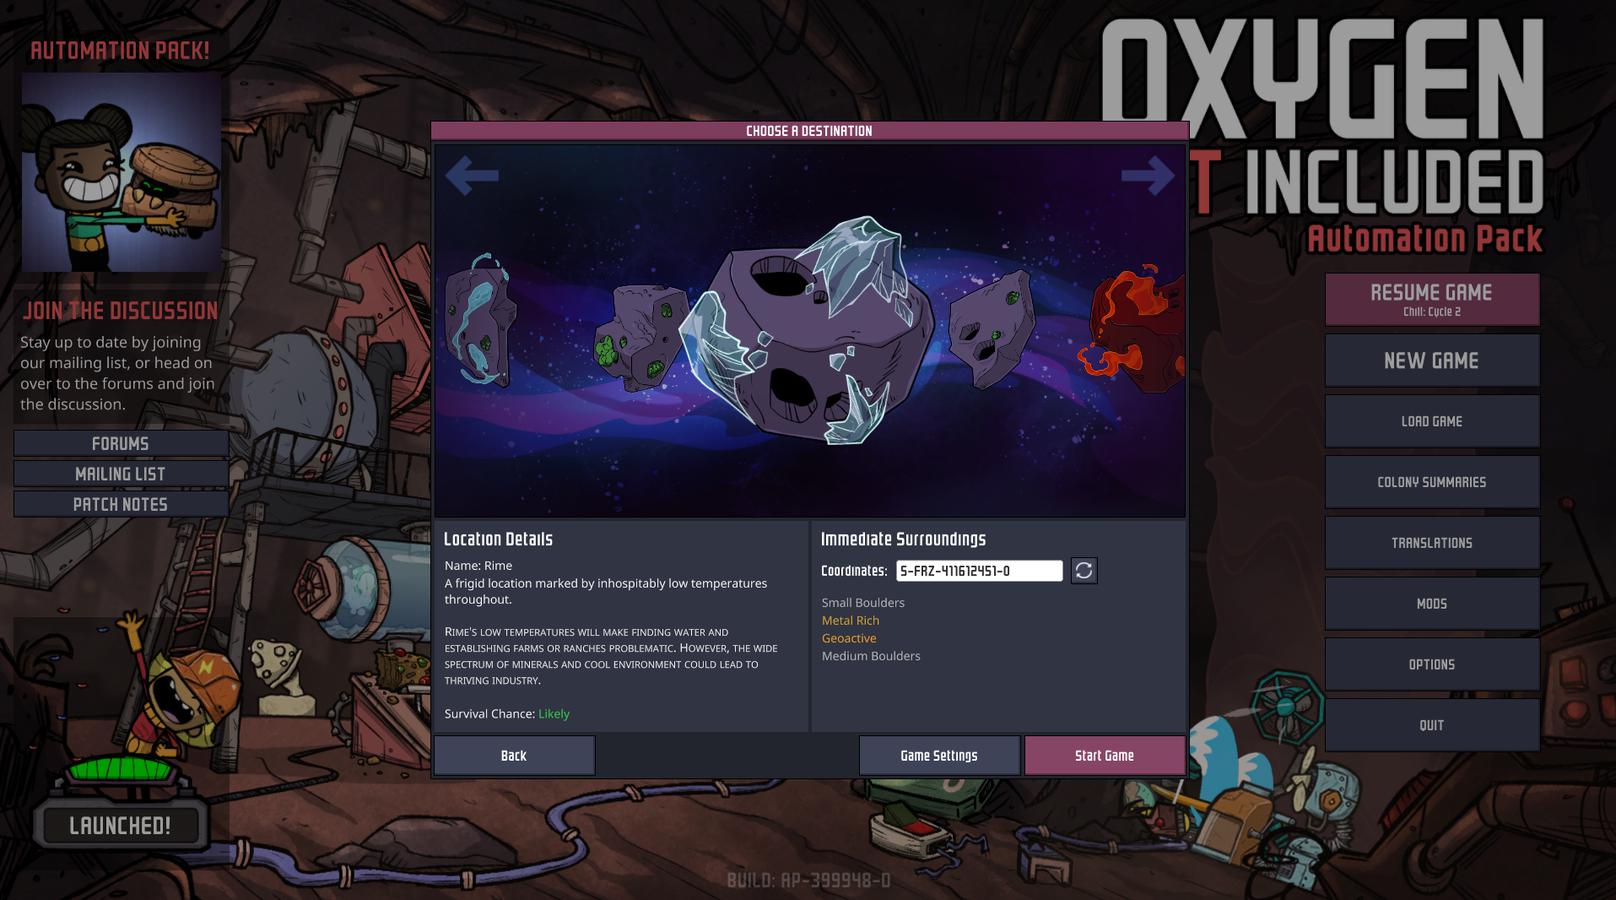
If you want to play along in the exact same world, the seed is shown in an image below.
We will cover:
- What not to do as a new player
- Asteroid selection
- Duplicant selection
- Base design
- Basic sanitation
- Sleeping
- Shifts
- Power (Manual)
- Early research
- Priorities
- Farming
- Skills
- Oxygen
- Housekeeping
- Automated power
- Preparing for midgame
What not to do as a new player
There are a few major points that should be highlighted upfront that can make the game overly challenging and lead to a quick colony death. For this reason we recommend new players:
- Do not start on a difficult asteroid (defined below)
- Do not accept duplicants with bad traits (defined below)
- Do not accept more than 8 duplicants by cycle 50 as rapidly expanding your population can strain resources
- Do not skill-up dupes until you have the colony morale to support the stress of the skill levels (detail below)
Stress and overpopulation are three significant causes of colony wipe-out and avoiding those four actions will go a long way to keeping your colony safe in the early game.
Asteroid selection
At the begining of a new survival game you must select an asteroid on which to play. For this guide we will be playing on Rime, however the first four asteroids (Terra, Oceania, and Rime) are perfectly survivable. I have selected Rime here because it happens to have the broadest selection of biomes within it and I personally enjoy the diversity. This start of this guide works best with Terra, Oceania and Rime because of the starting biome.
Along with the base asteroid, we can also roll and re-roll the world seed which changes the make-up of the world. Don’t ignore these asteroid traits, they can have significant effect on your game. For a beginner:
Avoid
- Magma Channels
- Miscalculated Pod Location
- Metal Poor
- Slime Moulds
- Geodormant
- Frozen Core
Prefer
- Metal Rich
- Geoactive
- Geodes
- Volcanoes
Inconsequential
- Buried Oil
- Large glaciers
- Boulders
- Subsurface Ocean
You can see the world seed selected here is both metal rich and geoactive, making resources a little more available. Boulders are largely inconsequential. In the long run the most powerful asteroid traits would be Geoactive and Volcanoes as both of these traits give rise to more infinite sources of resources.
Duplicant selection
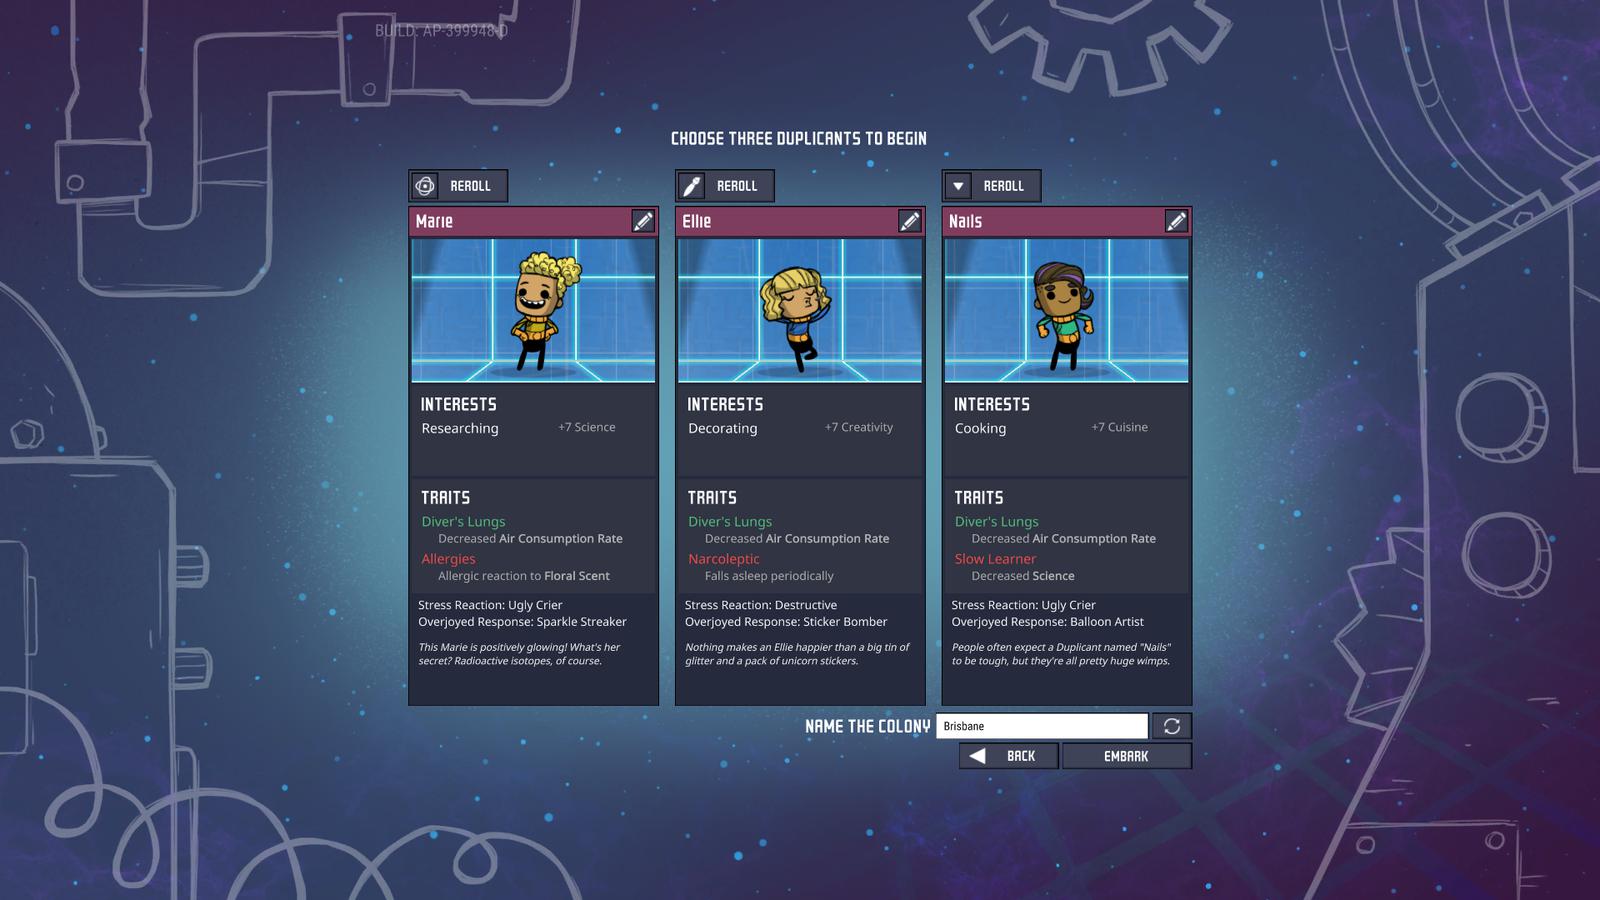
When you start the game, you are given 3 randomly selected duplicants (dupes) that each have their own set of traits. Whilst you will be able to add more duplicants later in your game, this first dupe selection opportunity is special since you can infinitely re-roll the dupes until you get “good” ones. This is a helpful mechanic for new players so lets discuss good and bad traits for your starting dupes.
Attributes
Attributes can be thought of the dupe’s skill level in various tasks. These can be leveled up during gameplay but having a head start in particular skills within your colony can be helpful.
Good attributes
In a loose order of priority, valuable attributes for a starting colony are:
- Science. Have at least one dupe strong in science. This skill is valuable for for research and advancing your colony’s technology. Because it affects how quickly your dupes learn, it is also generally a great attribute to have.
- Athletics and strength. Moving materials around your colony takes time and these traits rapidly speed that up.
- Excavation and construction. Building out your base requires a lot of excavation and construction, these skills speed that process up and some excavation skill is required to dig through harder rock.
Bad attributes
Generally there are no bad attributes, just attributes that offer little benefit in the early game:
- Machinery. This skill doesn’t apply well to early game survival.
- Husbandry. Husbandry is an enjoyable challenge and source of food, but an necessary complication for a starting base.
- Creativity. Creativity will become important later in the game where we will need an artist to produce artworks to keep our dupes happy as they skill up.
Traits
Traits modify your dupes and they are fixed for the life of the dupe (with only a minor exception). For this reason picking bad traits can be particularly damaging for a new player. Most traits simply increase attributes, but some have material, life-long effects on the dupe and the efficiency of the colony.
Good traits
- Divers lungs, significantly reduces the oxygen consumption of the dupe. This is the by far the most beneficial trait to have.
Bad traits
In a loose order of how undesirable the trait is, try to avoid all of these in your first three dupes, but in particular, never take a dupe with either of the first two:
- Mouth breather, significantly increases oxygen consumption.
- Bottomless stomach, significantly increases food consumption.
- Flatulent, a fun challenge and even an energy source for experienced players, generally though its just a pain for managing gases in your base.
- Anemic, dramatically slows the dupe down. The dupe can grow out of it through athletics, but it is a pain early on.
- Unconstructive, stops the dupe from building. Undesirable in your first three dupes.
- Trypophobia, stops the dupe from digging. Undesirable in your first three dupes.
Others are generally less harmful but be careful not make a silly match-up. E.g. if you’re selecting a dupe with high Learning to be your researcher, make sure it hasn’t got the Yokel trait and therefore can’t research.
Below you can see the dupes I have selected for this run through.
- Marie will be our researcher with her high science skill.
- Nails is our cook.
- Ellie will serve the role as Artist, she’s a our least helpful dupe for now but re-rolling was taking too long.
Base design
Having accepted your first three dupes, you start you game inside the center of the starting biome. As you build out your base in this center biome, having a structure in mind can keep things orderly going further into the game. We generally advise the below configuration of three columns of 16x4 spaces (excluding walls and floor) separated by a gap of 2 tiles to be used for transportation. This is not required, feel free to play freestyle, but after a few bases, you may find yourself tending to this structure anyway for the benefits that come later.

The location of water pockets will inhibit this to start. Be sure to leave a border two tiles thick of non-sand elements around water pockets to ensure the water pressure doesn’t burst through the walls. One other item you might not want to dig up are wild Bristle Blossom. Try build around them until you have a nice farm going. If you were trapped on a desert island, you wouldn’t cut down all the coconut trees would you?
Basic sanitation
From the second you start playing your dupes bladder’s start to fill. If bladders fill when there are no toilets to use, the dupe will urinate on the floor and spawn several liters of Polluted Water containing the food poisoning germ. Food poisoning spreads quickly on contact and will make your dupes sick and generally less productive.
In the image below I’ve built a one-way bathroom containing an Outhouse on the side of the base. Dupes can only enter/exit through one path. Upon exiting, they must pass by the Wash Basin. The arrow on the Wash Basin indicates that when a dupe passes the building in that direction, they must use the basin.

The Basin is important because using the Outhouse results in the dupe being covered in germs. Clicking the germ filter view in the top right of the screen gives a view of germs across the map. The below image is taken after the dupe used the Outhouse but before they have passed the basin.
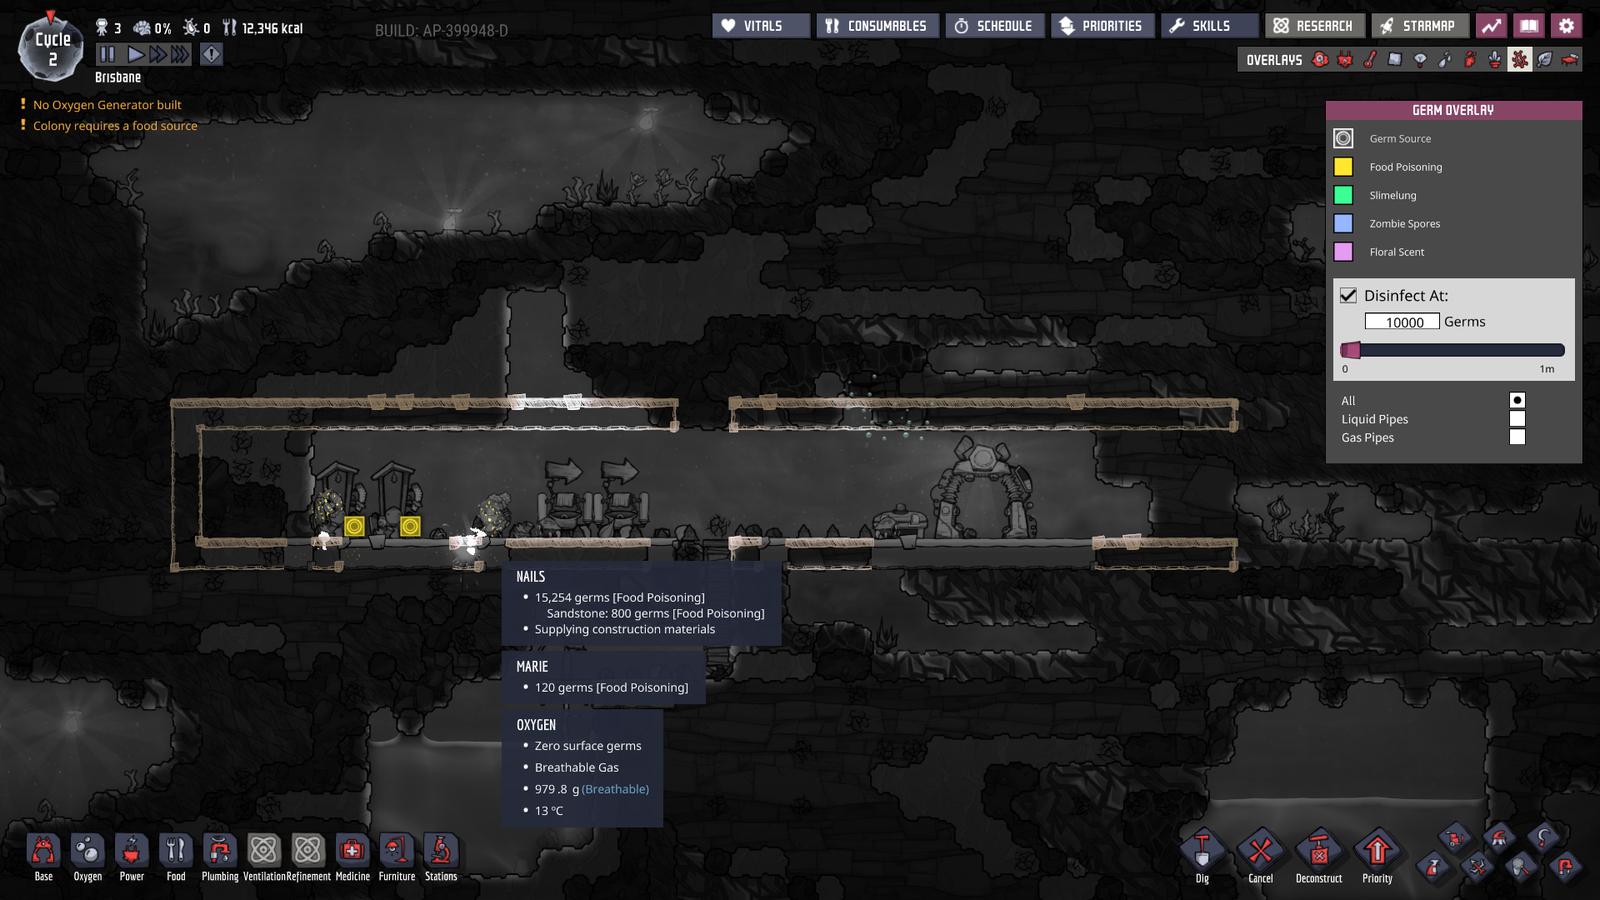
The basin requires Water, to supply this I’ve also dug to my nearest pocket of water and built a Pitcher Pump.
The room size we set up above is already useful as it gives us space for four basins and toilets in our bathroom. Two should be safe for a colony of this size. No dupe should have to wait too long for a free Outhouse. Importantly, you must have as many basins as outhouses. Dupes will not wait to use a basin, so if there isn’t one free after using the outhouse, a dupe will walk out the room and spread germs throughout your colony.
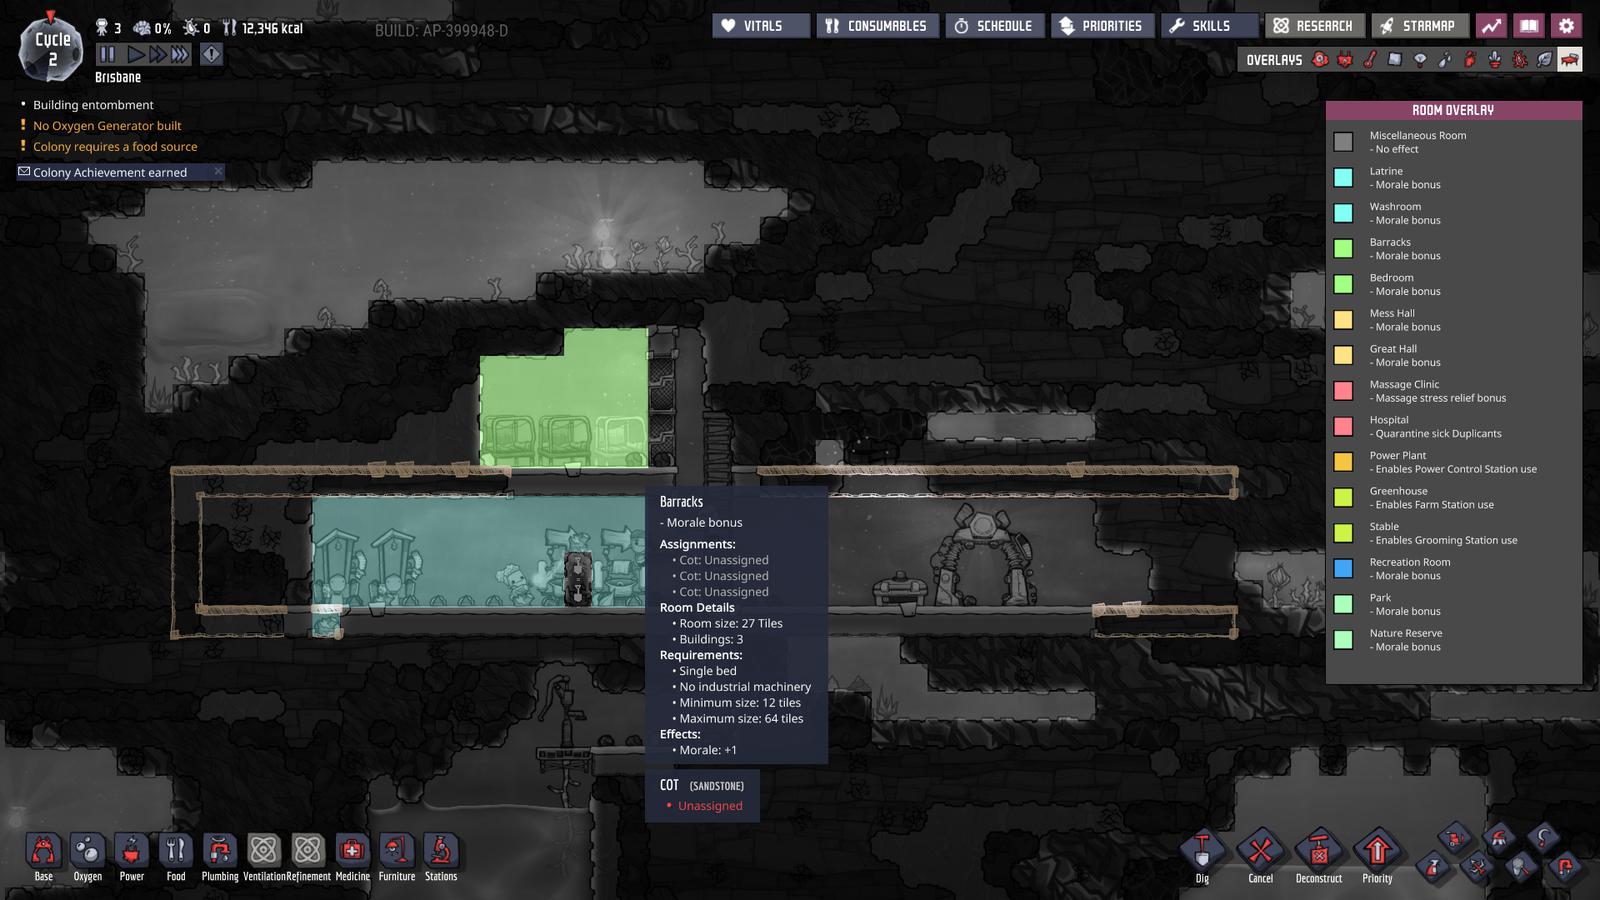
Speaking of rooms. Clicking on the room overlay icon in the top right of the screen will give the following view if you have an enclosed space fulfilling the necessary requirements. We have built a Latrine room. Rooms give bonuses, its important to occasionally check the room overlay to confirm your renovations have not broken a room. These bonuses become increasingly important to dupe morale as you play.
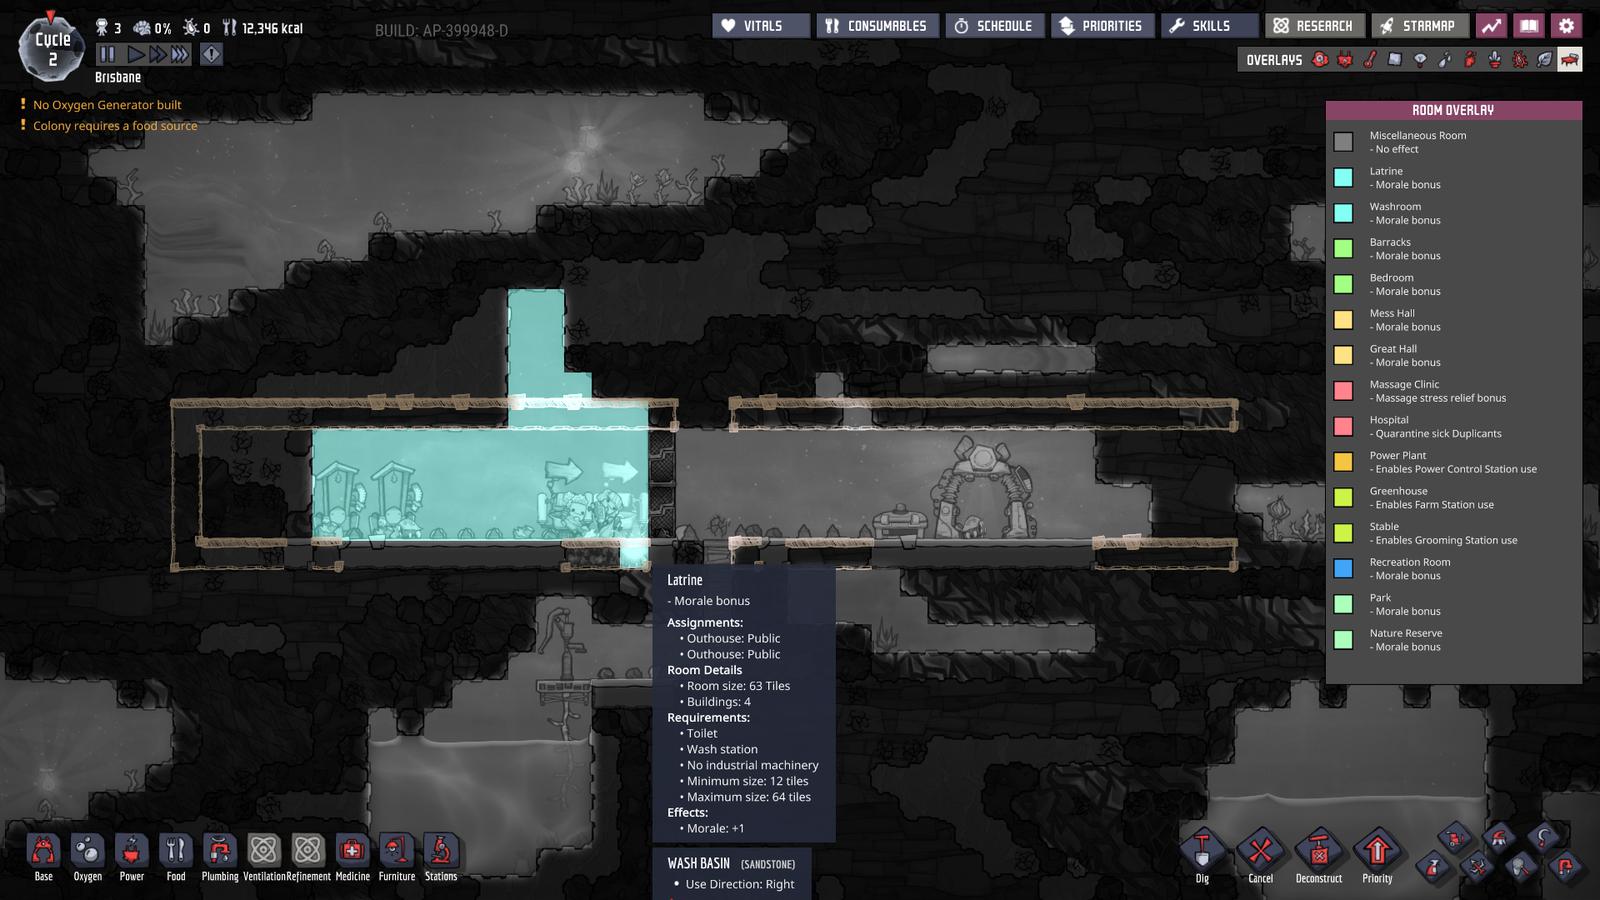
Note that I have used a cheap Pneumatic Door and set it to always open. To have a room you need to enclose it fully, but open doors still count toward enclosing a room. Having the doors closed would just slow your dupes down if each of them is opening and closing 20 doors or more per cycle. Building these doors will require Copper Ore so dig towards some.
To promote airflow through the base I’ve also used a closed door as a wall. Later we will get tiles that serve the same purpose, but a pneumatic door is fine.
Sleeping
Sleeping on the ground gives your dupes a sore back and slows them down (-1 athletics). Let’s not have have our dupes sleeping on the ground.
In the image below you can see I’ve set up a sleeping room above my central room. The location is not critical, but having the bedrooms higher helps make sure your dupes are not sleeping in the own carbon dioxide but instead nice oxygen (Oxygen (Gas) is lighter than Carbon Dioxide (Gas) so works its way up). If you do build above, connect the two floors using ladder in one of the two spaces we’ve reserved between our rooms (We’ll use the other space for fire poles later that help dupes move down fast).

If you enclose the room and fulfill the requirements, you’ll also give your dupes a room bonus from sleeping in a Barracks.
Shifts
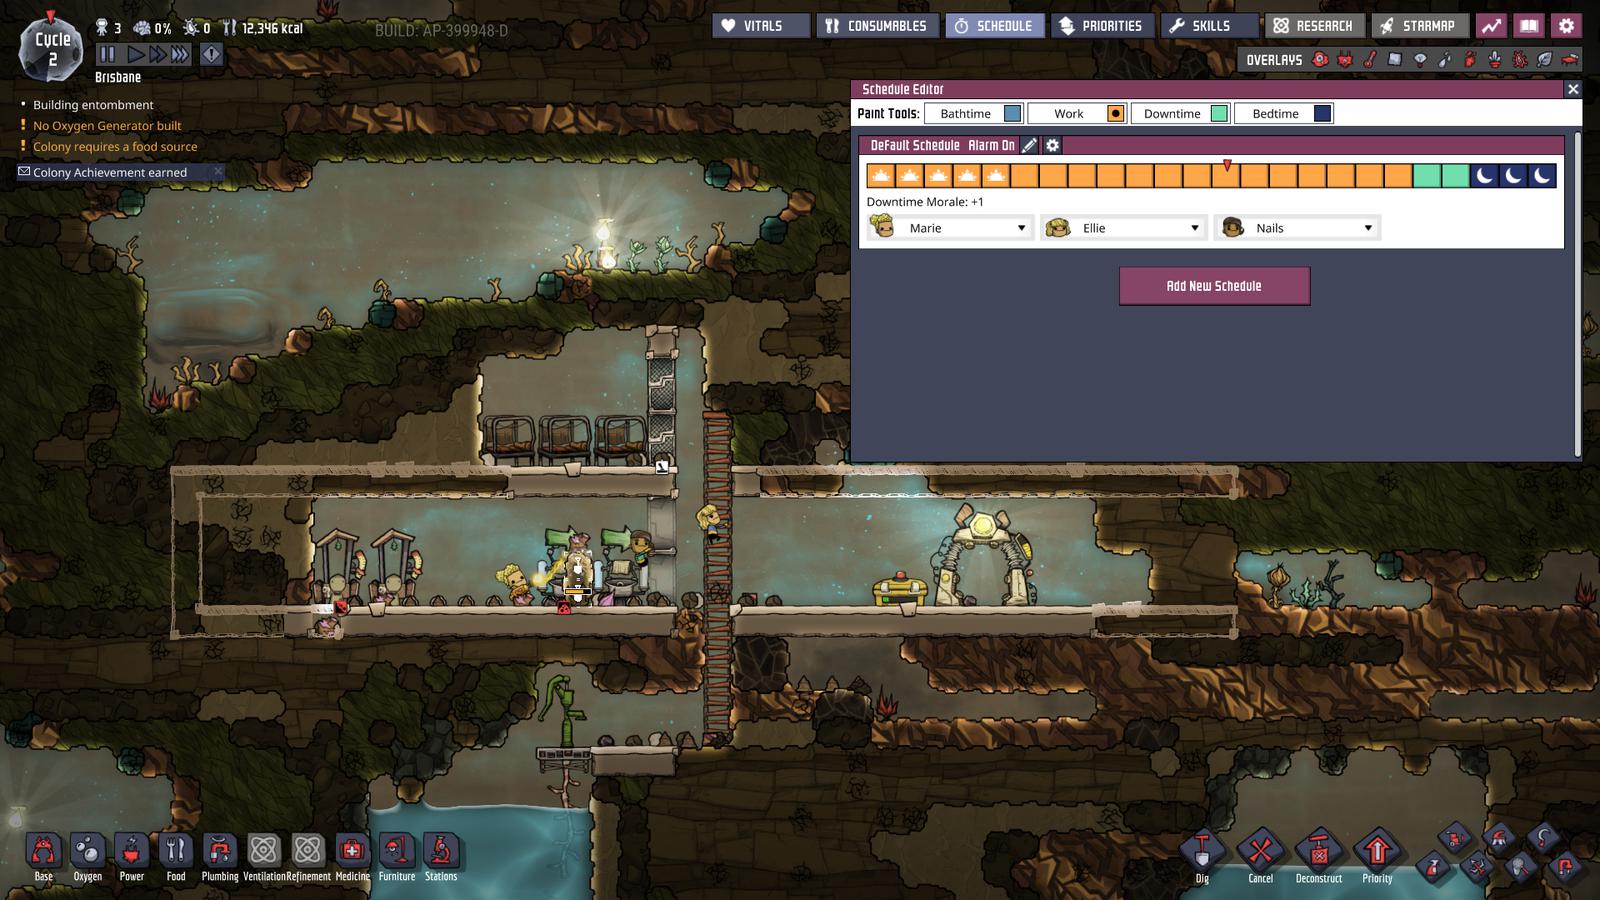
Clicking the clock in the top left of the screen gives you the following view of your shift arrangement. Shift are important because:
- Dupes get a morale bonus equal to the length of the dupe’s “Downtime” minus 1.
- As your colony grows, you can put packs of dupes on different shifts. This prevents bathroom crowding and stalls in your progression when all dupes are asleep.
Because dupes can go to the toilet during “Downtime”, it’s typically best to remove bathroom time and extend “Downtime”. For now though I won’t impact the colony’s output since we don’t need the extra morale right now and keep them at only 2 downtime slots.
Power
We want to start researching some new tech, but to do that, we need power. Our only source of power to start is the Manual Generator. It has to have a dupe running on it it order to generate power. We don’t want to have a dupe running every time we want to use electronics so we also want to build a Battery to store power. In the image below you can see I’ve built the generator and connected them both using Wire to the Research Station.

A note on wires, they have a negative Decor effect. It’s best to build them behind walls and floors to hide them and the negative Decor effect. We won’t go into depth on Decor, but generally you should try hide things with negative Decor so your dupes are not upset by unpleasant working environments. You can click on the decor overlay in the top right to see the good and bad decor in your base.
With our first power circuit built, we’re now ready to put our research duplicate to work.
Early Research
Our dupes have toilets and a place to sleep, our next priority is feeding them. For that we need to research some new tech. As a first step we will research Basic Farming, this will unlock important tech for feeding our dupes. As a general guide, the below research order is helpful for a new base:
- Basic Farming
- Advanced research (setting up for other research)
- Sound amplifiers (for smart battery and coal generator)
- Brute force refinement (quick refined metals for battery)
- Smart home (automating power generation)
Priorities
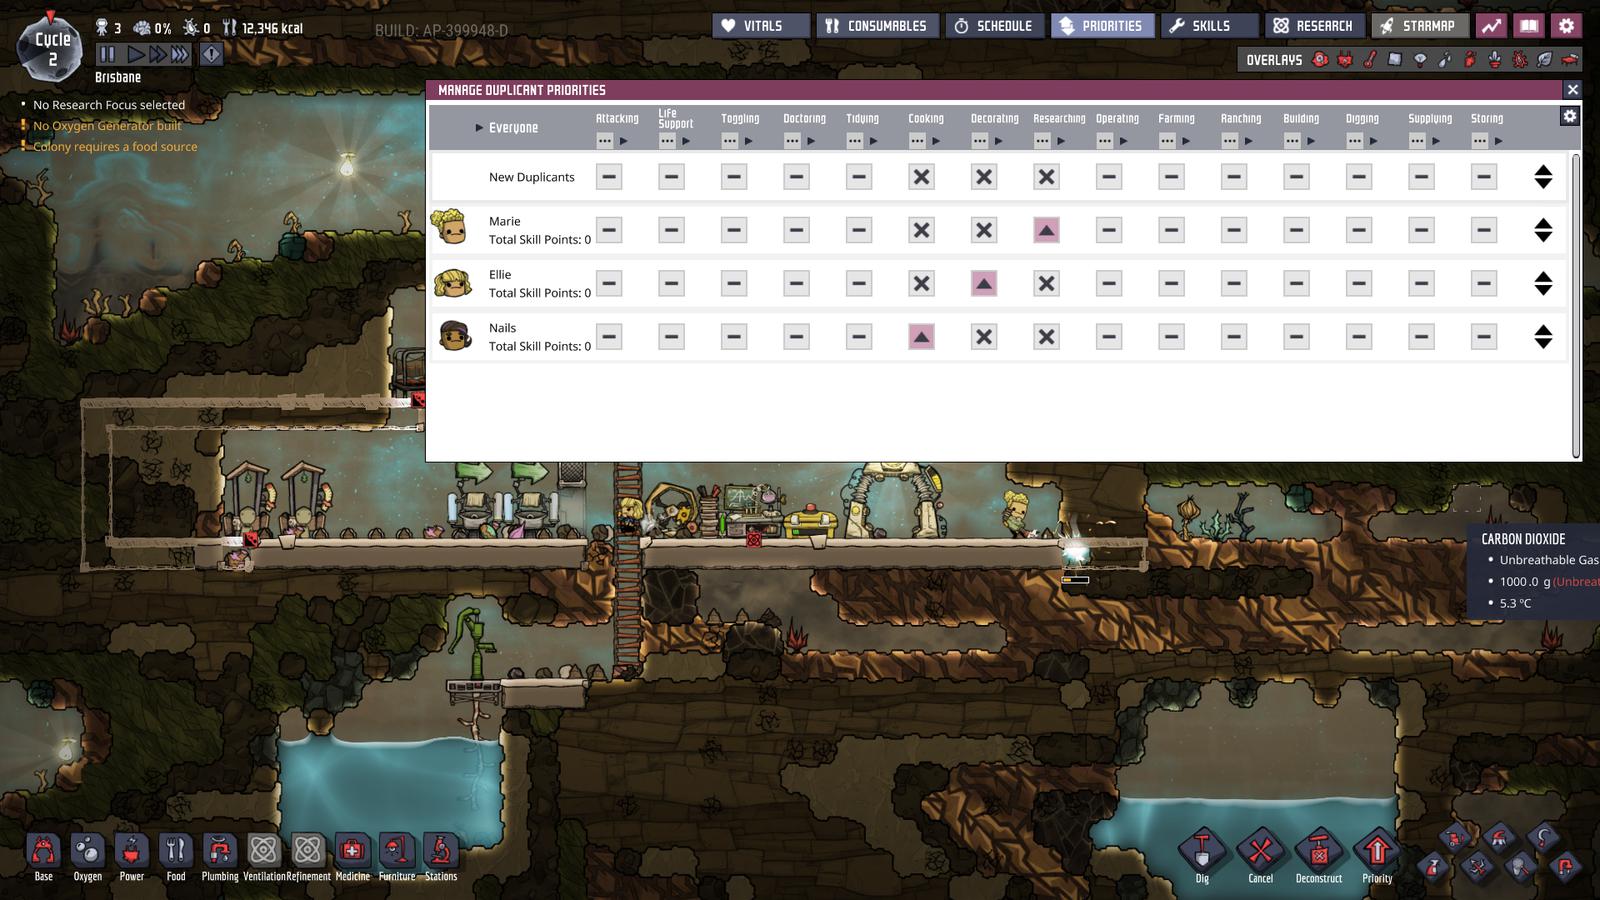
We want to make sure our research dupe with her high learning skill is the only dupe working the research station. Anyone else would research slower, consume more materials and generally slow our progress. To control who does what tasks with higher priority the game gives us a priorities tab in the top right.
You can see below that I have de-selected all existing and potential new dupes from ever performing research. Further, I have increased Marie’s priority for the research task to help make sure she researches before doing other jobs.
This priority panel is the first layer of priorities. Marie for example will now always do any research task before doing other tasks. To help her decide which of all the other tasks to do first there is a second layer of priorities you can assign to objects, buildings etc.
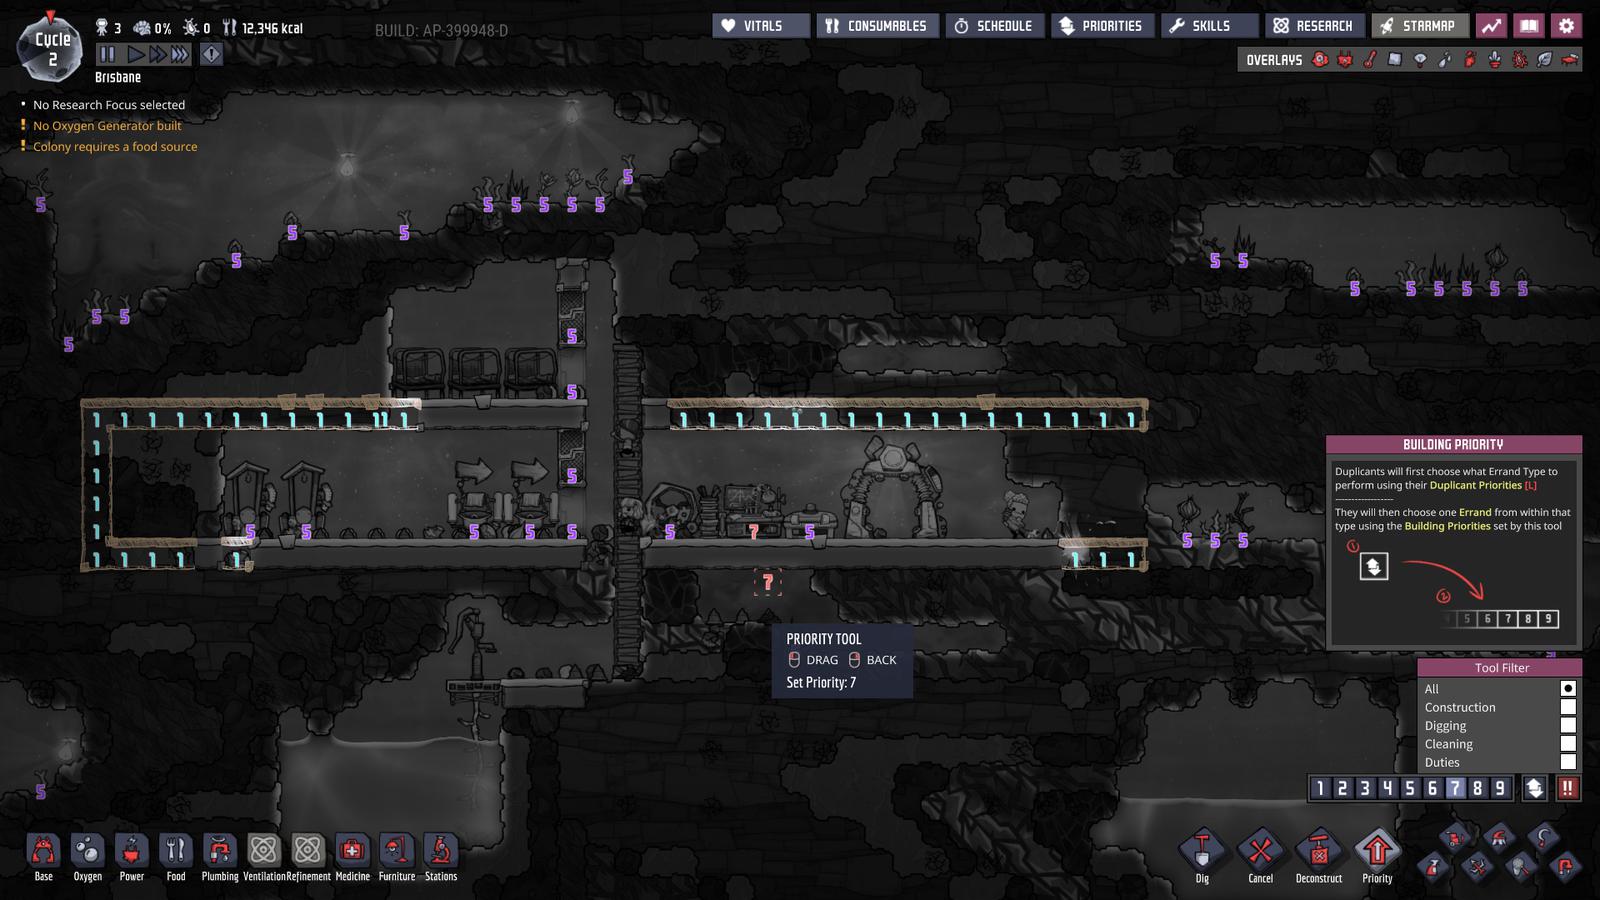
You can see below I have assigned the research station a priority of 7. This does nothing for Marie since from the priorities tab, she will always do research before anything else. However all other dupes will now supply the research station with water before other tasks, help keep research flowing.
Just keep this two tier method of prioritizing in mind. First a dupe will do the most important thing from the priorities window; if there are multiple things to do then they will use the priorities you assign in the coloured priorities overlay to order them.
Whilst your other dupes wait on your researcher, they can begin digging out a farming room.
Farming
In the top left of your screen are some vital metrics for your colony. We can see at a glance:
- How many cycles we have survived
- The number of dupes we have
- Our dupes stress levels (helped to be low by our barracks building efforts)
- The number of dupes we have sick (helped to be low by our latrine building efforts)
- The amount of food we have stored in calories.
We haven’t addressed point 5 yet and the initial food we started the game with will eventually run out. Once your dupes run out of food, death will follow very fast, so lets build a farm with the new tech we researched.
Your first farm can be a crop of Mealwood in order to grow meal lice. The database entry for Meal Lice shows it takes 3 cycles to be produced and contains 600kcal. You can also see that two can be used at the Microbe Musher in order to produce Liceloaf, which has higher quality and total kcal of 1700. On average then, each Mealwood produces 1700kcal/2 lice/3 cycles = 280kcal/cycle.
A normal dupe requires 1000kcal per day, so some loose math suggests 4 plants for each dupe. Oni Assistant has put together the Oni Food Calculator for you to help calculate the farm size for this and other crops give your colony size.
You will see buried objects in the tiles of your starting area, these may contain Muckroot among other things so keep in mind there is some emergency buried reserves if things get dire.
Below you can see our base updated with the beginning of a farming room and microbe musher to process the meal lice.

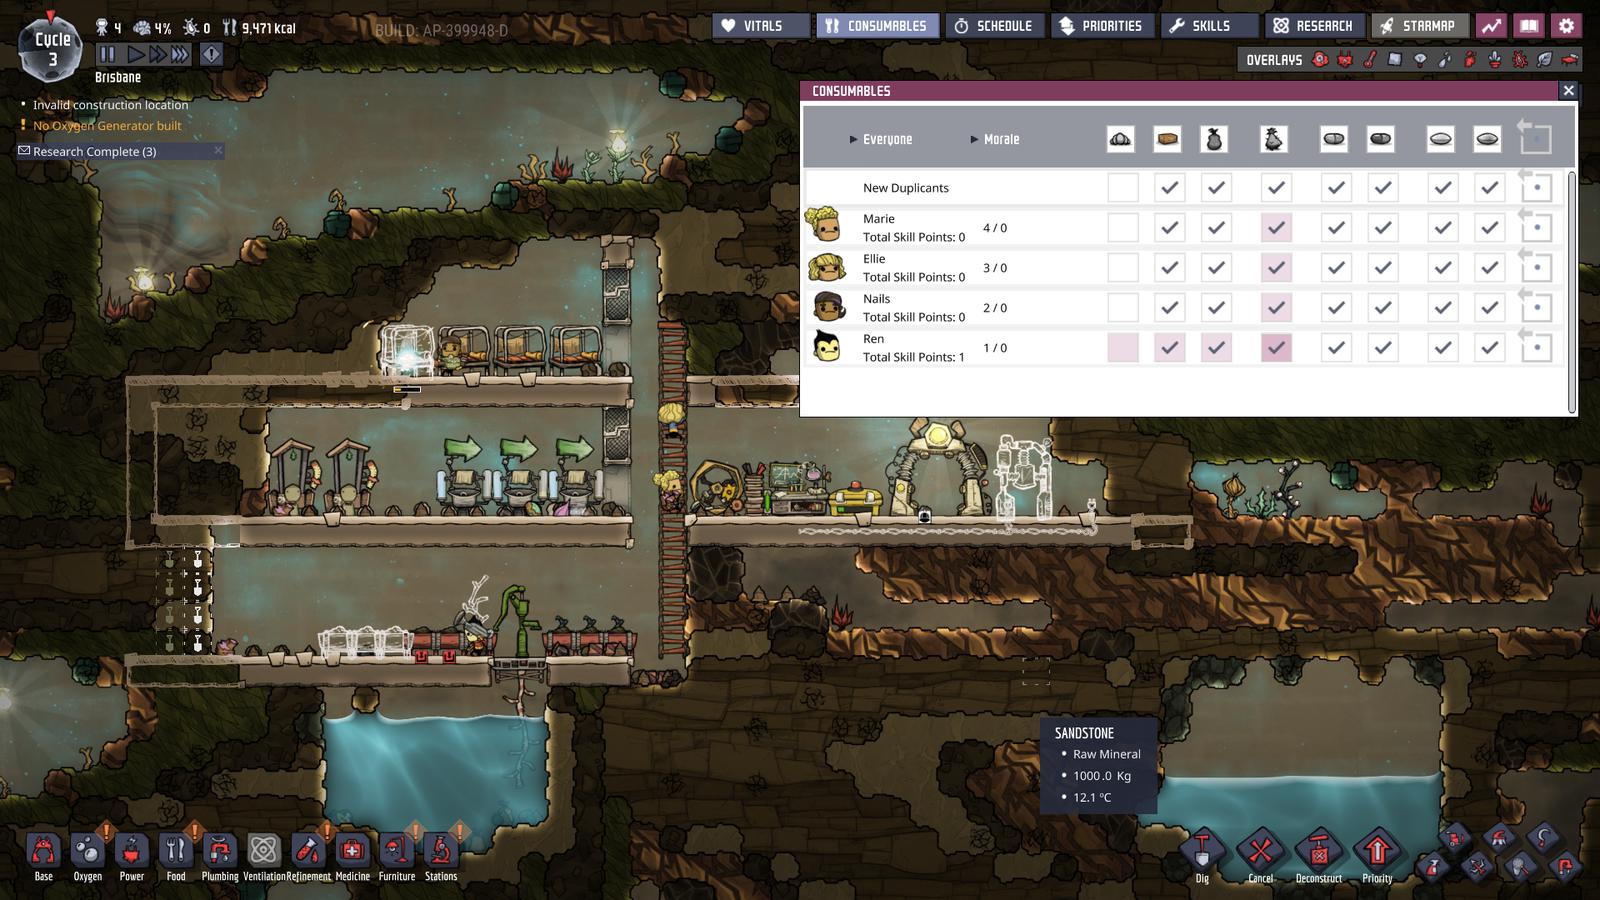
A note on consumables. Because we want to maximize the benefits of our Meal Lice by cooking it into Liceloaf, we want to make sure none of our dupes eat the Meal Lice. You can disable dupes ability to consume this food using the consumables screen:
Skills
A quick note on skills as you duplicants may soon start earning their first skill points. Clicking the skills button in the top right of the screen will bring you to the below menu where you can assign any skill points a dupe has earned. Skill points are earned quickly at first but take longer as the game continues.
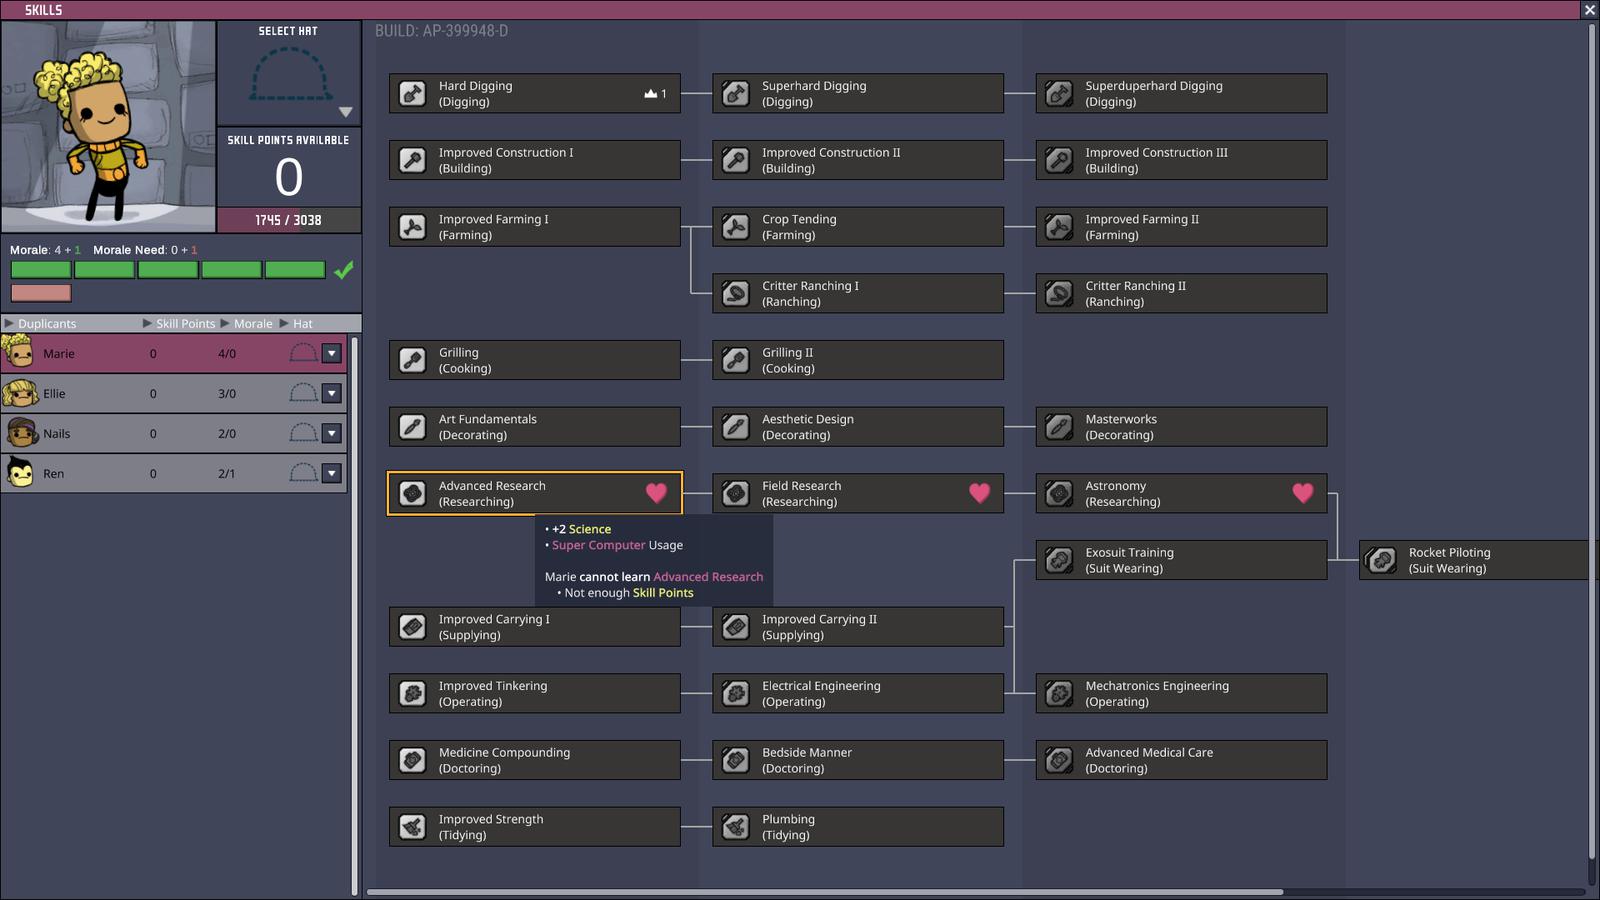
However the real limiting factor is the morale required to support higher level skills. Skilling someone up past the level of morale your base is providing will eventually result in a stress out for that dupe and a probable downward spiral for your base. For this reason, picking dupes with interests (resulting in the pink hearts seen above) that reduces the morale cost of that skill and allows for more skilled dupes in the long run.
Oxygen
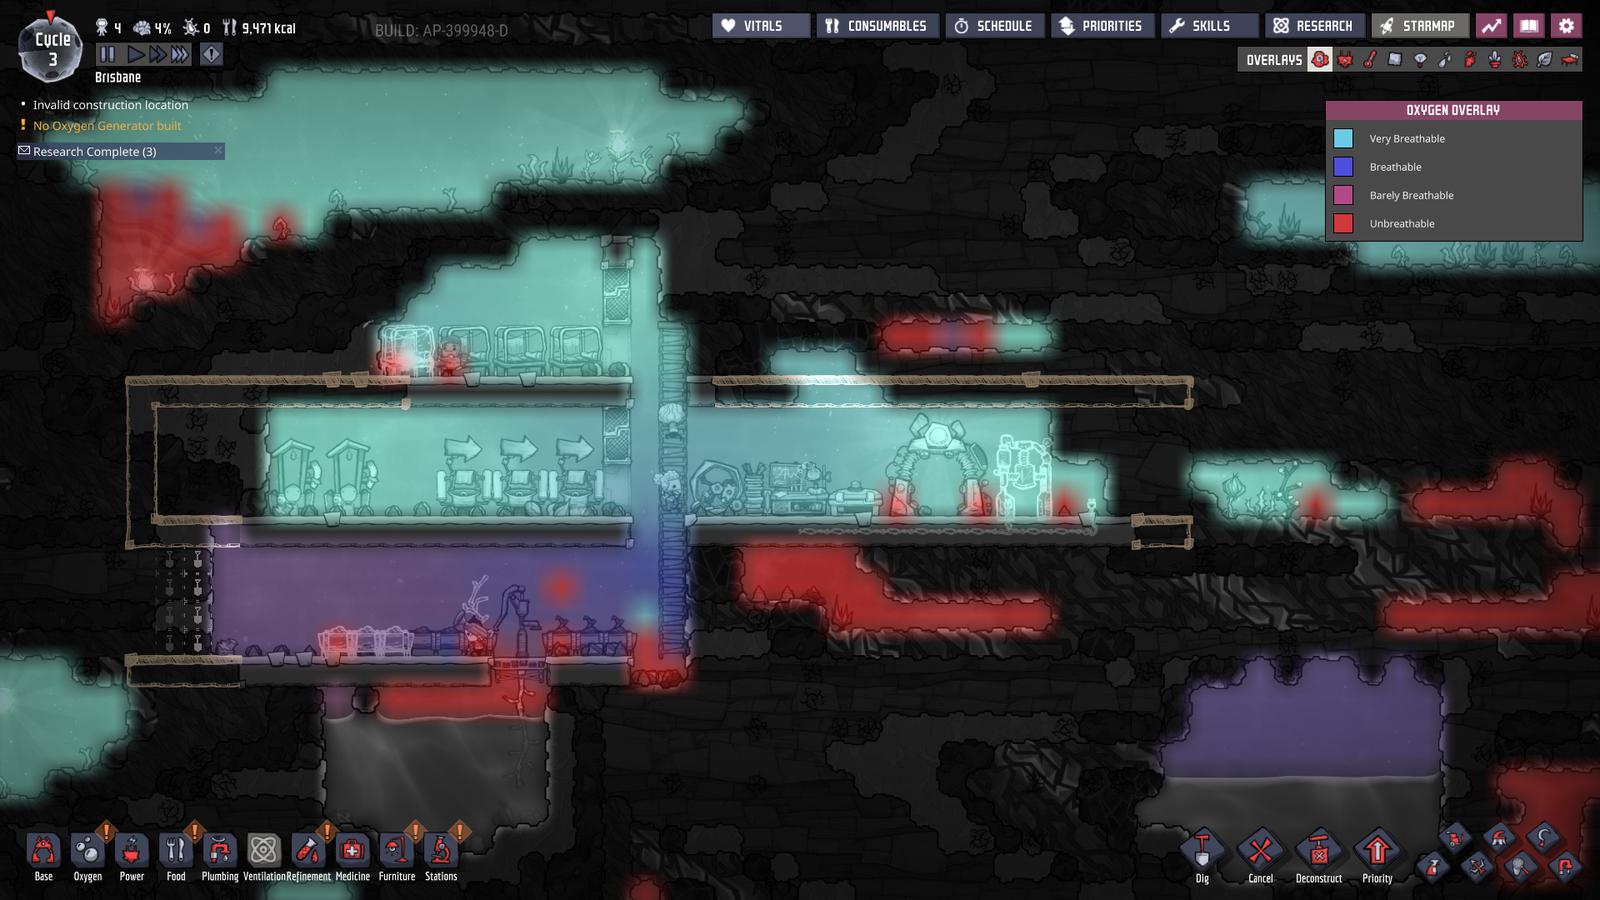
At this point our oxygen is running a little low. In the screenshot below I’ve used the Oxygen Overlay in the top right of the screen to show that the oxygen pressure is getting a little low. Low oxygen stresses dupes and stressed dupes will go out of control and risk a base wipe-out. Let’s add of oxygen production.
Below you can see I’ve added two sources of oxygen:
- Oxygen Diffuser. This item consumes electricity and algae to produce Oxygen. You can follow the link to see specifically how much.
- Algae Terrarium. This plant consumes CO2, algae and water to produce Oxygen. The plant is built low in our base as this is where the C02 sinks to.
THe diffuser will automatically shut off when pressure around it is 1800g per tile. The terrarium however will happily keep producing oxygen as long as there’s water, CO2 and algae. Keep this in mind as it is possible to over-pressure your base and pop your dupes eardrums, however with a couple terrariums this risk is low.
Looking at the database entry for Oxygen (Gas) you can see that a normal duplicant requires 100g/s, whilst the diffuser outputs 500g/s on its own. So just the diffuser on its own is good enough for 5 normal dupes, 500/75 = 6.6 dupes with divers lungs.

Housekeeping
At this point your base is in good shape. You have food, water, oxygen, electricity, sanitation and sleep all under control. Whilst we have a lot of algae and water near us, they are finite, we we will want to move onto better methods for sourcing our water and oxygen in the future.
Additionally, our power is very manual at the moment and consumes a lot of dupe time via running on the manual generator. Our researcher is working towards a coal generator combined with tech from “Smart home” research that will allow us to automate power. It will take some time to do all this research so now is a good time to have the other dupes work on preparing the base a little, a few comments on the image of our progress below:
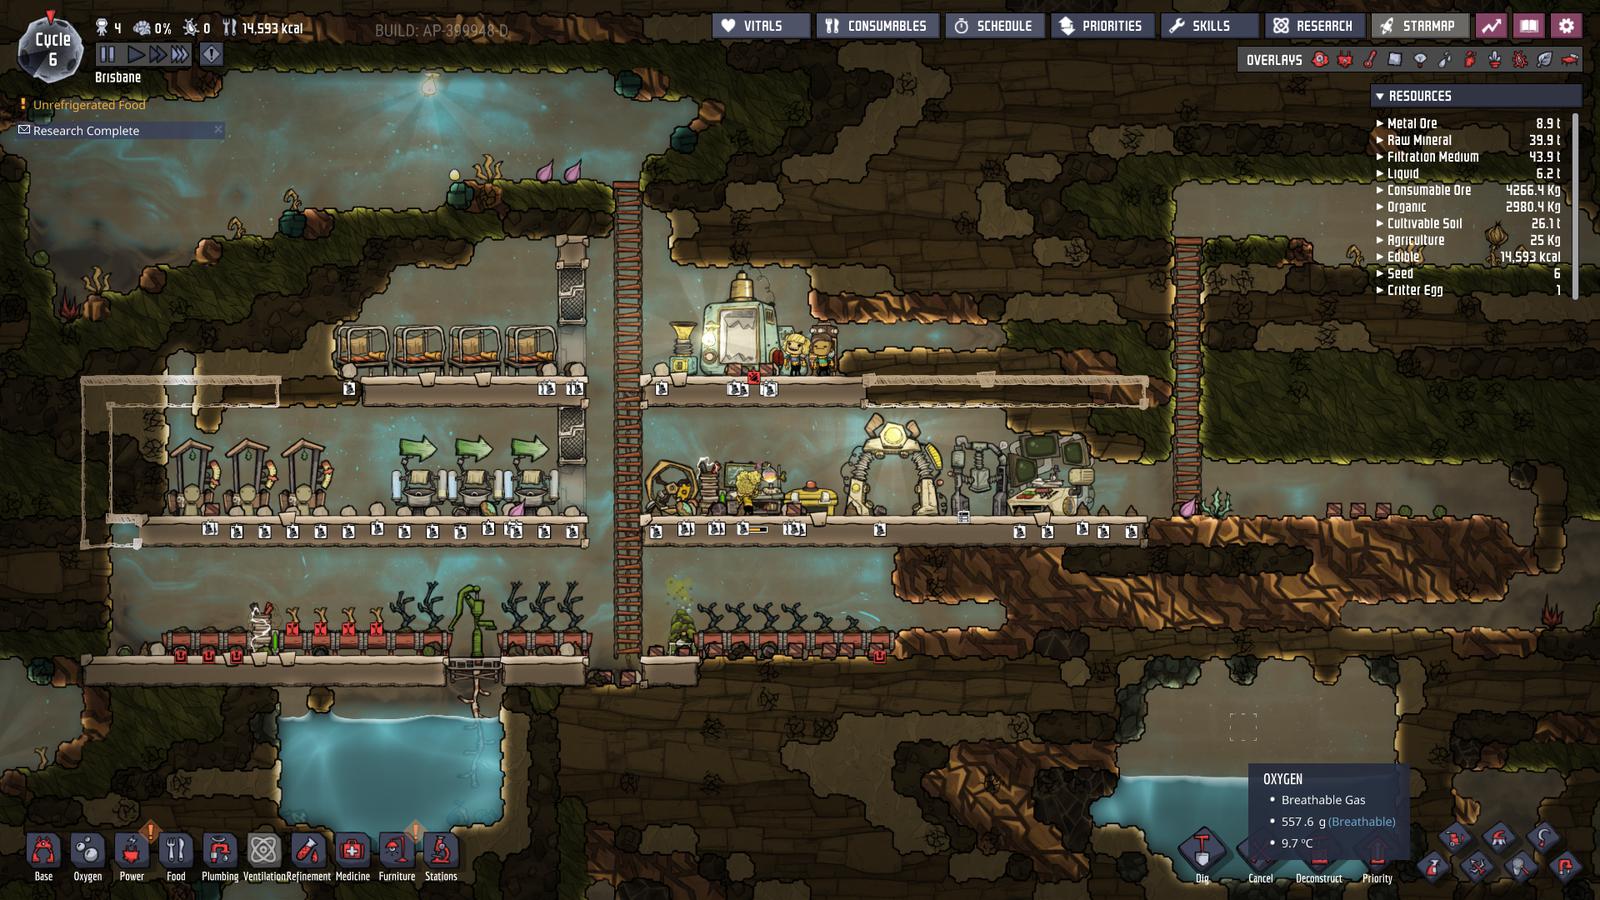
- There are some low priority (4) sweep commands set-up. These make sure the dupes have something to do. We want to sweep up debris from high traffic areas since debris has a negative decor effect.
- We’ve added an extra bed for a 4th dupe.
- Note that we aren’t digging out any more than necessary. Your base’s oxygen will rush in to fill the space of any tile you dig out, reducing pressure. The oxygen diffuser and algae terrarium will need to run longer to make up for this, consuming more resources and dupe time.
- We’ve built the Super Computer unlocked from “Advanced Research”. We need this for tier 3 research.
- We’ve built the [Rock Granulator] unlocked from “Brute Force Refinement”. We will need this to build our automated power project.
Note also that I am on cycle 6 but still only have 4 dupes despite the printing pod providing new dupes every three cycles. I throughly encourage you to be picky with your dupes and select only good dupes (refer to Duplicant selection). There’s no rush to accept dupes, a good base will run for hundreds of cycles and give you plenty of opportunities to accept good dupes.
Automated power
So we’ve rushed to researching Sound amplifiers and Smart Home, giving us all the tech we need to automate power production. With the rock granulator we can run 5 orders of refining 100kg of Iron Ore into 50kg of Iron (Solid), giving us 250kg of iron; enough to build a simple automated power arrangement:
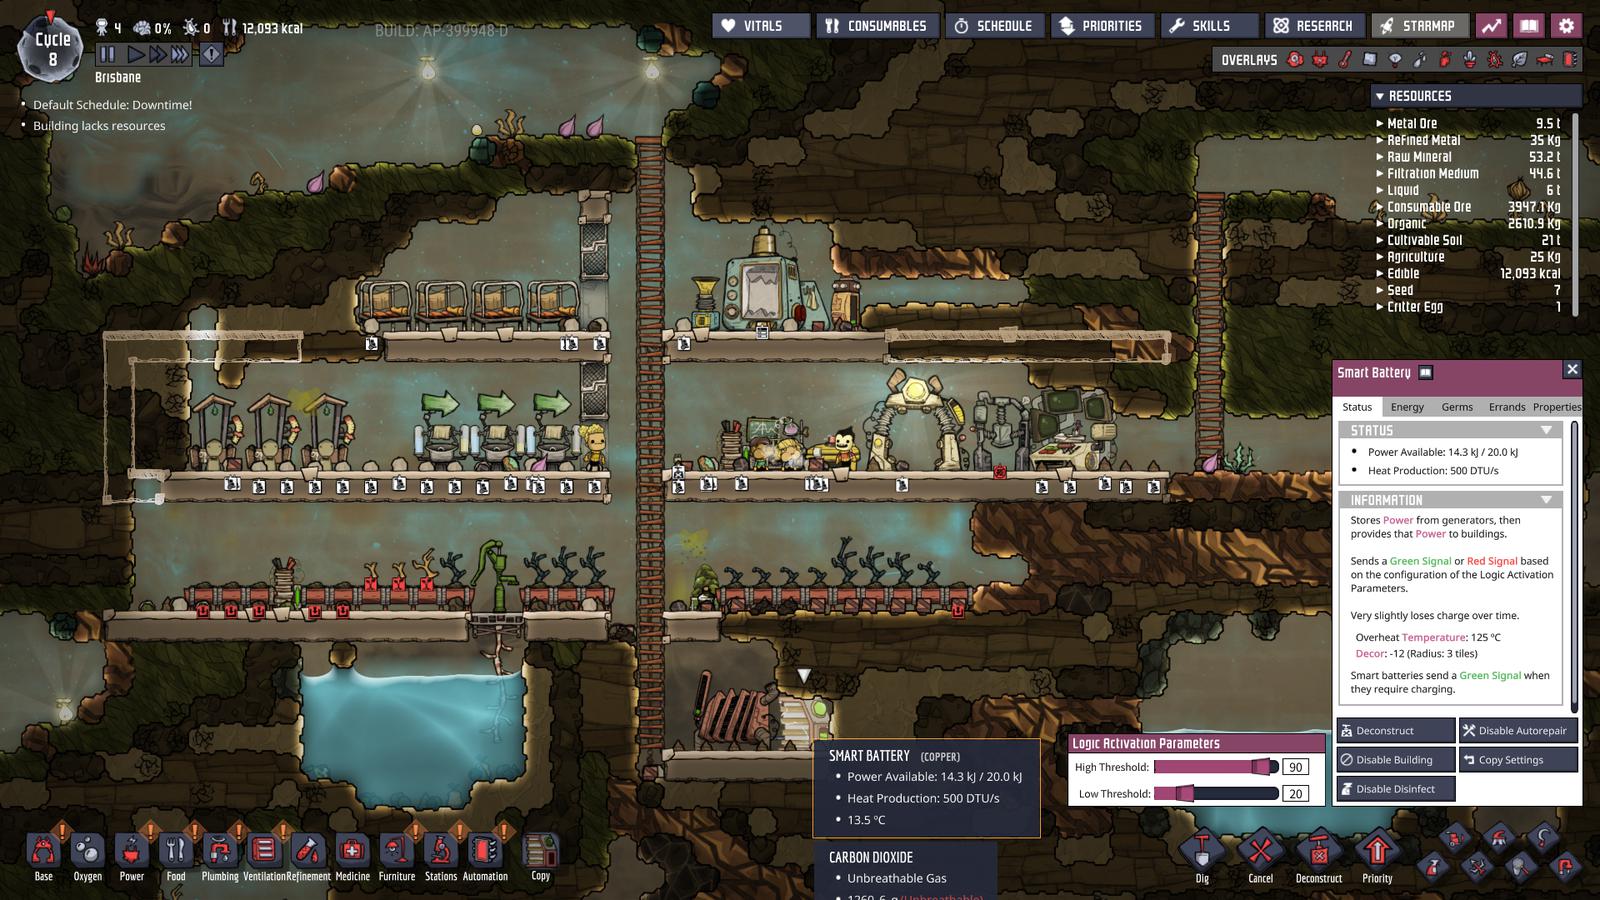
A few points on this simple design:
- The Smart Battery has an automation output that we have connected to the coal generator with Automation Wire.
- The battery is set up to turn off the Coal Generator when its charge reaches 90%, once the battery charge falls back down to 20% it will turn the generator back on.
- The generator is built at the bottom of our base, it will generate a lot of Carbon Dioxide (Gas) that can stay low.
- Immediately after building the new automated power system I deconstructed the small battery, the extra storage wasn’t worth the slight power loss and heat output of the battery.
Now our power is largely automated, dupes only need to infrequently add more coal.
Preparing for midgame
At this point you’re probably around cycle 10 and the base is in a condition that it could survive quite happily for at least another 50 cycles. To help make sure that happens though there are a couple further projects we can get done quickly:
-
The Algae Terrariums are outputting Polluted Water which sublimates into Polluted Oxygen, this stuff multiplies the Slimelung germ. Luckily we haven’t dug into the Slime biome yet, so we’re safe from that. But we should still remove this polluted oxygen. Tunnel your researcher toward “Decontamination” in order to unlock the Deodorizer. Building one of these near your terrariums will suffice.
-
Check the rooms overlay and look at what is required to build a “Mess Hall”. Carve out a room fulfilling those requirements and your dupes will have a nice place to eat and get a morale boost. To build the Mess Table you will need to research “Meal Preparation”.
-
There’s a small compost area set up for dealing with the waste from the toilets. Importantly it has its own one-way basin set up to manage germs.
-
Food storage. Below the new Mess Hall I’ve built a simple food storage room. This room is designed to catch CO2. CO2 is an Unbreathable Gas and therefore food won’t decay when stored in it, unlike the Oxygen elsewhere in our base. Because CO2 is a heavy gas, it will sink and fill up our food storage room.
-
Expanding sanitation and food. If you are lucky with dupes, continue expanding the toilet and farm solutions.

Now your base is looking pretty good and ready to survive the next 50 cycles pretty safely. Given you’re probably only at cycle 15-20 at this point, check out the Oni Mid-game Guide to see what your priorities are for the remaining 50 cycles.
Discussion, questions and feedback
Oni Assistant is a place for learning and sharing ideas. If you think this page could be improved please let us know. If fellow users have questions, please be kind and helpful in your answers.
If you like using Oni Assistant and want to give back, the best way is to link it on your forums and socials.
K
To save your bandwidth, comments don't load automatically. Click the button below to view and provide comments.
Show Comments