Introduction
Welcome to the end-game guide for Oxygen Not Included. We’ll be picking up where we ended the Oni Late-game Guide on cycle 190 so check back there if you need an update on where we left-off.
It’s an arbitrary distinction, but we define end-game as starting from the point you build your first rocket. Oni is a fantastic, open-ended game and you should feel free to experiment outside of the steps shown in this guide. These guides only seek to give players a solid foundation for their colony on which they can experiment and enjoy the game freely.
Here are our major goals for this end-game guide:
- Launching our first rocket
- Liquefying oxygen and hydrogen
- Solar power
- End-game food
As usual, these are only the major goals. The chapters in this guide are as follows:
- Heat transfer in Oni
- Building in space
- Steam box
- Our first rocket launch
- End-game resource value
- Exploring your asteroid
- The solid booster
- Petrol engine
- Base update cycle 250
- Liquid hydrogen and oxygen
- Finished with the end game?
- Capping volcanoes and digging vacuums
- Precision heat exchanger
- Solar Power
- Power Management
- Dupe time optimization
- Automating sleet wheat & pincha pepper
- Base update cycle 400
Heat transfer in Oni
Having made it to the end-game guide you’ve obviously been able to wrap your head around the complex interactions going on in this game. To empower you going forward and prepare for space construction, I want to offer a little more detail on heat transfer in Oni. Heat transfer in Oni is surprisingly complex with a lot of special cases and exceptions. One key nugget of information is that heat transfer doesn’t happen between all things in Oni, only specific entities, these are:
- Tiles to tiles
- Buildings in tiles
- Debris on a tile
- Debris in a tile
- Pipes to contents
The most important takeaway is: all temperature transfer in Oni must go through the element in a tile.
Whether that tile is a gas, liquid or solid (including constructed tile); all heat energy must path through that. There is no building to building transfer for example, so for a pipe running behind a hot machine, there will be zero energy transfer directly between the two buildings. All heat energy has to go through tiles.
Taking an example where we are cooling our polymer press with cold oil, the heat is only flowing indirectly through the tile:
Polymer press (building) > Gas (tile) > pipes (building) > oil (pipe contents)

If however there is no gas, liquid or solid in the tile with which to conduct energy; then no energy can be transferred. If our polymer press room was a vacuum with no gas in it, then no matter how cold the oil was and how hot the press was, no heat could be transferred. If you want to dive deeper into the rabbit hole and enjoy math, there is a post on the Klei official forums that is a great start.
Building in space
Two important factors are about to collide:
- All energy has to be transferred through the element of a tile
- In space tiles are a vacuum, with no elements.
Accordingly, there can be no heat transfer in space until we add elements to tiles (gas, liquid or solid). This can be a blessing and a curse. For example:
Blessing: We can now use the vacuum as a perfect insulator for builds with 0 heat transfer not requiring insulated tile.
Curse: Buildings that generate heat will overheat in a vacuum as there is no element to transfer heat away.
These heat dynamics will greatly influence the design of our builds in space.
Steam box
Our first little build with be a cheap steam box to generate the steam for our first rocket using the Steam Engine. We build it in space so we don’t have to worry above the steam loosing heat over time and condensing before it gets to the rocket. We won’t bother with generating the heat for the steam ourselves. We’ll take it from our piping hot meteorite shield:
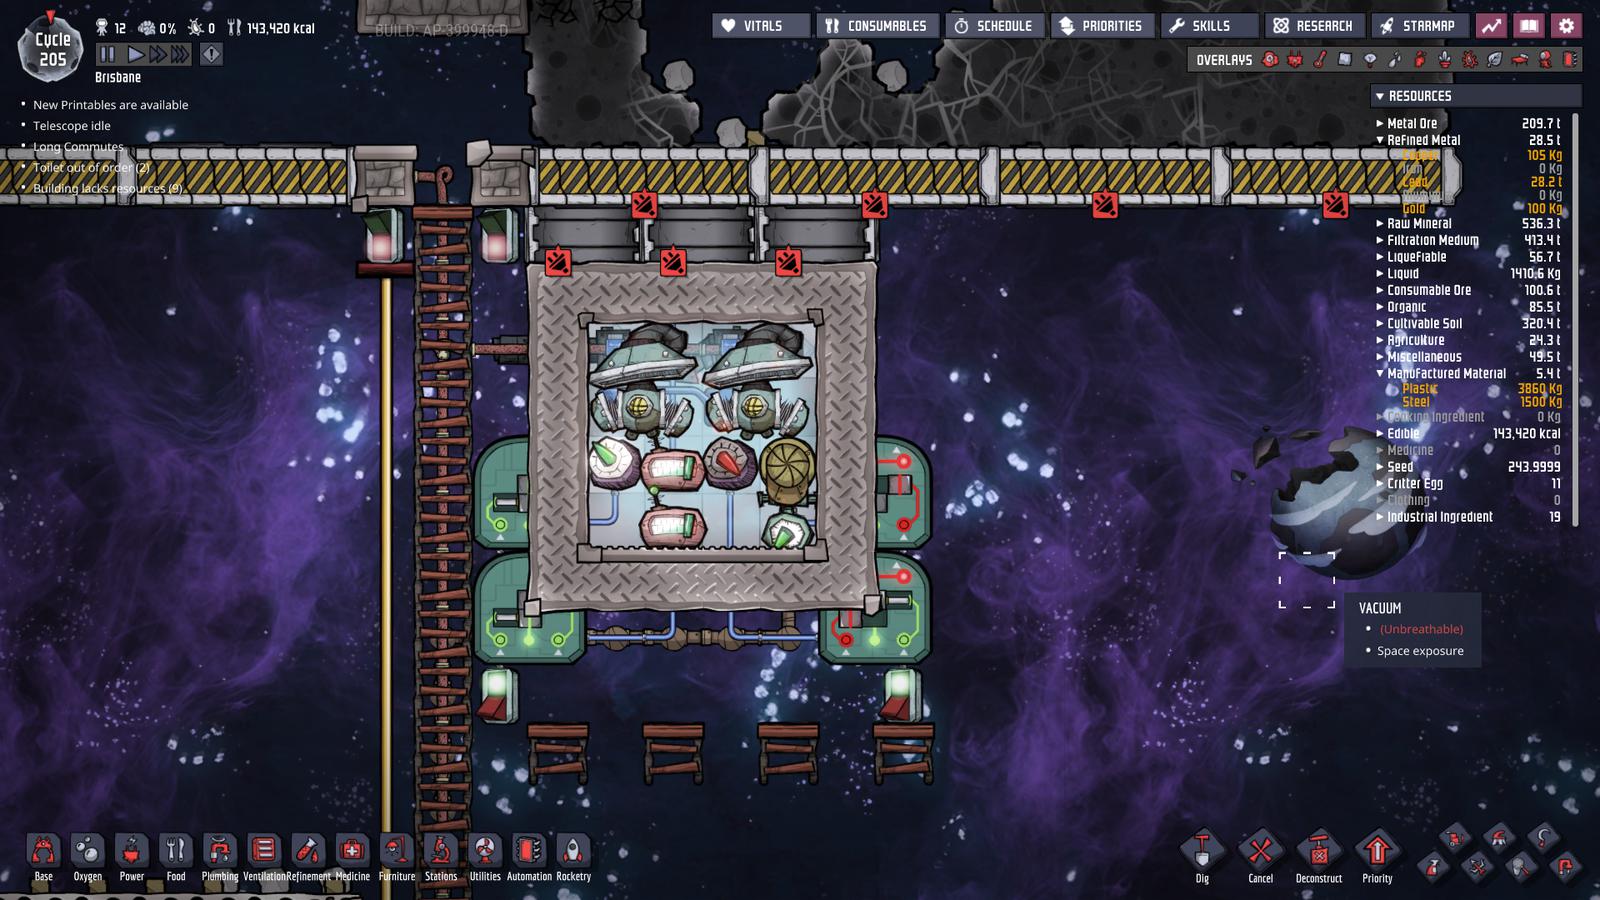
To prevent the steam and liquid disappearing into the vacuum we use Drywall inside the box. It is alternated with some diamond Tempshift plate to help thermal conduction.

The steam box is Aluminum (Solid) to maximize heat conduction, connected through 3 Gold Amalgam doors to the meteorite shield. Using a Thermo sensor, the doors will open when the temperature in the steam box is above 140, creating a vacuum between the box and the shield, stopping heat flow.
We have hot water piped up from our steam vent to the box. Using 2 And Gates, the Liquid Vent is only enabled when: (i) the liquid pressure on the floor of the box is < 0.1kg, (ii) the gas pressure in the box is < 3000g, (iii) a manual switch is on. These stop us flooding the the box with too much water or steam.
Finally, the Gas Pumps are enabled when (i) the pressure is above 1000g, (ii) temperature is above 130C, (iii) a manual switch is on.
Gas output is pretty simple, we’re just using a bridge to make the gas flow smoothly to a single pipe. Note that we’re only setting the steam to be 130C to prevent too much damage to the pipes on the first run. The pipes will absorb heat and some of the steam will condense and break pipes on the first run. This is fine, once the pipes are hot they will stay hot in the vacuum and we can step our sensors down to let the steam out at 102C to save energy.
This build could be done without the manual switches and additional and-gates they require but sometimes you just want to manually disable things.

Our first rocket launch
Our first rocket silo won’t be a complex endeavor. You can see the build below. Steam from our steam box is piped into the engine. A single Gantry allows our astronaut into the Command Capsule and we will retract the gantry with a switch before launch to prevent damage.

The rocket has 5 research modules. By sending 5 in one rocket we will research all 5 points of the object shown in the starmap and get the full benefit of 250 databanks on the rocket’s return.
For this rocket, and especially for later rockets, it’s efficient not to waste fuel. The rocket is only aiming for the 10,000km range and no matter how much fuel you put in the rocket, it will always return empty; so why put in more than you need. Calculating how much fuel you need is somewhat complex. For this guide we will use the Oni Rocket Calculator to tell us a steam rocket with 5 research modules will require 695kg of steam to reach its target, so we set the engine to only accept this much. If you’re interested in the math, the bottom of the Rocket Calculator goes into more detail.
The automation for now will be very simple. A single manual switch on the gantry and a switch on the 2 segments of the shield.
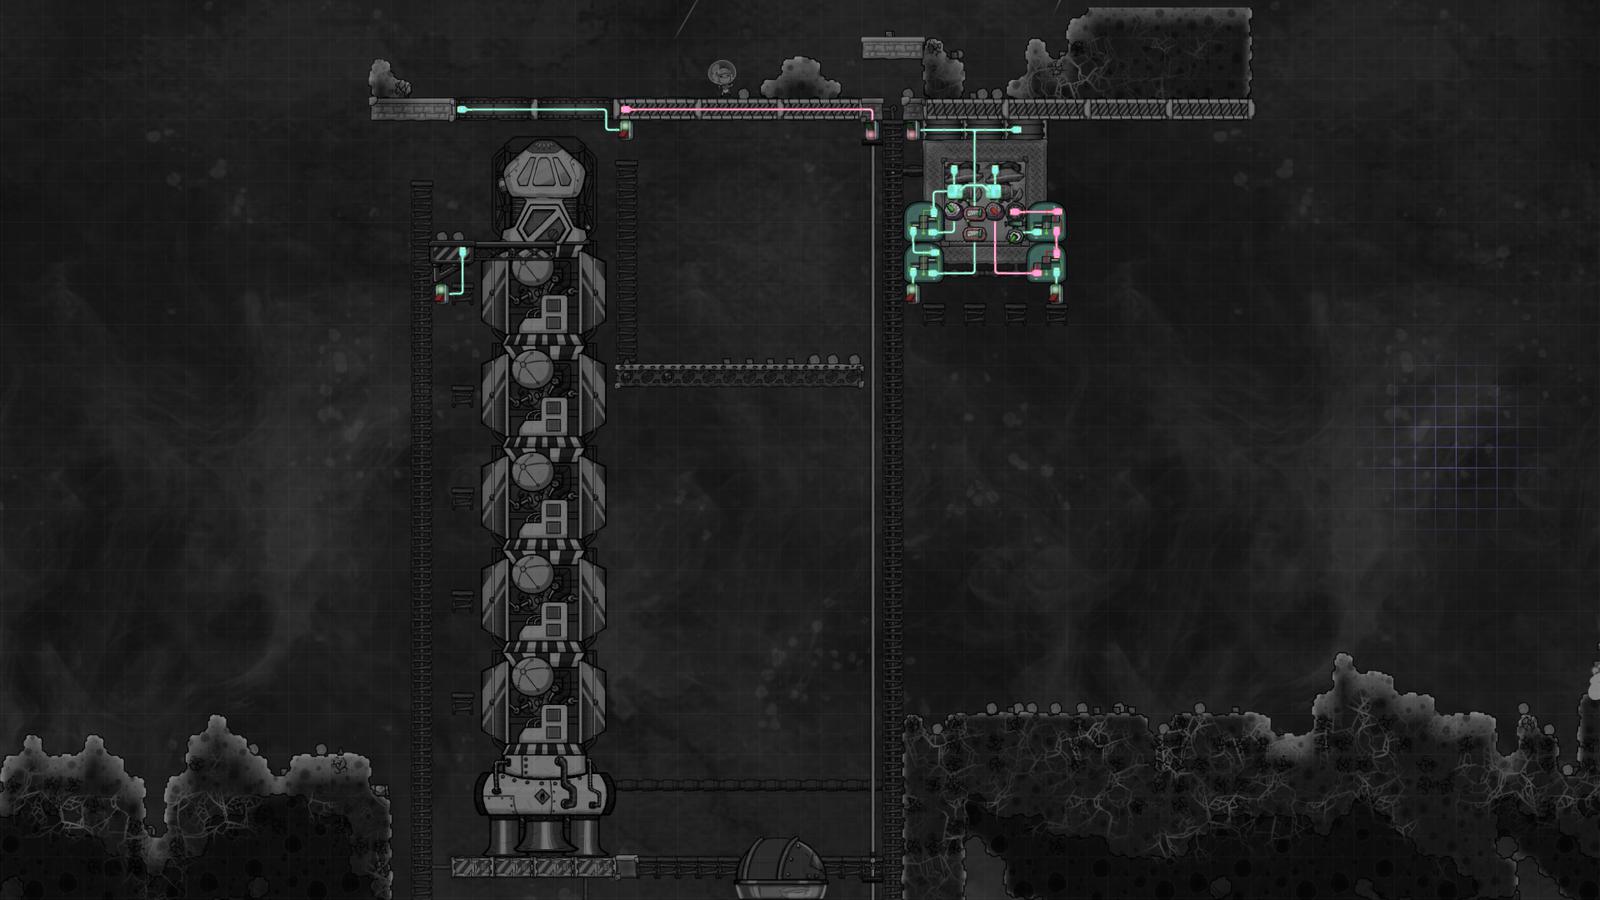
We are ready to launch our first rocket at cycle 210. We won’t win any speed records but its not a bad effort. We could have definitely raced to the top faster by skipping the turbine build and optimizing other approaches for speed, but the goal of these guides is not speed, but to show a path to steady, sustainable growth that is safe for your colony.
That said, getting to space in a timely fashion has its importance. The sooner you open up access to Rare Resources, particularly Fullerene and the resulting Super Coolant (Liquid) the better for your colony. Gathering these resources takes a lot of rockets back and forth, so starting that process now rather than later won’t leave you waiting later on.
End-game resource value
You will have seen that in order to research more advanced rocketry, we need a new orange research type Gamma Point that is produced at a new station Virtual Planetarium that consumes Data Bank. We’ve just sent out first rocket off to collect some Data Banks from space.
It is possible to farm the early planets for enough research to skip to the final rockets, but for usefulness, this guide will step through to the intermediate rockets and fuels.
Be aware that rockets take at least 3 cycles each launch, and every 10,000km further you go takes another 3 cycles. During this time, the dupe you put on that rocket is not available to do work for your colony. E.g. if you have a 12 dupe colony but 3 rockets in flight, only 9 dupes are left to fulfill colony tasks. We’ll keep this in mind as we progress because dupe time will become a more valuable resource to us as a result. At the same time, as we build solar panels, energy will become cheaper. Accordingly, we’ll be looking to reduce dupe time expenditure on buildings like the Oil Refinery and Metal Refinery that require dupe operation to function and look to replace them with other methods.
In this way you can think of your colony as having 3 resources:
- Physical elements (the gases, liquids and solids)
- Energy (electricity and heat)
- Duplicant time
Duplicant time is about to get more valuable in the end game, whilst new technology will make energy cheaper for us. Where possible, we’ll be making some decisions to favor spending energy in exchange for saving duplicant time.
Exploring your asteroid
If you are like me and haven’t yet explored your asteroid, it’s time to get out and take stock of what resources you have at your hands. The colony was already at the limit of what its steam vent outputs in water. Filling rockets with steam and other fuels in the future will run us dry, so we need another renewable source of water.
In addition, I’m hoping to find an ice biome to source some Sleet Wheat Grain, otherwise we’ll have to wait until we can pilot a rocket to Interstellar Ice.
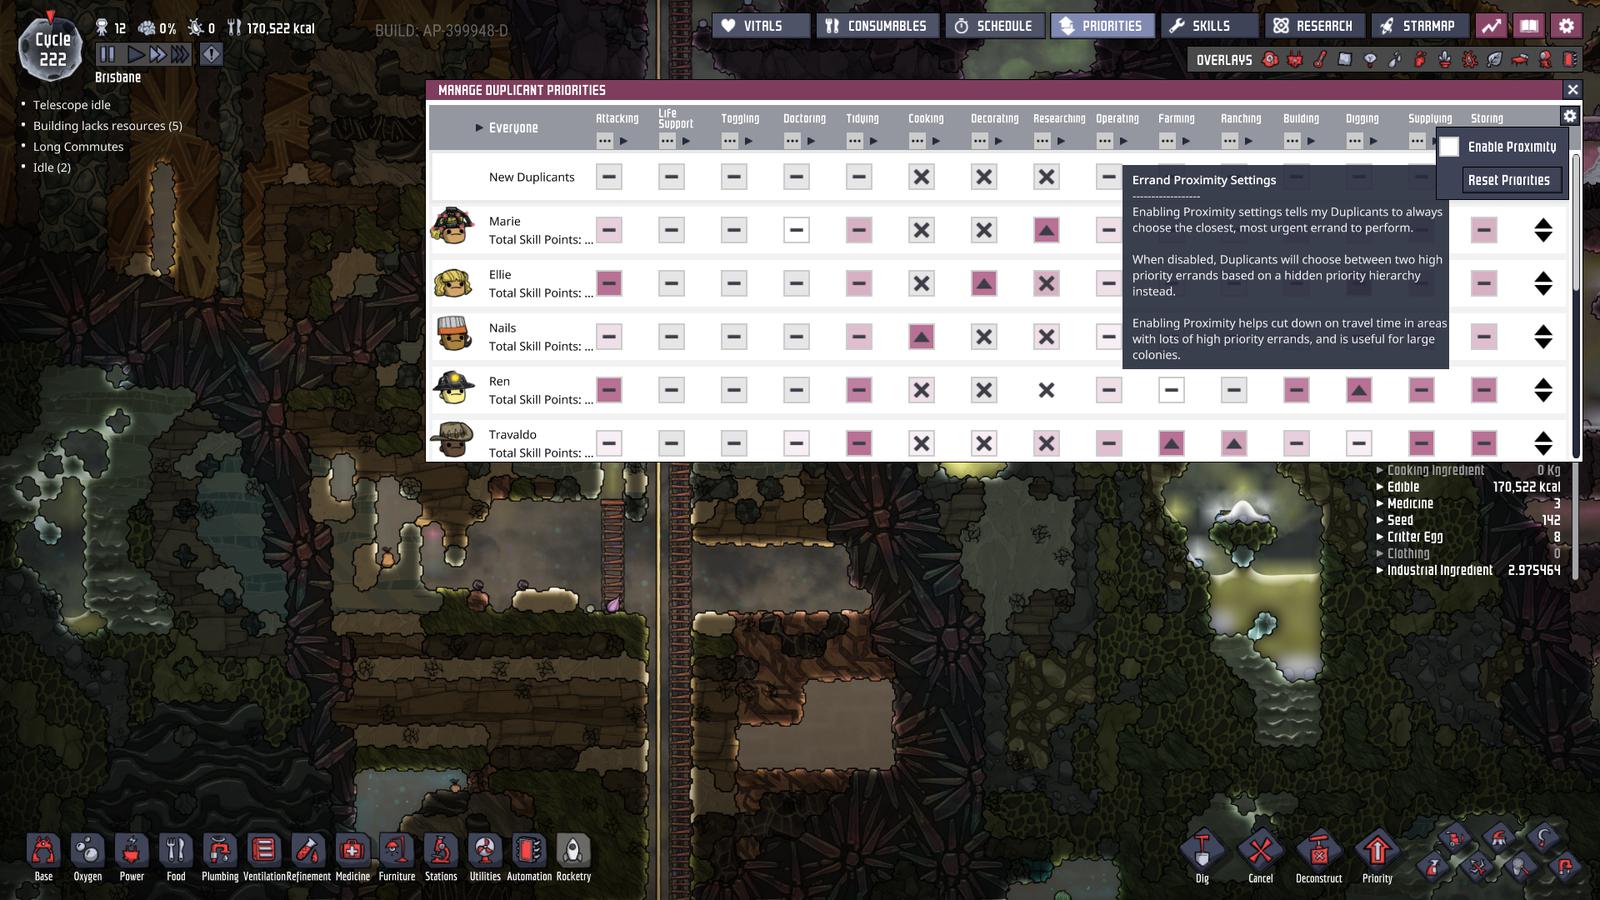
As you start exploring, the distances your dupes move will grow significantly. At this stage in the game it benecifical to open the priorities window and turn on “proximity priority”.
The solid booster
Once you’ve completed missions to all the 10,000km planets, we need to give our steam engine a little boost to make it to 20,000km and continue collecting databanks. Below you can see we dug down a little to allow space for a Solid Fuel Thruster filled with 400kg of Iron (Solid) and 400kg of Oxylite. Where the booster is on the rocket doesn’t matter providing isn’t not at the top or the bottom.
To get to 20,000km the Oni Rocket Calculator shows a rocket of this weight needs 809kg of steam.

Side note: You can can see exhaust gases in the image above from the launch are extremely hot and it takes a moment for the vacuum to suck it away. In the future we could harvest that energy, but for now we let it disappear. We will need to set up a barrier between the telescope and the rocket to prevent the hot gases from heating up and breaking the telescope.
Petrol engine
A few cycles later we have flown our steam rocket enough to have collected the data banks to finish both Hydrocarbon Combustion and Solid Cargo research. We can now build ourselves a petrol engine based rocket. The petrol engine has double the power of the steam engine so we can use it to lift heavier components into space; namely the Cargo Bay.
Below we’ve put together a petrol based rocket with a Solid Oxidizer Tank and two cargo bays in order to bring back some Fullerene to produce Super Coolant (Liquid).

Lucky for us one of the 10,000km entities has a chance at some fullerene which lets us build this rocket with two cargo tanks. You may need to fly further and only be able to lift a single cargo bay.

Base update cycle 250
As at cycle 250 we’ve swapped out the bottom of our research rocket to a petroleum engine. With this we’ll be able to continue farming research from planets out at 30,000km.

We found a second Cool Steam Vent and have capped and vacuumed it ready for it to come out of dormancy.

Back in the base we removed the Wheezewort cooling and have run some granite pipes form our cooling loop instead, effectivly installing some air-conditioning in the base. The weeze wort are good, but because they inhale from their bottom and exhale out their top, they have the unfortunate side effect of acting as pumps, pushing air up. This was hurting the flow down of oxygen in our base.
We’ve updated all of the ladders in the base to Plastic Ladder for the speed benefits and all the beds to Comfy Bed for the morale bonus from the bedroom upgrade.

Liquid hydrogen and oxygen
A few cycles later we’ve farmed enough databanks and finalized research on Liquid Combustion. Whilst doing this we’ve put together a rocket fuel factory to the right of our rocket silo.
Similar to the heat deleter turbine we built in the Oni Late-game guide, there is a turbine here converting heat into electricity from two separate cooling loops. One loop is cooling oxygen down to Oxygen (liquid), the other is cooling hydrogen down to Hydrogen (liquid). The solid oxidizer tanks on our rockets have been replaced with Liquid Oxidizer Tank to take our liquid oxygen (LOX). LOX burns fuel 33% better than Oxylite so we can get approximately 33% further on the same fuel, or as we will, get the same distances for 33% cheaper.
These loops are using the Super Coolant (Liquid) we’ve been able to make since farming the fullerene from space. It has a monstrous SHC of 9.46 so it makes our aquatuners over twice as efficient at transferring heat per watt compared to polluted water. Super Coolant is so good that the electricity we get from the heat is almost enough to power the aquatuner on it’s own. Check the Oni Cooling Calculator for details, but these loops are costing us about 20W nett each, even after including the shut-off valve.

The piping isn’t any more complex than what we did in the late-game guide. One unique challenge of this build is the need to loop back what the pump pumps out. We can’t have liquid oxygen, and particularly not liquid hydrogen, sitting in even insulated liquid pipes in the rocket silo. The hot exhaust gases will easily boil the pipe contents, breaking the pipes and wasting rocket fuel. So the fueling pipe is a loop, once the rocket tanks are full, anything left in the pipes comes back to the cold tank.
Petroleum is however at no risk of boiling so its pipes do not need to be looped.
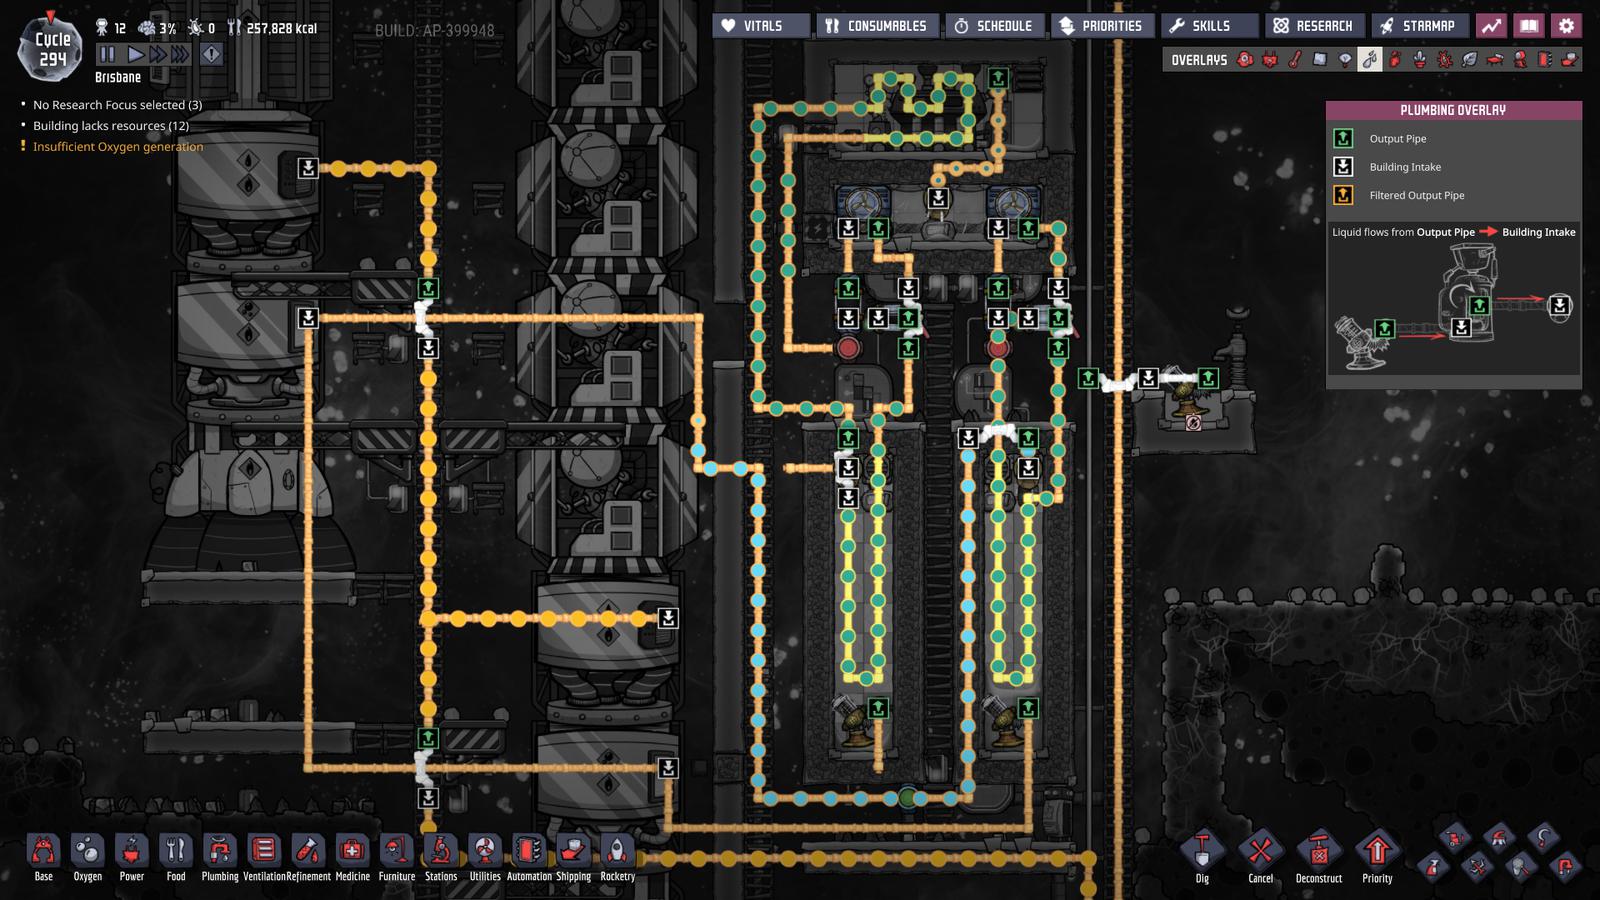
The automation also isn’t much more complex than our build in the late-game guide:
- The aquatuners are only turned on if they are at a safe temperature and a manual switch is on.
- The shut-off valves only feed the coolant back to the aquatuners if it’s not at risk of solidifying in the pipes and the temperature of the cold tank is above a specific temperate. E.g. for Oxygen I set this to -190, a good bit below the boiling point to have some safety when we pump it out.
- The pump pumping out the liquid oxygen is on a Memory Toggle. We just have to flick the switch from on and back to off, and the pump will stay on until the liquid pipe sensor sees oxygen has made it back to the tank.
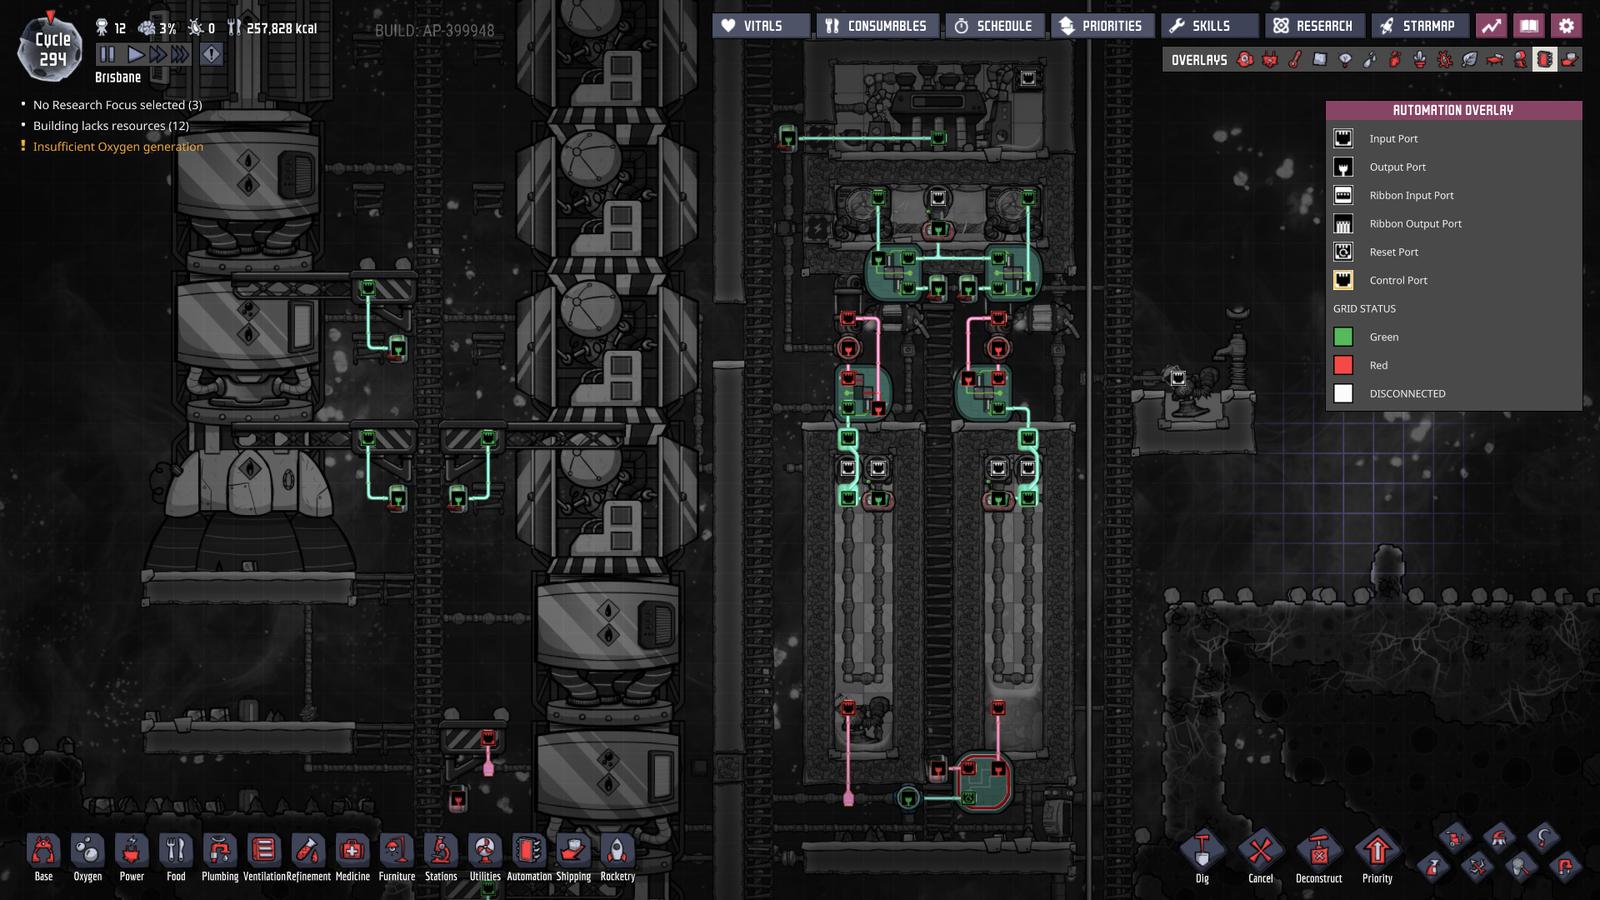
You will notice that the steam turbine only has two chambers this time. The aquatuners are built directly in the steam chamber with no need for an oil chamber. This is because we already have access to so much steel that there’s no need to use a third chamber that is easy to get back into like we did earlier.
We’ve also connected the aquatuners directly to a heavy watt line. Because we’re building in a vacuum there’s no heat loss to the environment through the hot Heavi Watt Joint Plate.
There’s no automation on the vents coming in to the tanks, they will just over-pressure when they’re full.
Finished with the end game?
If your goal was to reach the final object in space, then nothing lies between you and that goal except time. We simply need to swap out a petroleum engine for a hydrogen engine and wait for enough Hydrogen (Liquid). Oxygen Not Included is however a very open ended game and there’s a good chance your colony isn’t even at its midlife right now. There’s a lot of goals to take pleasure in from this point, some include:
- Minimizing dupe travel time
- Maximizing automation (minimizing dupe work time, dupe travel time, and player inputs)
- Moving all colony dependencies onto 100% renewable resources
- Mining out the asteroid completely
- Completing the in-game achievements
For the remainder of this play-through guide we’ll be working on points 1-3 above whilst showing off some cool techniques and builds that you may want to implement in your own colony.
Capping volcanoes and digging vacuums
Capping a volcano safely is a fun challenge. We’re also going to use a technique in this build we haven’t used yet called “digging a vacuum”. You’ll remember from the late-game turbine build that pulling a vacuum with a pump took a long time. Where possible, it’s best to not let the gases get to where you’re building in the first place using a liquid lock:

Using a save, I previously dug up and saw there’s an iron volcano sitting on that neutronium that we want. Before we start digging there this time, we’re going to build a liquid lock at prevents air rushing in to all the digs after it.
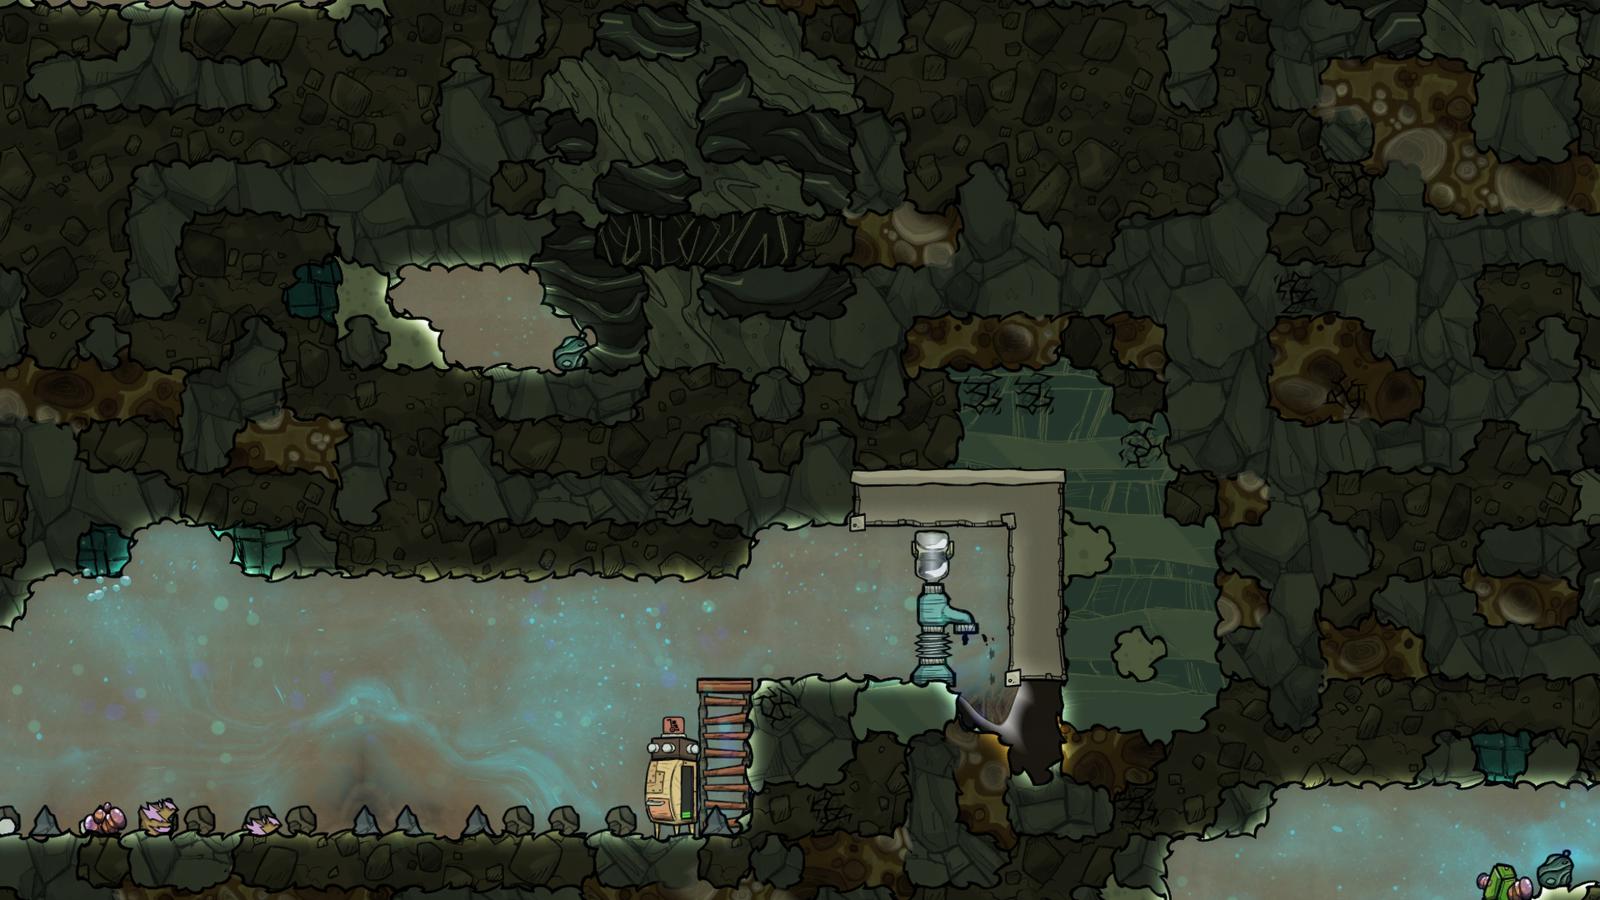
With this lock set up, we can now dig and prepare our volcano capping build in a perfect vacuum.

While active, this volcano will spew 9600g of Iron (Liquid) at 2527C for 45 seconds every 790 seconds. This build lets the liquid iron sit in a vacuum (transferring on heat) until it drips down into a metal tile in a pool of cold water to solidify and cool. You might think water and liquid iron at 2527C might not mix too well but lets do some math:
9600g * (2,527C + 273.15)K * 0.449 SHC * 45 seconds = 543,110,400 DTU
This sounds like a lot of energy to deal with but we will be dripping the iron into a bath of almost 16 full tiles of water. What will happen to the water receiving all that energy?
543,110,400 / (16,000,000g * 4.179 SHC) = 8.1C/K
That’s it, 8 degrees. The insanely hot 2527C 9.6kg/s of iron for 45 seconds will only raise the temperate of the water by 8 degrees. It will actually raise it a little less because there’s more than just the mass of water there but also the temp-shift plates and metal tiles too. We are using the water as a big heat sink, designed to safely soak and spread the burst of heat from the iron.

Let’s discuss some other elements of the build:
- There is one thermo sensor that turns on the liquid shut-off valve to allow cooling liquid to cycle under the metal tile whenever the pool of water is above 5C.
- There is another thermo sensor that turns on a Auto Sweeper whenever the sensor is below 20C. This sensor is positioned exactly where the iron will drip down to so it will update quickly. This means the arm will only transport out cool iron.
- In addition the auto sweeper will also only come on during the middle of the day. Auto Sweepers use the same amount of power no matter how much they are lifting so we might as well have it lift a lot in one go rather than lots of little lifts. We set the Cycle Sensor to the middle of the day because once we have solar power, this is when energy is free anyway. This is called “demand matching” or “demand management” in real life.
- There’s some metal tile and tempshift plates to ensure heat gets spread away from the tile being dripped on quickly.

To prevent the water from slowly rising in temperature and eventually boiling off, we just need to make sure it’s chilled over time by running some radiant pipes from our cooling loop behind the metal tiles. If you plug in the Volcano’s stats into the Oni Geyser Calculator you see that over its eruption cycle and with the target of cooling the iron down to 20C, we’re going to need to average 615,000DTU/s of cooling.
Our polluted water and aquatuner loop can move:
10,000g * 1second * 14C * 4.179SHC = 585,060DTU/s
So we’re 30,000DTU/s short, which means the water will rise in temperature by:
30,000DTU/s / (16,000,000g * 4.179SHC) = 0.00045 C/s (about 0.3C per cycle)
So as long as we start the water chilled at say 5C, we’ll have (97C/0.3) = 300+ cycles before it boils. Plenty of time for the Volcano to go dormant or for us to replace the coolant with super coolant.
The key take-away here is that when heat is concerned, you only need some simple arithmetic to be sure your design is going to work. We can now have infinite refined iron being automatically delivered to the base at 20C. I’m not going to uncover the volcano just yet because I want to farm some more super coolant, but that’s the build.
Precision heat exchanger
In an upcoming section we’ll be building a Sleet Wheat farm. Growing sleet wheat is a great challenge since it requires water to grow but also needs to be below 5C to grow. This doesn’t leave us much room to wiggle between being too high for the plants to grow and too cold that the water freezes. For this we need a heat exchanger, and a pretty precise one.
A Thermo Aquatuner drops the temperature of the liquid that passes through it by exactly 14C. So chaining them together we can reduce a fluids temperature it steps: -14, -28, -42, -56, -70, -84, -98. These big steps are too coarse to hit a precise temperature.
Below is a heat exchanger that cools to a specific temperature you define and does so with zero power costs (again, the best solution to your power problems is not needing power). Generally, the exchanger is exchanging heat from the hot water at 98C with our coolant loop until the water reaches 4C.
Cooling is turned on and off by a thermo sensor that opens the doors when the output water is below 4C. Opening the doors creates a perfect vacuum, cutting heat transfer to zero. The doors don’t need to be powered.
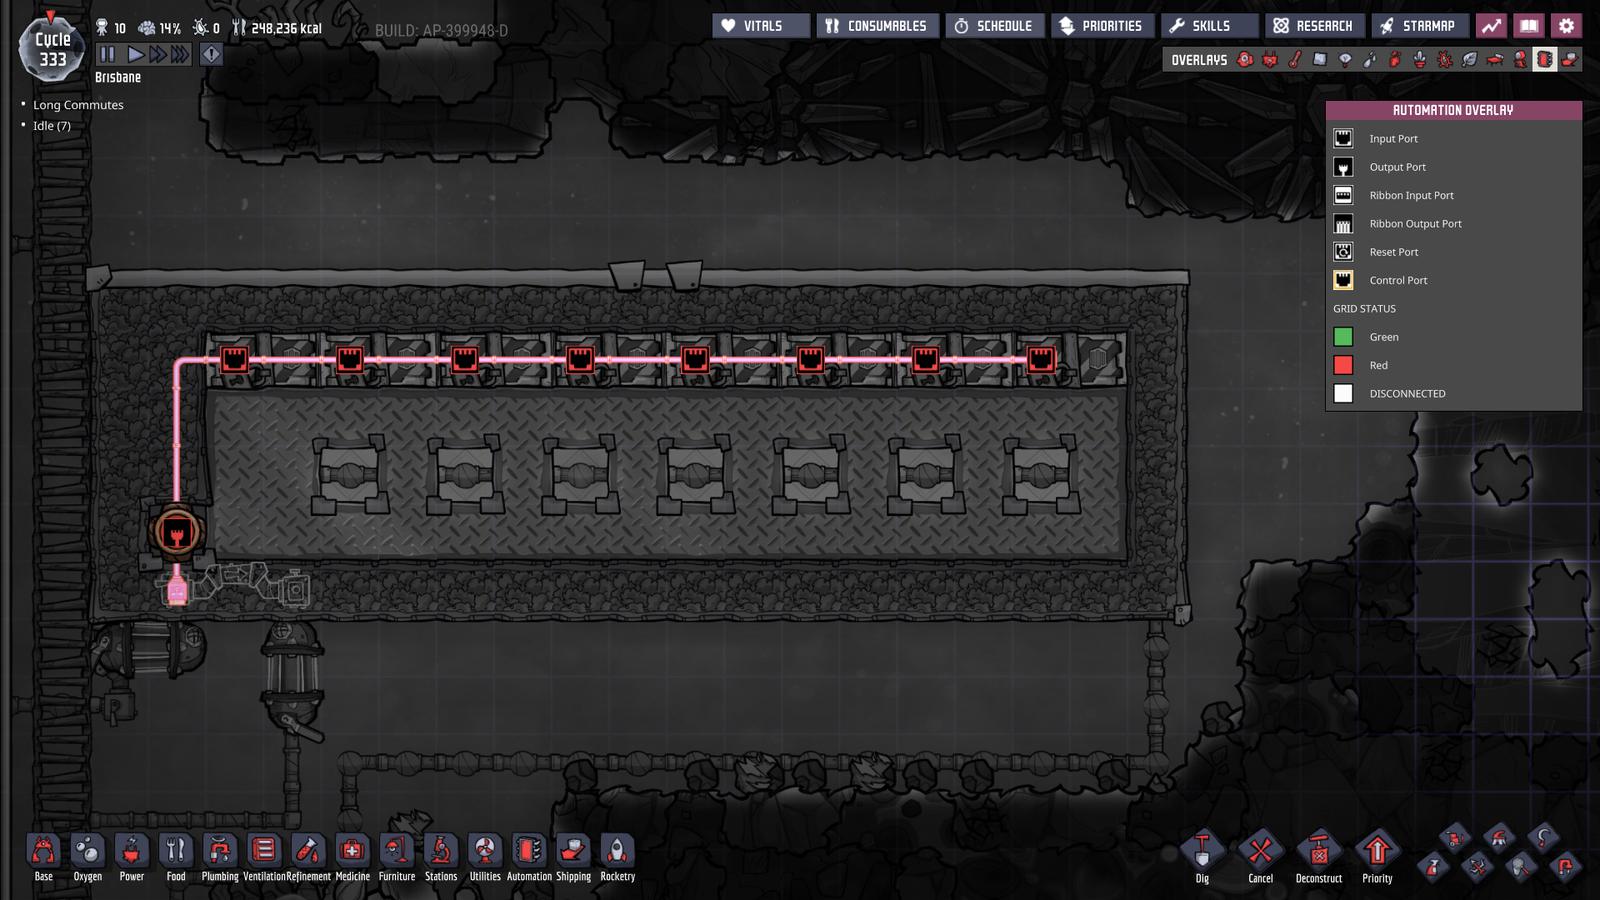
The trick to a precise heat exchanger is lowering the temperature of the fluid evenly and slowly to prevent overshooting the target. We do this with a big mass of Aluminum (Solid) tiles and tempshift plates. These transfer heat between each other, the aluminum radiant pipes and the water extremely quickly. This big mass rapidly averages temperature across itself, bringing the temperature of the water down smoothly.

The water loop is an infinite loop, effectively making the loop of infinite length, giving all the water a chance to cool to the target temperature slowly. We bridge the source of hot water onto the loop so it only enters if there is space on the cycling water. There won’t be any space for new water until we start siphoning off cold water (this would be done by the bridge under construction in the image).
This exchanger is tuned to work within a reasonable range. With a super coolant loop at -100C, this exchanger can chill up to about 2kg/s from 98C to 4C without risking overshooting. 2kg/s is plenty for our farm in the next section but just keep this in mind. If you need more than this then look at putting your water through aquatuners to do big, coarse reductions in heat first, then letting this do the last 15 or so degrees.
Alternatively, you could replace the granite pipes behind the doors with radiant pipes (starting form the left) to increase heat transfer and maximum cool water flow. This would be more efficient than aquatuning the water directly since any aquatuner that isn’t running on 100% super coolant is wasting energy (the cooling line above is only about 50% super coolant).
Powering the doors would also increase precision at the cost of electricity.
You may also wish to have a shut-off valve peeling off the cold water only when the sensor shows it’s cool enough, but because I know we’ll be using this well within its 2kg/s limit, all the water we take off will be cool enough.
Just keep in mind how much energy you are asking to be transferred. For each gram of water per second we need:
1gram * (98C-4C) * 4.179SHC = 392.83 DTU/s of heat transfer
So that would be 392,830 DTU/s of transfer just for 1kg/s.
Solar power
Let’s make our energy renewable and limitless for a colony of this size. To give you some background, automation of solar energy went through many changes as Oni the game changed through its beta process. There are a lot of dated and even impossible builds still published online. I believe the following solar array, with automated blast shielding and regolith mining to be one of the simplest and most efficient possible at the time of publication.

First you’ll want 2000kg of Glass which will take a while to cook up in the Glass Forge. The liquid glass comes out extremly hot so it’s best to drip it into an oil pool chilled by our cooling loop. To minimize travel time we have the sand delivered in bulk to the storage bin. They can run around 10 times with 600kg, this is better than 100 times with 60kg.
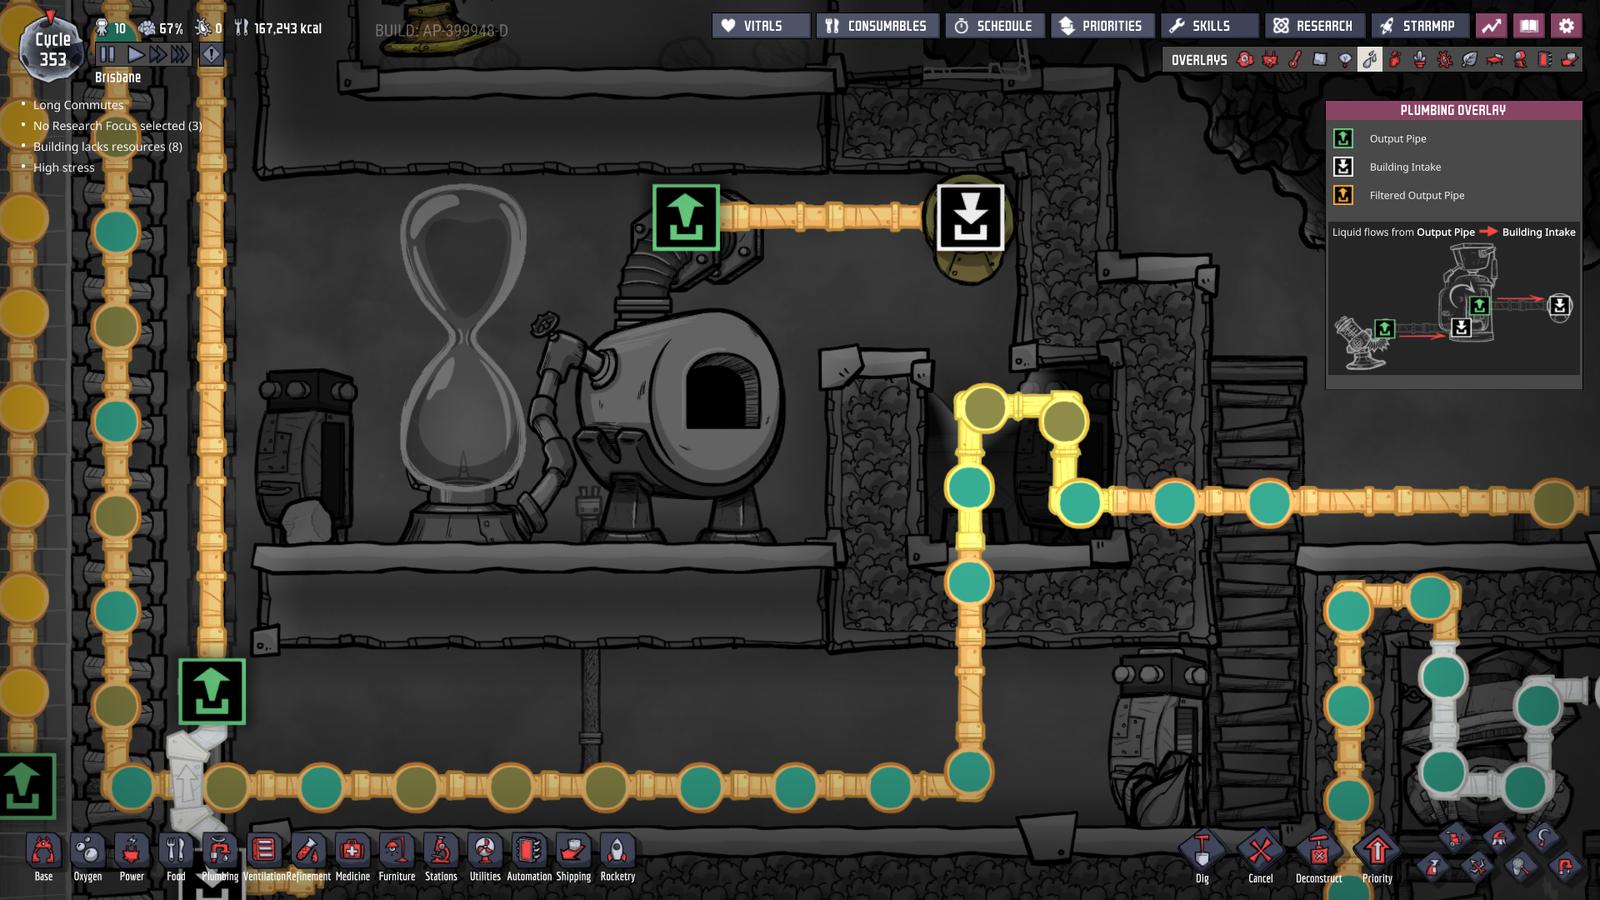
Once you’ve got the glass, let’s start the build. Begin with the top layer to get your shield up. I would recommend this to be the minimum width for your first solar array so save up the steel for 12 Bunker Door (6 tonnes) and 5 Robo Miner (1 tonne). The spacing of the robo miners is very specific. The first robo miner must be able to have its Airflow Tile roof completely dugout by the next miner in line, having a gap of only 5 until the next. Afterwards we can open up the gap to 6 tiles since we can rely on a fellow robo-miner on each side to dig out one side of the airtile roof each.
The airtile roofs must have a gap of 1 to the blast shield to let the regolith fall through.
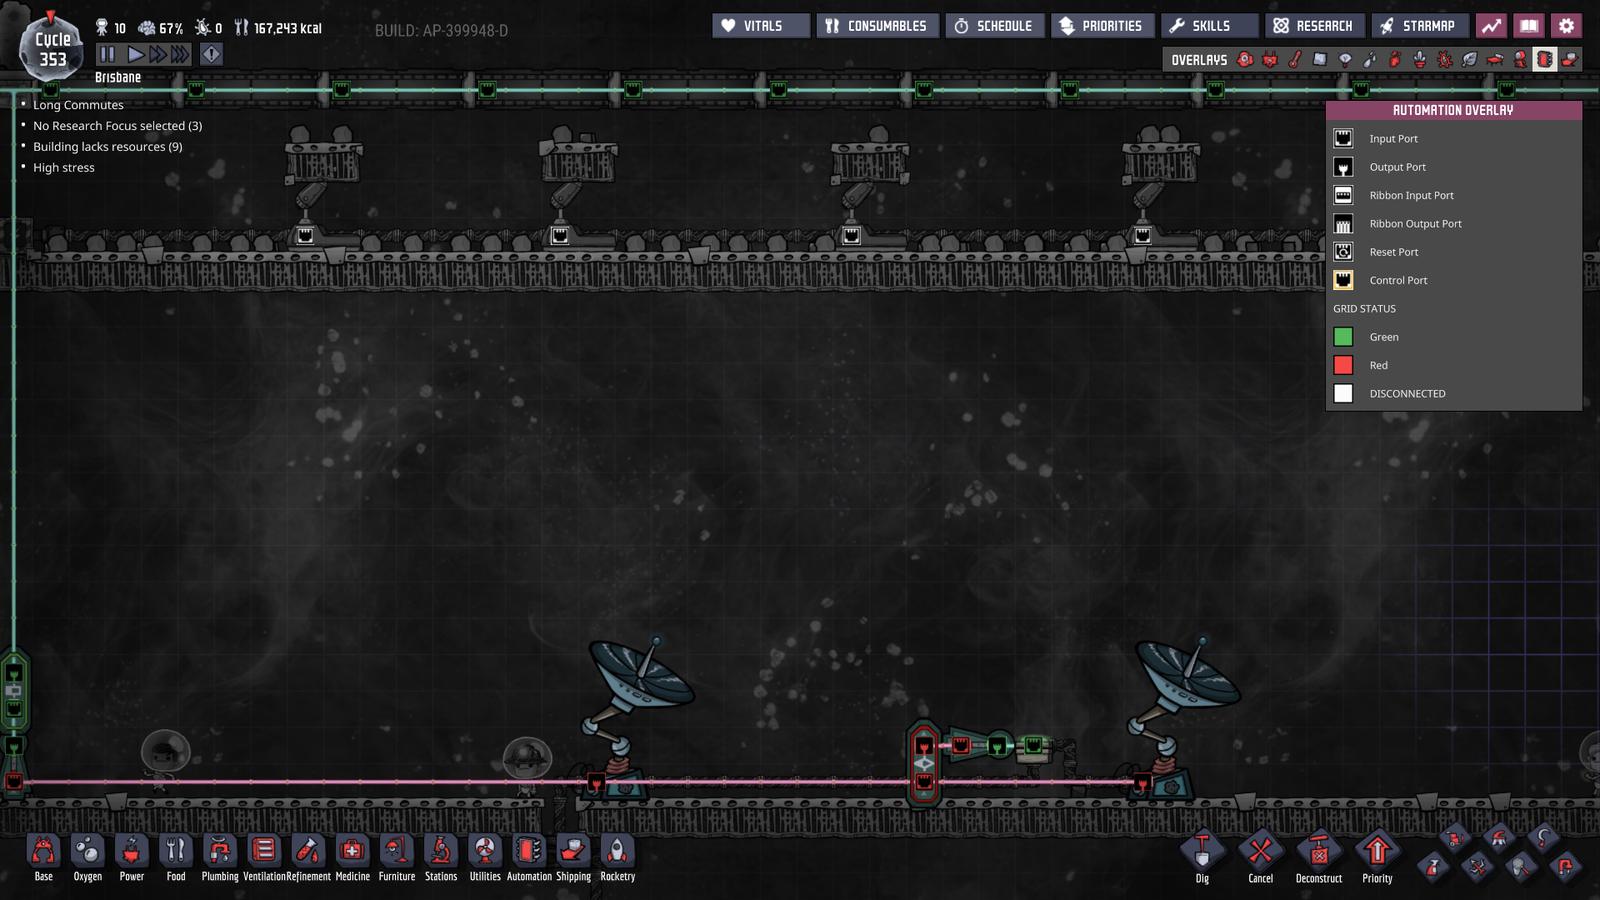
We use the minimum two scanners to give us 34% scan quality (17% each), this provides a chance to detect showers 68-200 seconds before they occur. The bunker doors require 39 seconds to close so the 68 second minimum is sufficient. The scanners require two separate clearance types:
- Sky clearance: 2 tiles above them, 15 tiles to their left and 13 tiles to their right.
- Machinery clearance: no heavy machinery within 14 tiles of their bottom left tile. For this reason they are 14 tiles below the robo-miners and 14 tiles above the solar panels.
When the Space Scanner detect an incoming meteor shower they send out a green signal. On this green signal we run two peices of logic:
- Bunker Doors: First we use a Not Gate to change the green signal to red. Then a Buffer Gate to delay when this red signal is sent to the doors to close. Because doors only take 39 seconds to close but we will detect the incoming shower at least 68 seconds before it happens, if we don’t use a buffer gate we would be wasting up to 29 seconds (68-39) of sunlight. I set the buffer to 25 seconds to give some safety for logic lag when it is off-screen.
- Second Scanner: Once the shower is happening, there’s no need for the second scanner. With a 200 second Filter Gate after the green signal is sent, we not gate it and send a red signal to a Power Shutoff to disable the powerline running to the second scanner, saving 120W during the meteor shower.

Light passes freely through the airflow tile and falls on the Solar Panels. The panels are 7 tiles wide and produce a maximum of 380W each. In midday sun however, we only need 4 of the 7 tile width receiving full sun to produce the 380W so it’s efficient to use this pyramid style to increase the amount of panels you can fit within the bunker door width.
Using this approach we were able to fit 10 full power solar panels in a space only 47 tiles wide. Had we simply laid the panels next to each other then we would have only fit 47/7 = 6.7. Because it costs significant power to open and close the shield, we want to get as much back from that investment as possible.

Because our dupes wont be up here often to experience the morale, there’s little downside in connecting everything possible directly to our power spine.
Extensions
Cooling
This build will run fine for a long time, however the robo-miners produce heat as they mine but have no way to transfer that heat in the vacuum. Being steel robo-miners, they have a maximum temperature of 275C. Assuming a starting temperature of 30C, that’s 245C of headroom. To raise the temperature of the steel to their maximum we would need:
(275-30)C * 200,000g * 0.49SHC = 24,010,00 DTU
The robo-miners only produce 2,000DTU/s when operating, accordingly they can run for 12,000 seconds before overheating. That will take over 100 cycles giving us time to find Niobium (Solid). At this point we can craft Thermium, rebuilding the miners with this would give them an overheat temperature of 975C. At these temperatures we can simple add some tempshift plate and a drop of supercoolant and then the regolith itself could passively “cool” them to 350C.
Gathering
Later we will add some Auto Sweeper to collect the dug materials sitting on the airflow tile.
Power Management
Power management in Oni is a lot of fun, and with our solar array on-line, it just got really interesting. Solar Power is the ultimate power source in Oni; it has zero inputs and no waste products, however it is highly cyclical. Let’s discuss three power topics:
- Demand Management
- Power Storage
- Production Management
Demand Management:
When you know you’re going to have excess power around midday (like solar in real life), it’s best to take stock of your energy usage to see if you can’t move some machinery to only run when power is cheap. In real life, hot water heaters might be set to turn on during midday when solar is peaking, look around your colony for machines that can run periodically without consequence. One example would be sweeper arms like that on our capped iron volcano. Use a Cycle Sensor to limit usage to when power is cheapest.

Alternativley, if you are near your power spine, you can use a not gate on a smart battery so that the battery will turn machines on when it’s full instead of off like we use for generators. This is another great benefit of a single power spine throughout the colony, at all times the entire map can know how much power we have stored. This applies great to something like our plastic production. Blow the polymer press will only turn on if the temperature is below 50C AND the colonies batteries are above 99%.

Above all, don’t forget the golden rule from the Oni Late-game guide:
The best solution to most power problems is not needing the power in the first place.
Power Storage:
With our other power sources like steam, natural gas and hydrogen there was no need to build battery storage because the inputs themselves acted as a battery. Big rooms of hot steam and canisters full of natural gas and hydrogen meant the colony had energy stored without needing battery storage. With solar however it would would be optimal to store energy from the peak at midday for use later. How many batteries you need is best measured by your over-production shown in your colony stats:
A Smart Battery can store 20kJ, but leaks (uses) 0.4kJ each cycle. My advice here is to watch your average power wasted over a longer period of time, including unlucky days where your solar panels were off during the day due to a meteor shower. If you are over-producing more than 20kJ per day (average), then add another smart battery. If you aren’t over-producing on average then you may have too many batteries.
We use smart batteries instead of Jumbo Battery because jumbo’s have a worse storage-to-leakage ratio.
Production management
We have several sources of power now with varying costs and benefits. Through smart batteries, they are currently ordered as:
- Solar: Always On
- Steam: 95-100%; We need to convert the energy from our thermo aquatuners
- Hydrogen: 15-25%; We need to burn our hydrogen to prevent build up in the base.
- Natural Gas: 10-20%; Automated but with waste products
- Coal: 5-15%: Last resort
At most, our hydrogen, natural gas and coal sources will never fill the batteries past 25%, leaving 75% to be filled by solar and steam. This means we need to build less batteries as lots of capacity in each battery is not taken up by energy from hydrogen, natural gas and coal. These energy sources already have energy storage in all the gas and coal laying around, so there’s no need for them to be taking up lots of capacity in our batteries.
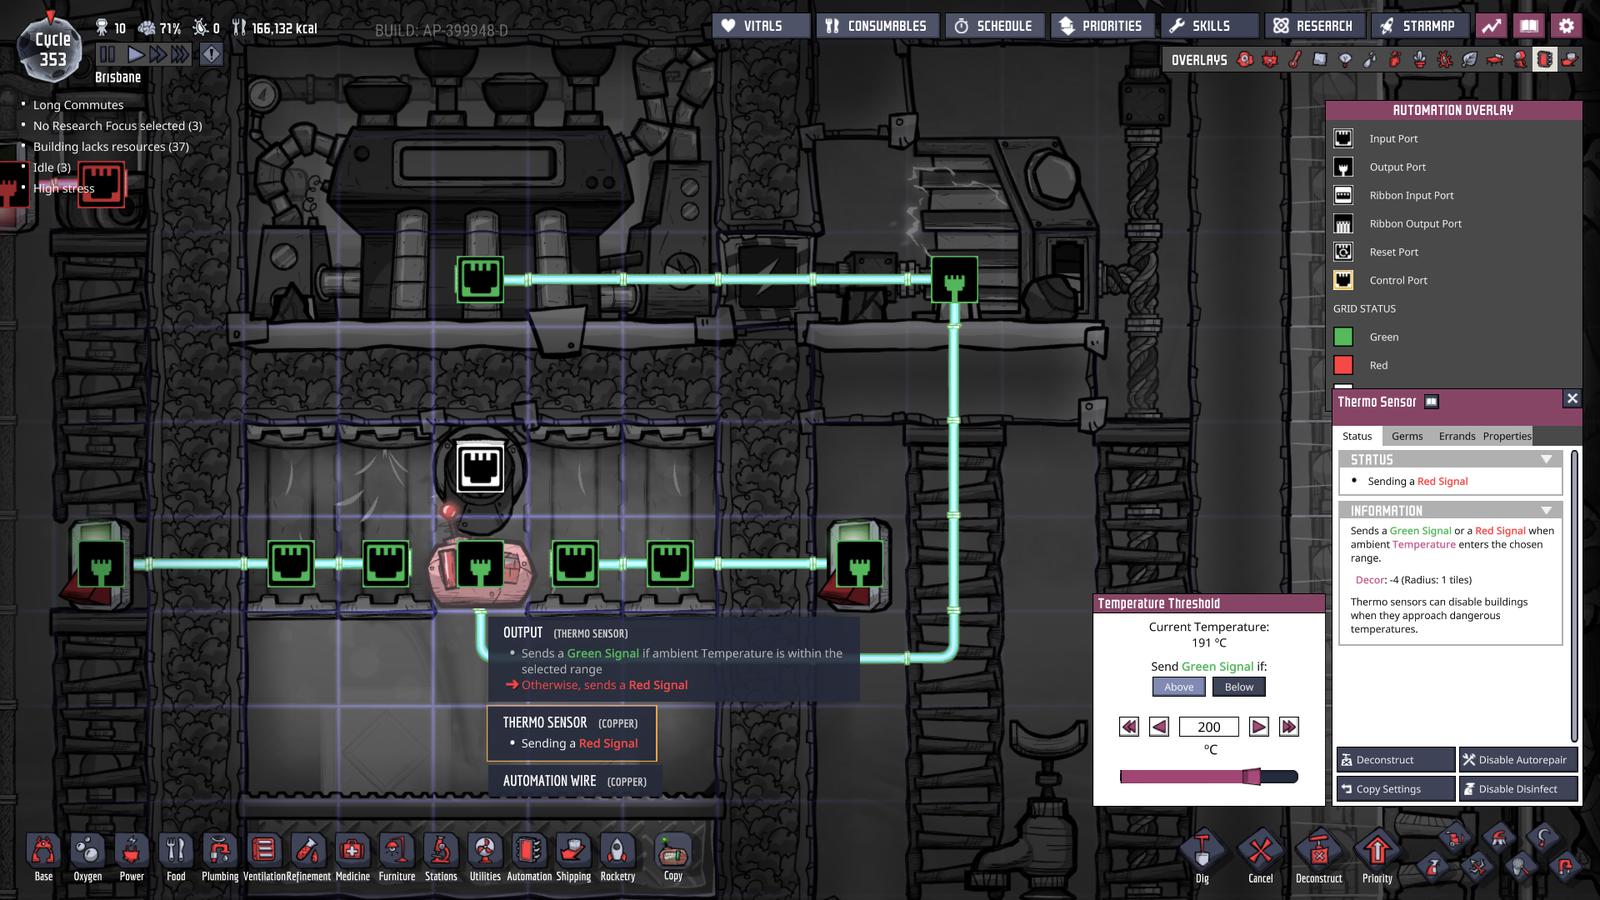
It may be that we have so much solar that our steam turbines don’t get a chance to run sometimes. This would be detrimental to our cooling loops so we should add some OR gates to them in order to have them turn on if the steam is above 200C. Technically, an OR gate is redundant since any green signal will turn an whole wire green. In the image below either battery or the thermo sensor will turn on the turbine.
Note that at no point have we ever built a Power Control Station. We generally discourage the use of this station on the grounds that its costs outweigh its benefits:
Benefit
- 50% more power production in a room.
Costs
- Consumes duplicant time
- Consumes refined metals
- Power plant spaces constricted to particular size
Because our power is effectively free and limitless, getting 50% more of infinity is inconsequential whilst duplicant time is extremely valuable.
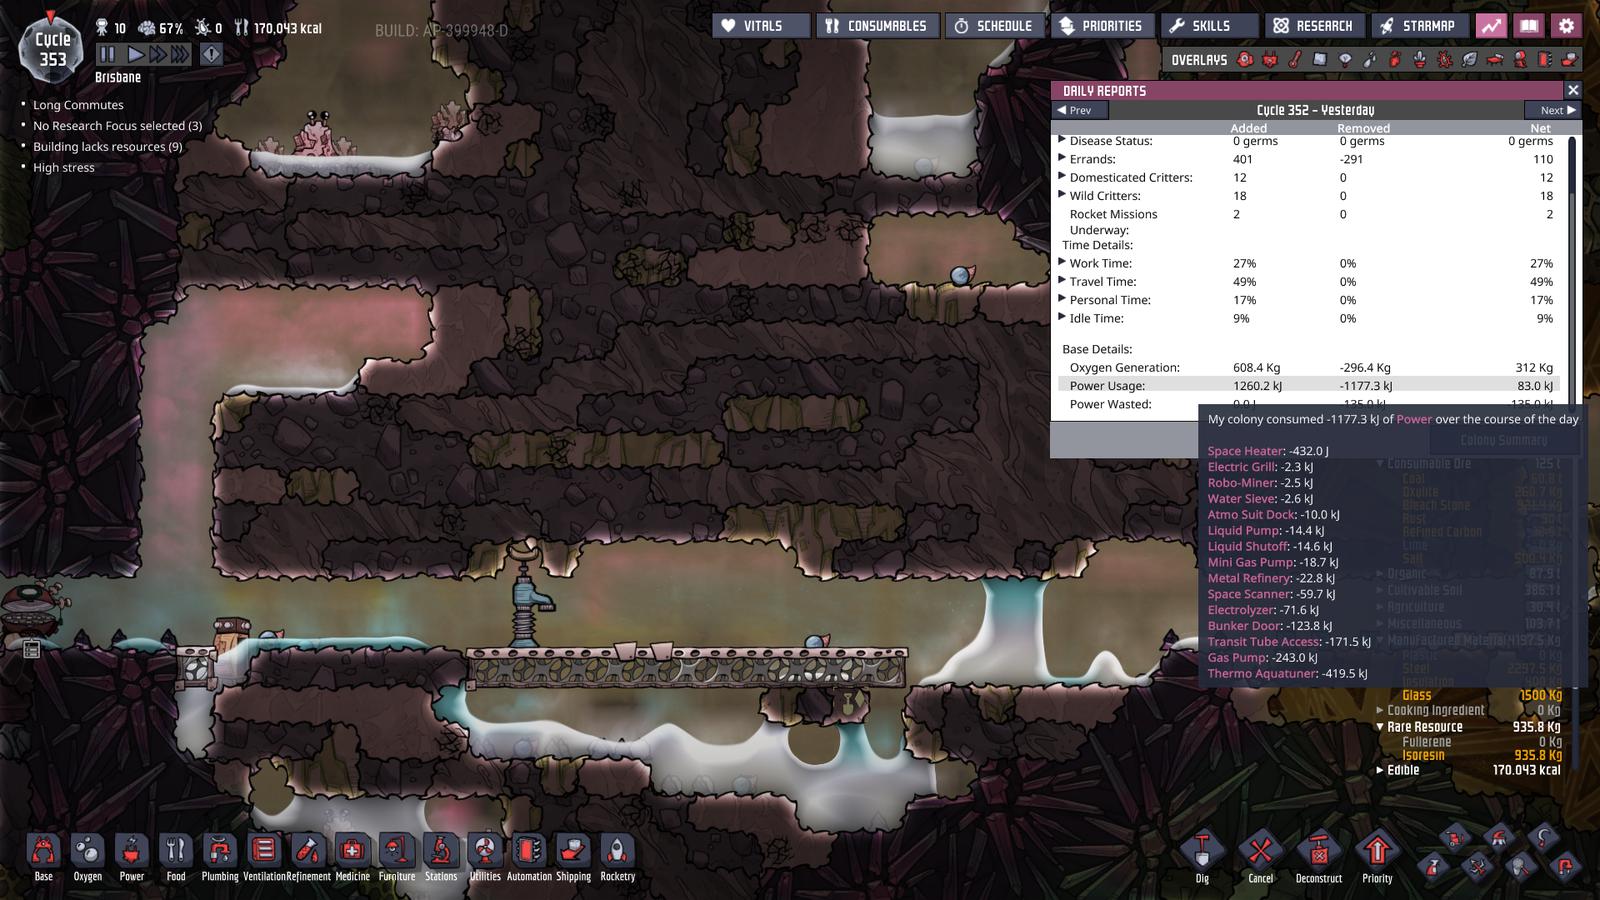
Finally, check in on your colony summary occasionally and question whether the things using a lot of power really need to be. Looking at our power usage below, I’m surprised how much energy is being consumed by mini-gas pumps so this is an opportunity to go look at them and see if that can’t be reduced.
Dupe time optimization
Using the Oni Building Database you can see there are a total of 31 machines in the game that require duplicant operation to run. As discussed in the End-game resource value section of this guide, duplicant time is much more valuable to us now that we have effectively infinite power and some resources like water/oxygen also infinite.
Of those 31 machines, there’s a couple we can minimize the usage of:
- The Oil Refinery: Instead we can produce Petroleum (Liquid) through automated boiling.
- The Metal Refinery: Instead we can source Iron (Solid) from the meteors. Iron, Gold (Solid) and Copper (Solid) can also come from automated capped volcanoes as seen in the Capping volcanoes and digging vacuums section.
- The Grooming Station: We can use methods to largely avoid needing this station for food or any other of its related outputs.
Along with minimizing dupe operating time, we can also start combating travel time more heavily with more Transit Tube Access points. These access points aren’t cheap, burning 10kJ per launch. But with our 3.8kW solar array, each launch can be earned back from the sun in 10/3.8 = 3.3 seconds of sunlight.
Finally, better than traveling quickly is not needing to travel at all, so we’re going to really emphasize Robot Arm usage going forward. The golden rule for minimizing dupe travel time is very similar to the golden rule for electricity problems:
The best solution to high travel time is not needing to travel in the first place.
Automating Sleet Wheat & Pincha Pepper
This build needs a little planning. I’ve decided I’m not going to grow this colony past 12 dupes. Additionally, I know at least 1 dupe will always be in space so I don’t have to feed them, this leaves an active colony of only 11 that we need to look after. Looking at the Oni Food Calculator, 11 normal dupes living off Pepper Bread need 28 sleet wheat plants to maintain food production.
28 plants would consume (28*33.33) 933g/s of water. This water has should ideally be chilled down to around 4.5C, near the top of the temperate that sleet wheat can grow at. The water from our Geyser’s is condensing at about 97.35C, so we’ll budget for 92.85C of cooling that needs to be done.
Plugging this in to the Oni Cooling Calculator, we need to take out 362,152 DTU/s from the hot water before feeding it to the plants. That is quite a bit of cooling. We also have to consider the other heat sources on our cooling loop. Remember our calculation from the volcano build that a single aquatuner on polluted water can only move 585,060 DTU/s. Cooling this liquid alone wouldn’t leave much capacity for the other items on the cooling loop (base aircon, the vent condenser etc).
I’m going to start this build now knowing that by the time I’m done with it, we should be able to farm up enough super coolant to ramp up the cooling power to:
10,000g * 1second * 14C * 8.44SHC = 1,181,600 DTU/s
So while we’re building this we’re continuing to constantly send rockets to collect more Fullerene for super coolant. Note; super coolant isn’t required, we could just build another aquatuner setup on polluted water, but being in space we’ll take this other path.
Thanks to our work in the Precision heat exchanger section, we already have the water covered, we just need to connect it up.

Cold water is bridged off the cold water loop but the bridge will only start taking if there’s space on the other side. This is governed by the liquid shutoff that is connected to the same thermo sensor as the heat exchanger doors. If the water is below 4.5C then the bridge peels it off to be sent to the sleet wheat.
The farm itself has no automation, but it does have conveyor systems. Each pair of auto-sweeper have their range overlapped by a single tile. In this overlapped range we place Conveyor Receptacle for receiving the Dirt required by the sleet wheat and we also place a Conveyor Loader to take the Sleet Wheat Grain away and be dropped off in our food storage.
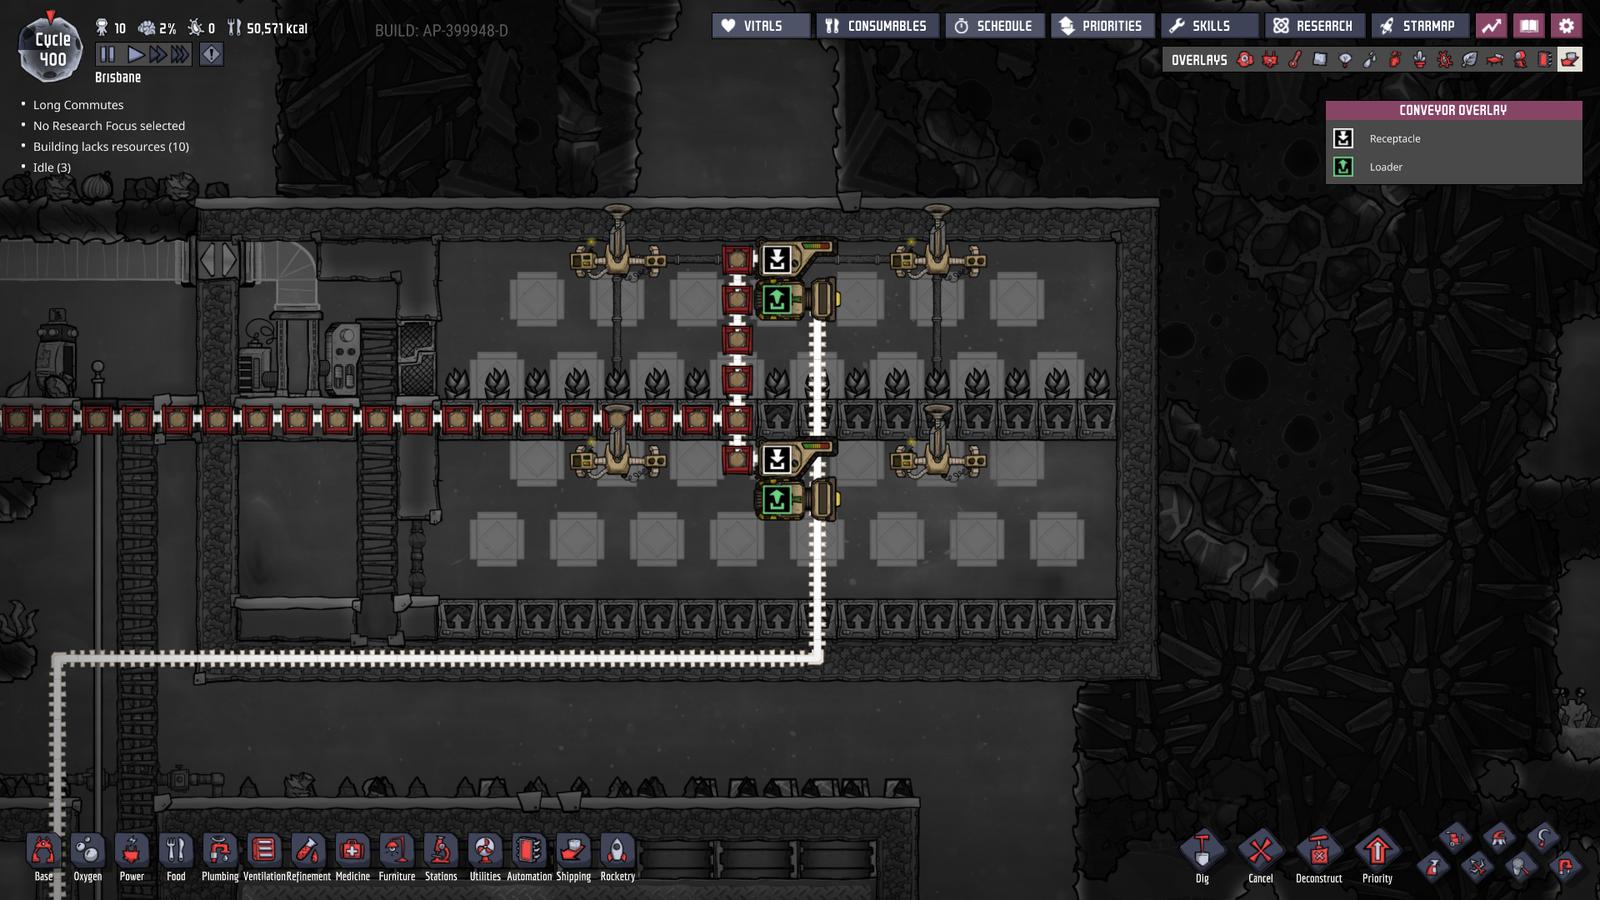
Right now, the only reason a dupe comes in to this room is to harvest but that could also be disabled in the future. Checking the Oni Food Calculator you can see that plants automatically harvest themselves after 4 cycles of being fully grown. We can disable dupe entry into this room entirely once we are confident we can handle the additional dirt/water consumption required by the extra plants and the 4 further cycles of consumption.
Next is the Pincha Peppernut we also need for the Pepper Bread. The food calculator shows we only need 6 Pincha Pepperplant for our food supply. It’s always safe to overbuild a little and I also know we’ll probably build an Espresso Machine in the future that would also consume the pepper.
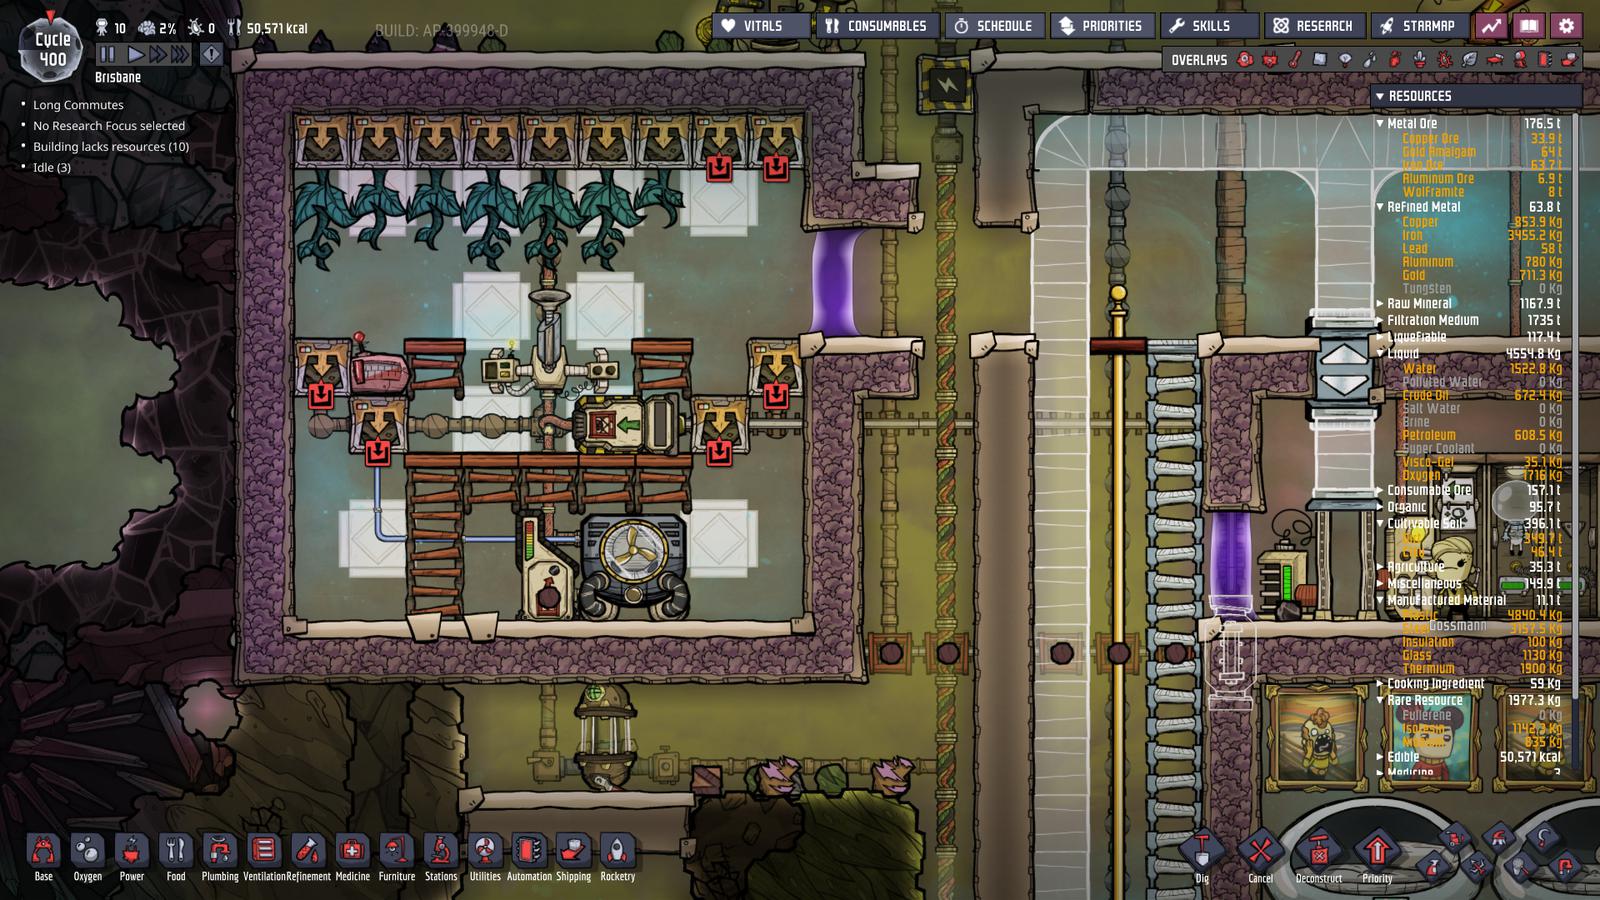
The Room is a 9x9 space, exactly the range of the single auto-sweeper in its center. From the center, the auto-sweeper can reach all 13 Hydroponic Farm. The plants are fed with hot polluted water from our power generation room (shown later). Because we’re on Rime I’ve also extended the coolant loop down here and the thermo sensor will turn it on if the room is below 40C, taking heat out of the supercoolant and dumping it into the room.

This is an important concept: think of super coolant as a way of moving heat to where you need it in the same way pipes move gas/liquid to where you need it. Using the aquatuner to heat this room is far faster and more efficient than using a Space Heater or other method and since we need to cool the super coolant anyway, this is two birds with one stone. Once you have super coolant, I can’t think of a reason to ever use a Space Heater or Liquid Tepidizer ever again.
This room is also wired up with conveyors. One is bringing in Phosphorite from the Drecko ranch in our base. The other will take the the Pincha Peppernut out of this room to be dropped into our food storage.
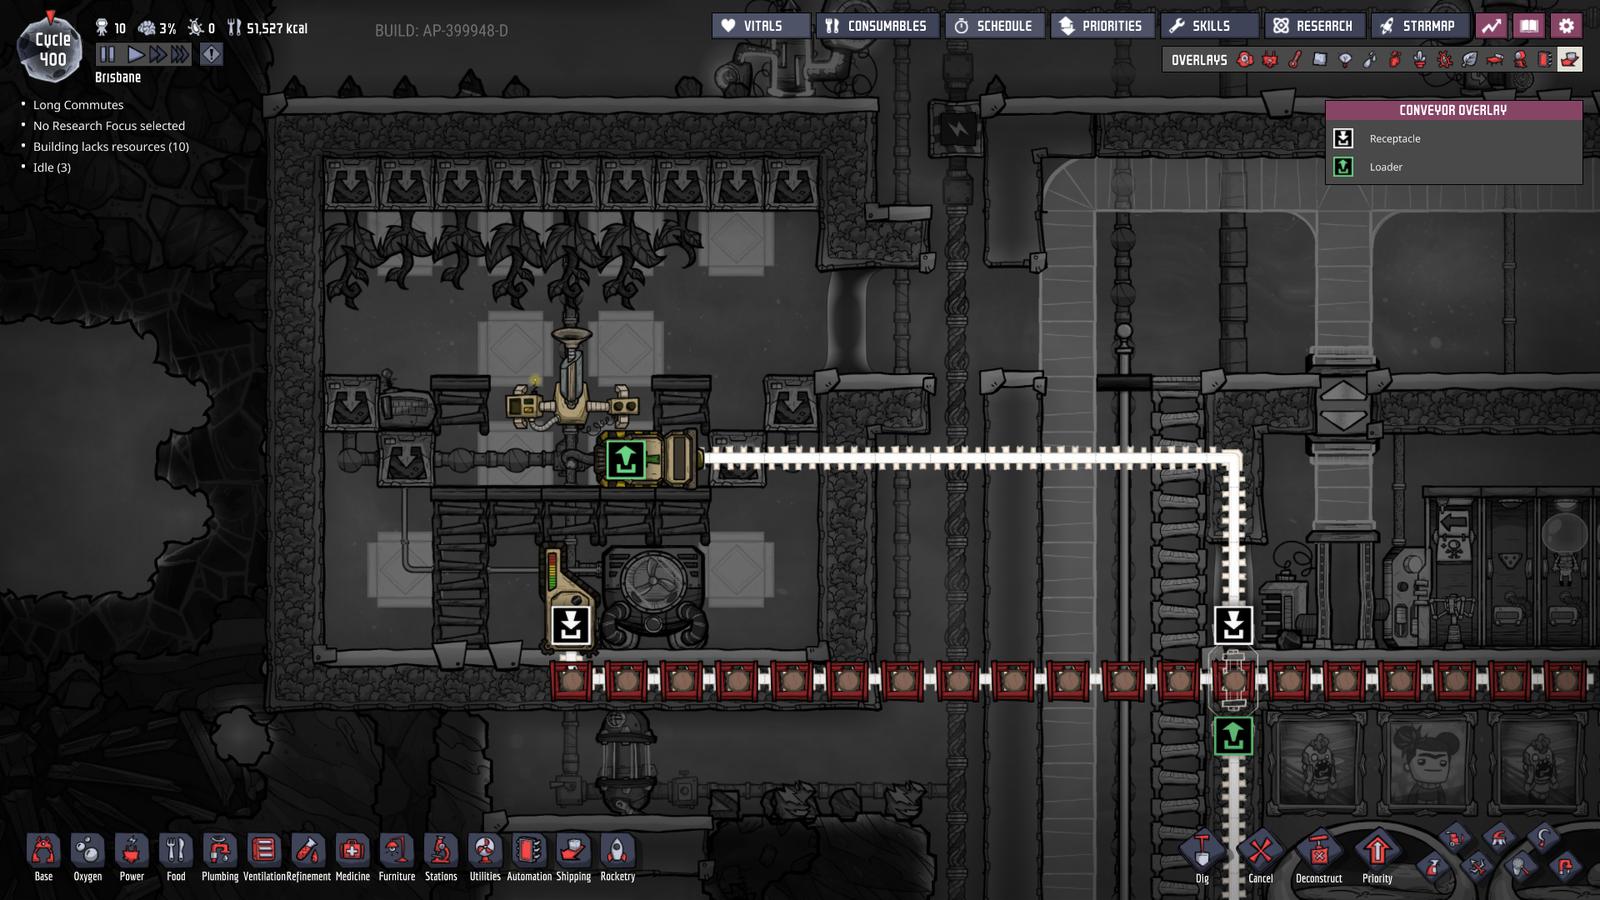
Again, once we’re confident in material consumption, we can seal this room up for no dupe to ever enter again.
Base update cycle 400
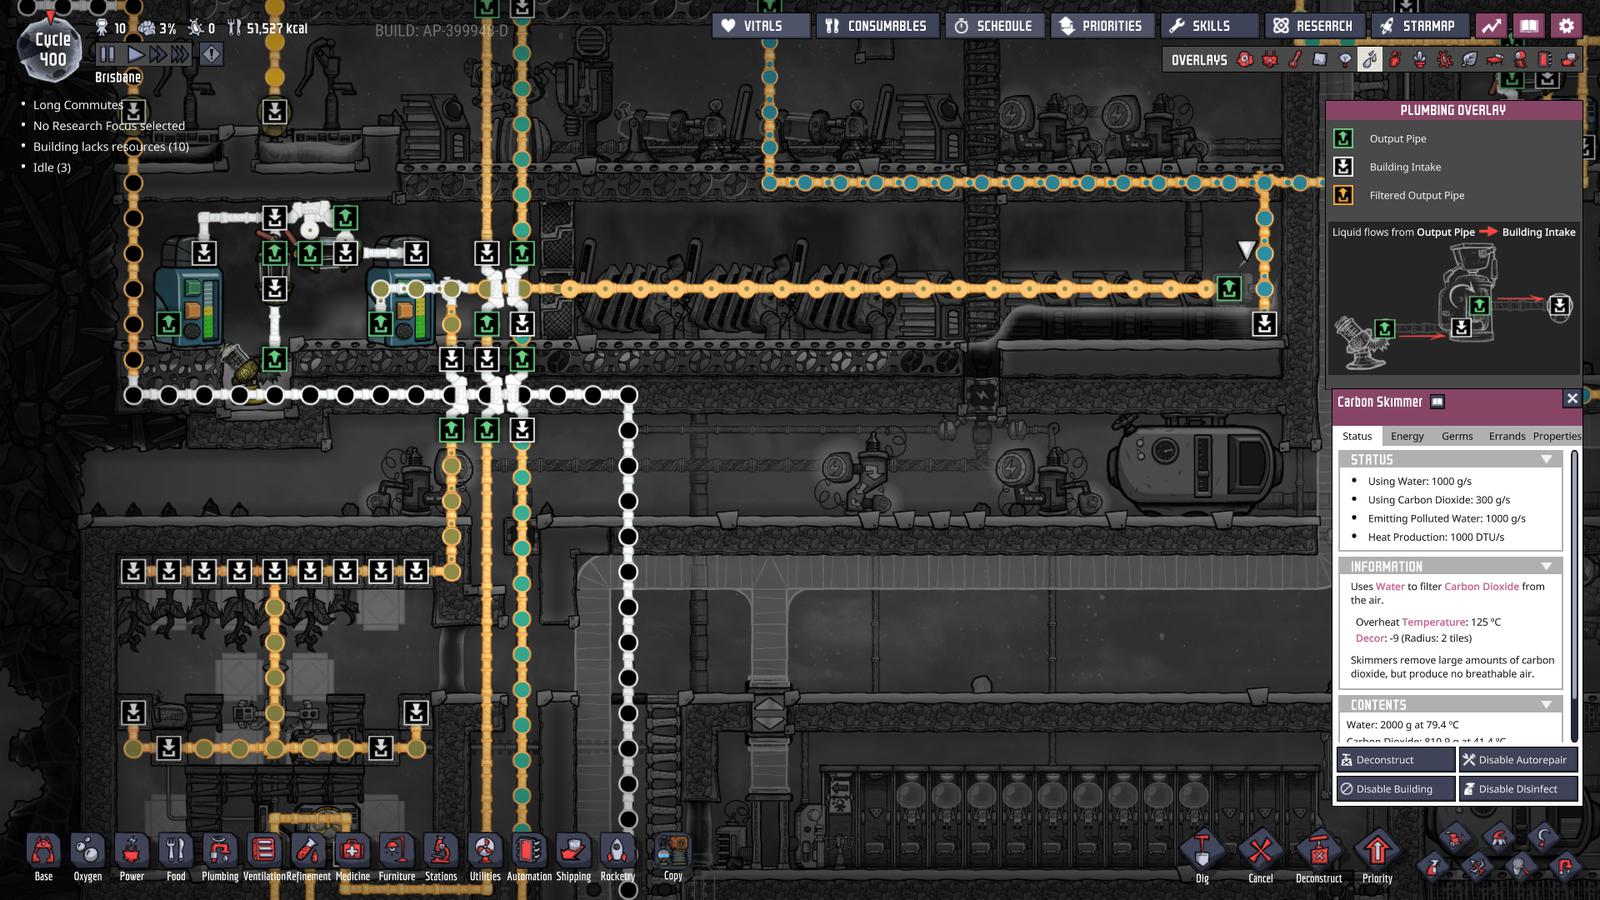
Below you can see we did away with the slickster ranch and have replaced it with a Carbon Skimmer. This serves two purposes for us; (1) grooming the slicksters was consuming duplicant time (2) the carbon skimmer produces polluted water which we need for the pincha pepper farm. The carbon skimmer is fed directly with hot water from our steam vent line helping to keep the pincha peppers warm.
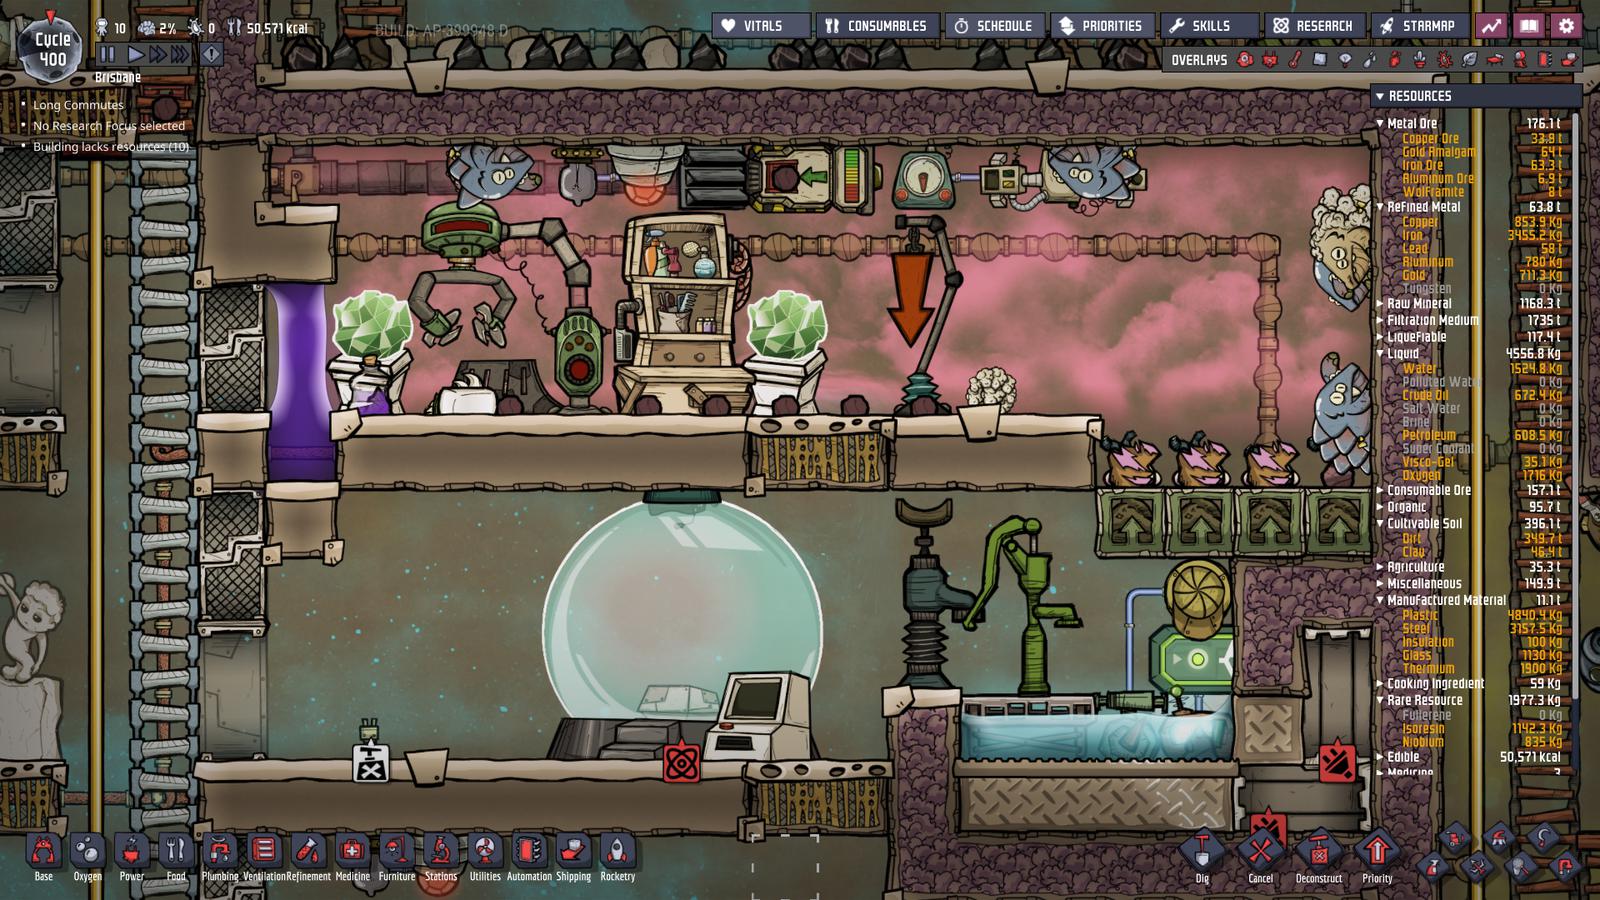
In the drecko room you can see the auto-sweeper in place that is picking up and sending Phosphorite to the pinch a peppers. In addition you can see the Visco Gel (Liquid) airlock is 3 tiles long. We do this because inside the base, dupes aren’t wearing their atmo-suits and the visco gel would make them wet. However, by jumping over the gap instead of walking through, they avoid the morale debuff from becoming wet.
Additionally because dupes get a 15% work speed bonus when working in a well lit area, we’ve added Ceiling light over work areas in the base that are turned on by Duplicant Motion Sensor. This should have been done much earlier and I’ll make an update to the mid-game guide.
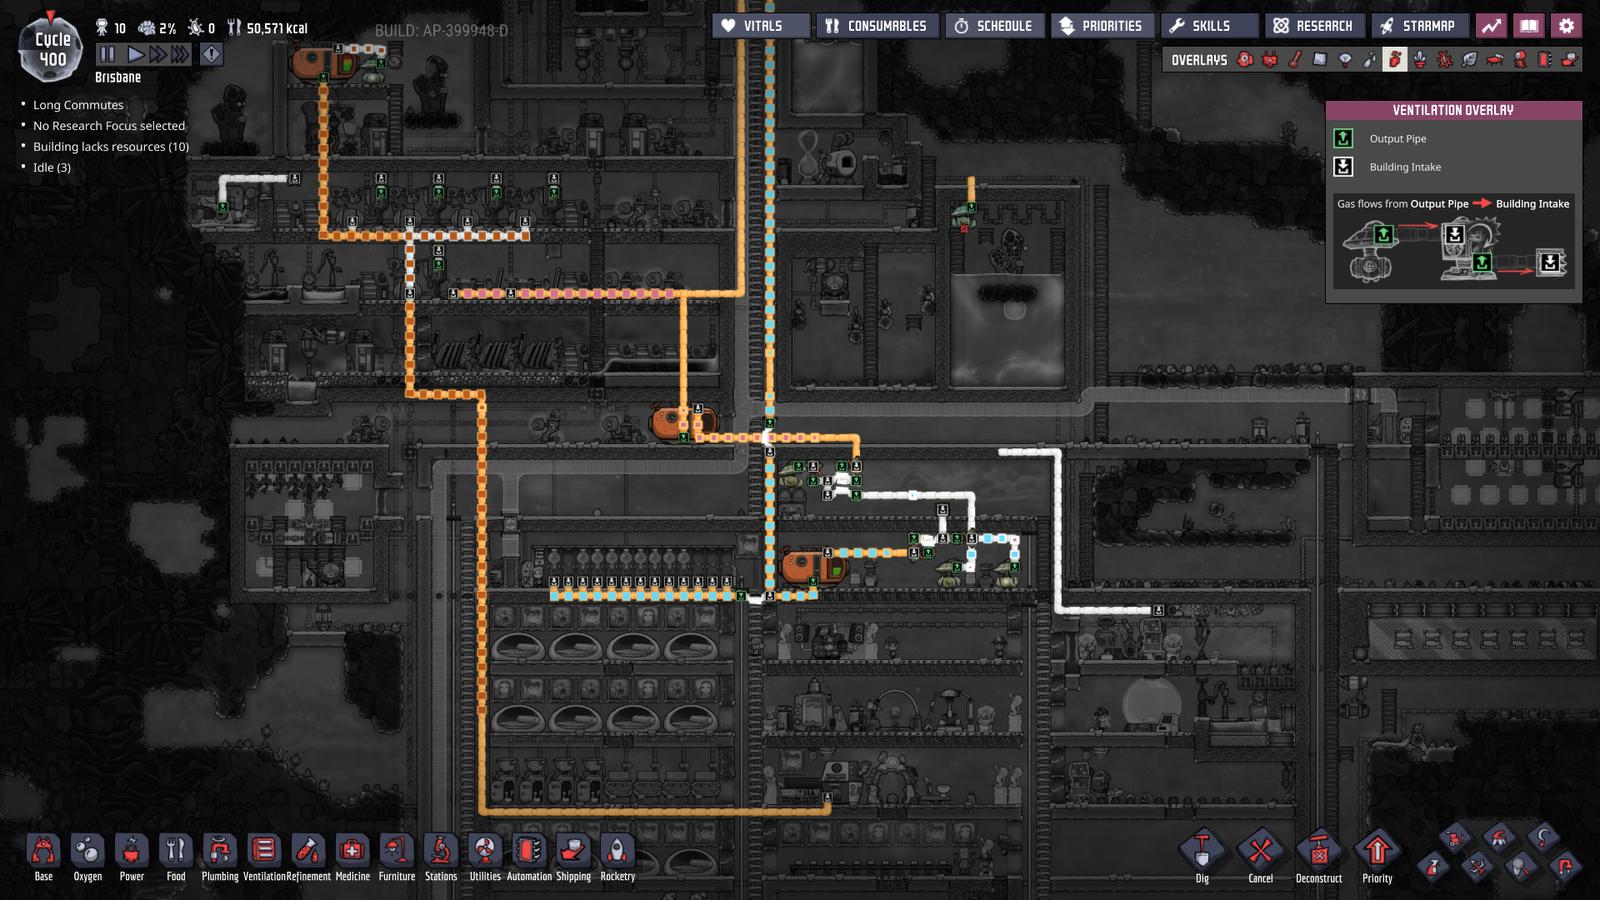
A gas view shows we’ve prepared the Natural Gas line and piped it in to the Gas Range required to cook our Pepper Bread.
We did get lucky having some Pip presented by the colony printer so I took them and just have them on temporary life support eating Arbor Tree fed by the excess polluted water on our bathroom loop. We’ve also gone a little heavier on paintings and Pedestal displaying the high decor artifacts we get from space. To enhance their value, the base has been retrofitted with a lot of Window Tile that lets the positive decor effects from on room flow into another.
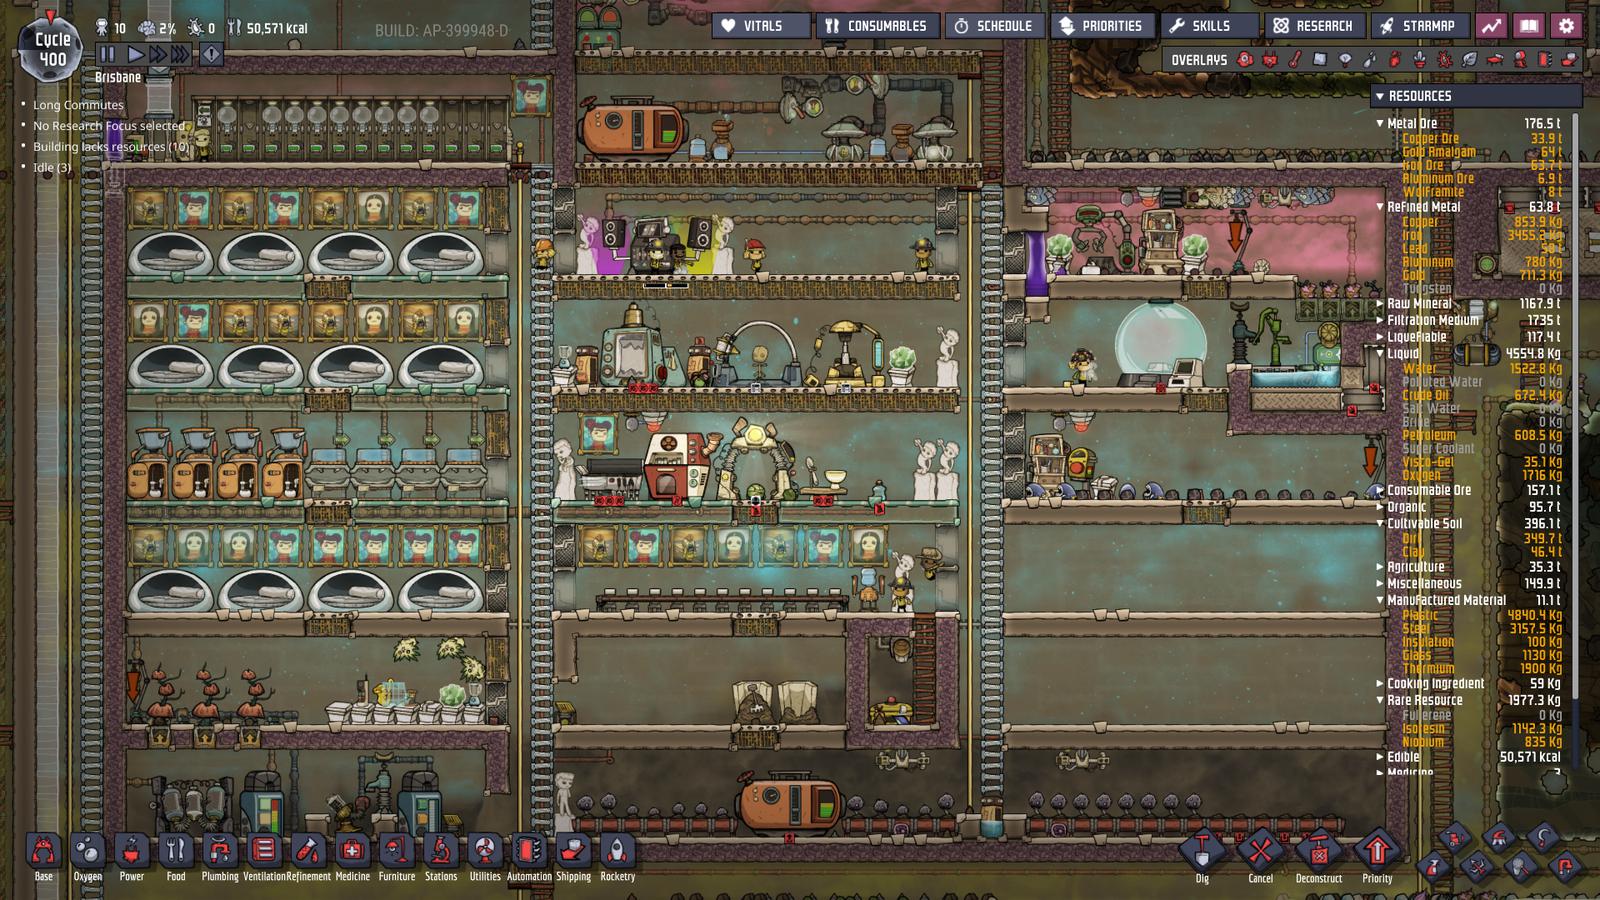
Having completed almost all of our research we’ve also removed all the unnecessary research related machinery.
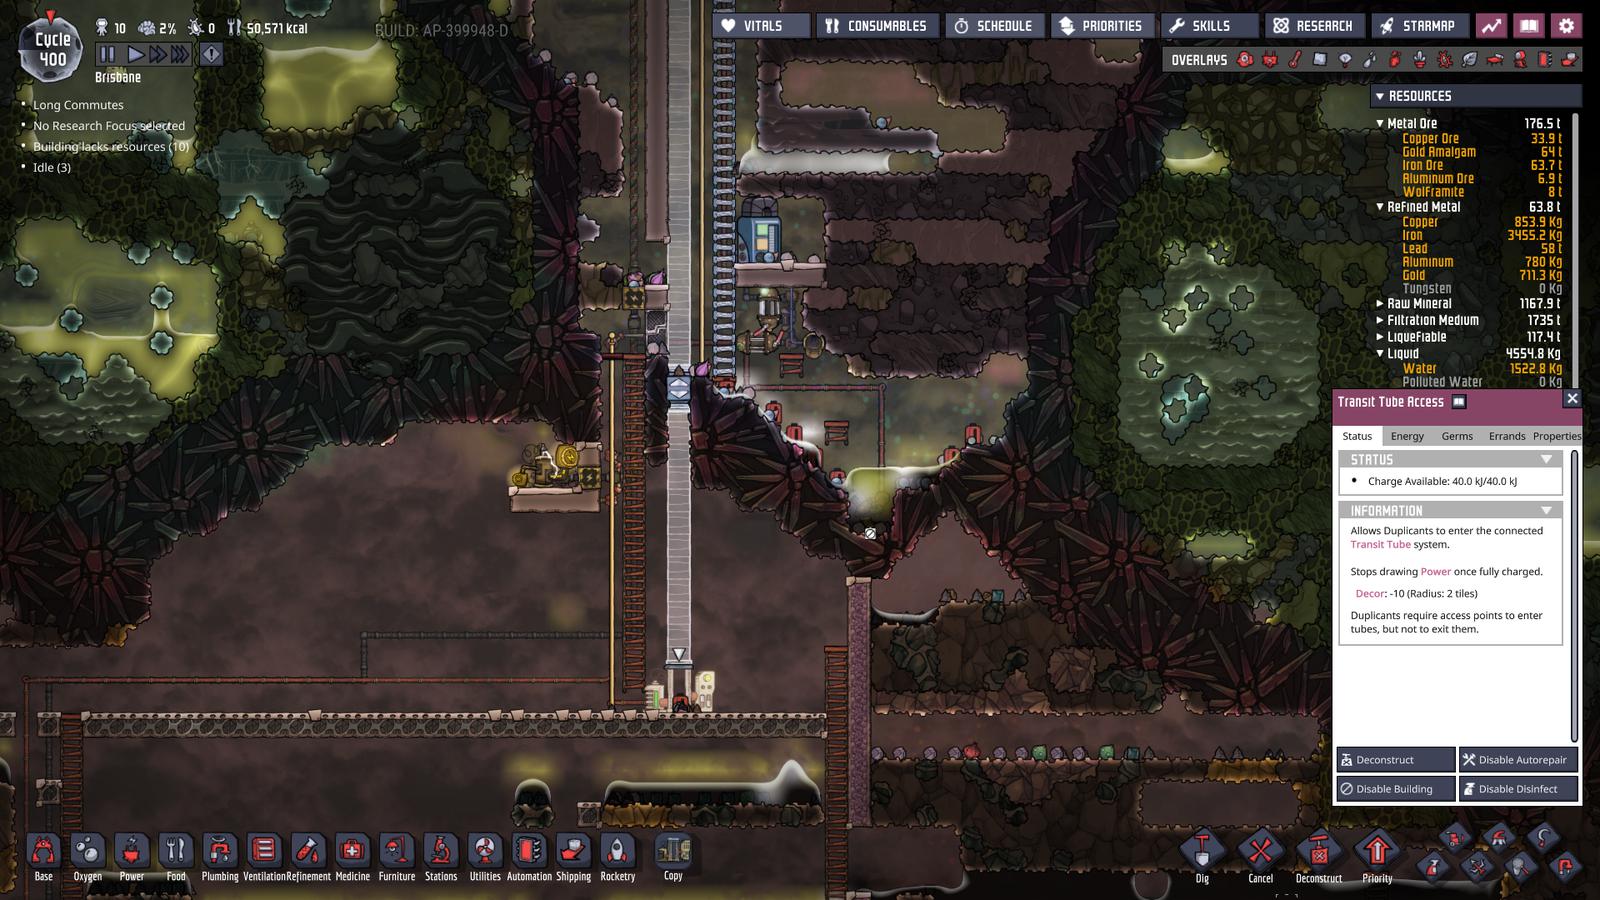
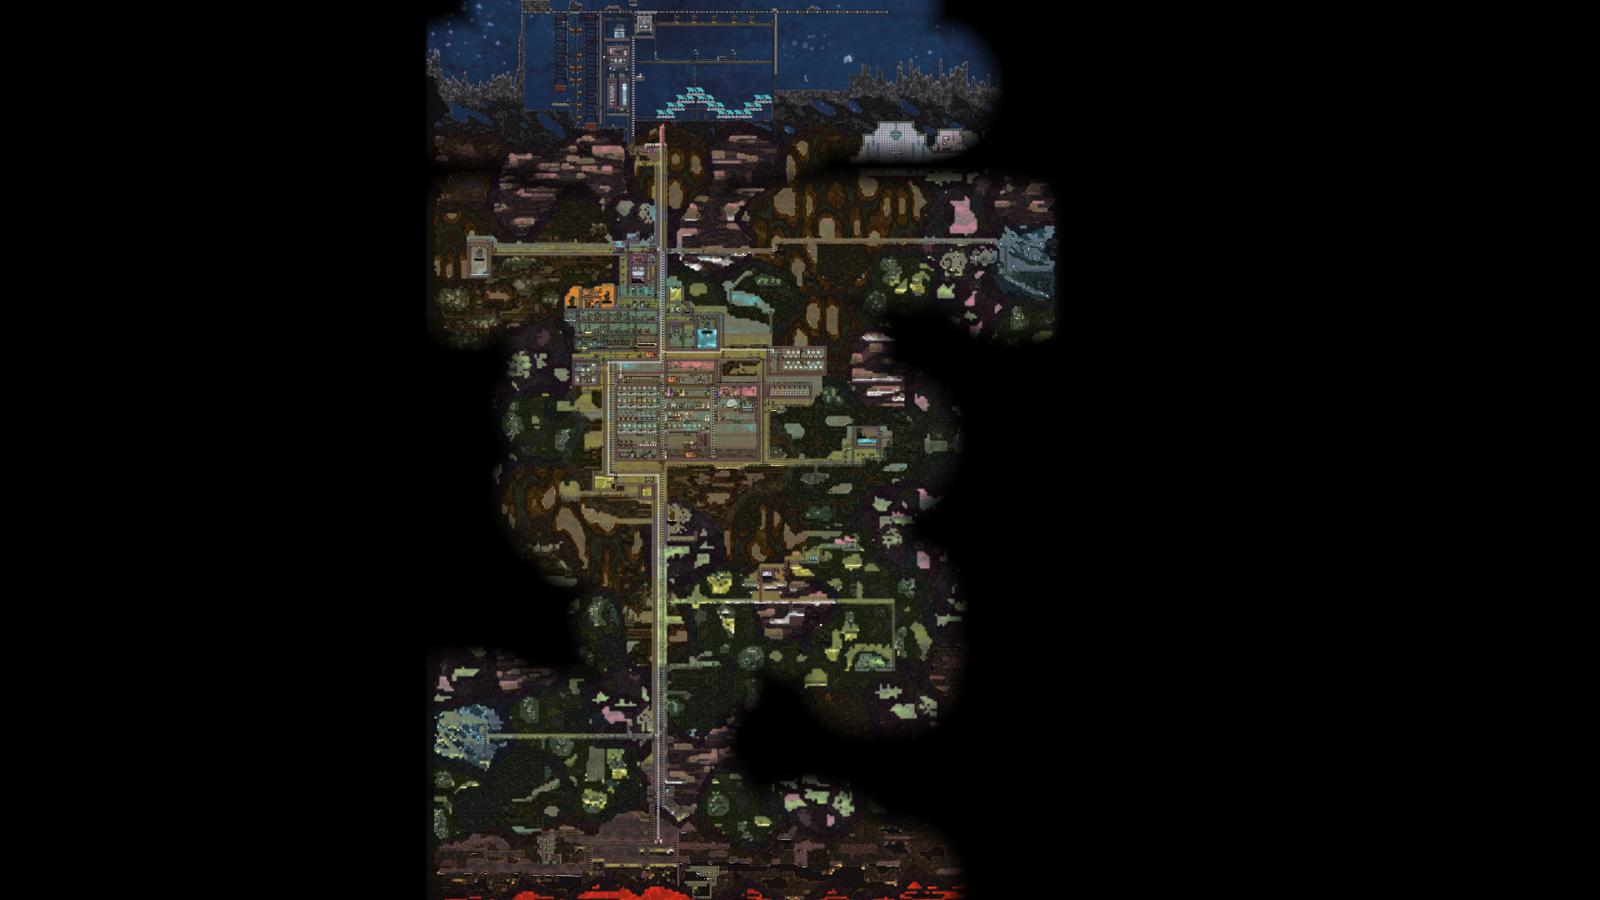
We also took some time to extend our power spine and transit tube down to the bottom of the map. This will save us a lot of time.
Generally the base is looking really strong now. Taking a step back, we’re pretty much set up for infinite survival here.
- Oxygen: Infinite through steam vents
- Water: Infinite through steam vents
- Electricity: Infinite through solar, natgas and hydrogen (steam vents)
- Food: Mostly infinite. Pepper bread needs water (infinite through steam vent), polluted water (infinite through bathroom/carbon skimmer), phosphorite (infinite through dreckos) and dirt (not yet infinite).
Based on this, some to-do items we’ll be working on next:
- Renewable dirt (final colony dependency)
- Oil Boiler (reducing dupe operation time)
- Expansion of the steam turbine (with two super coolant lines we can move a maximum of 2.3 million DTU/s into the steam chamber but a single turbine will only get energy from the first 0.85 million DTU/s)
To be continued
Discussion, questions and feedback
Oni Assistant is a place for learning and sharing ideas. If you think this page could be improved please let us know. If fellow users have questions, please be kind and helpful in your answers.
If you like using Oni Assistant and want to give back, the best way is to link it on your forums and socials.
K
To save your bandwidth, comments don't load automatically. Click the button below to view and provide comments.
Show Comments